Documentation:Open Badges/Create/Wordpress/Set Up
This toolkit will guide you through the process of setting up your WordPress site for badging. You will learn how to activate badge-related plugins, and how to create a link that allows students to login into your site. If your badge requires students to modify, publish or comment WordPress pages, this toolkit will show you how to give students editing, publishing and commenting privileges. This toolkit will also show you how to find the identification number for a particular page - which can be very helpful when your badge requires that students take an action on a particular page.
|
Activate BadgeOS and Related Plugins
As you've probably noticed, the basic WordPress software does not have any badge-issuing features. Luckily, there are software packages called plugins which can be added to a program for the purpose of adding a specific feature. BadgeOS is a WordPress plugin which enables you to define the requirements for earning a badge, with badges issued automatically when the specified steps are completed by the student.
This section will show you how to obtain the BadgeOS plugin from UBC's Centre for Teaching, Learning and Technology (CTLT).
- Go to support.cms.ubc.ca
- Click on 'Submit Questions'
- Select the Unit that best describes you.
- Fill in the form. Beside Title, type Request for activation of the plugin
- Beside Your Question, indicate that you want to activate the BadgeOS Plugin.
Additional Plugins (Optional)
You may find that the BadgeOS plugin doesn't do everything that you want it to do. Luckily, the CTLT offers plugins which complement the basic BadgeOS plugin. These plugins can also be obtained by going to support.cms.ubc.ca. Some of them include the following:
- LearnDash LMS and BadgeOS LearnDash Add-On: Together, these plugins enable you to write a quiz that will automatically issue a badge when the quiz is passed.
- BadgeOS Notifications Add-On : This plugin makes it possible to automatically notify a student that they have earned a badge. Notification takes the form of a pop-up window.
- BadgeOS Triggers Add-On : This plugin uses Boolean logic to restrict the issue of badges to those who have satisfied particular combinations of activities.
- BadgeOS Open Badges Issuer Add-On (UBC fork) : This plugin allows users to push awarded badges to their Mozilla Backpack.
Create a link to the Login page
Your WordPress site can be accessed by anyone with an internet connection. But before your students can earn badges, they need to log in to your site with their Campus Wide Login (CWL). This section will show you how to create a hyperlinked button which will redirect your students to the login page.
Step 1 - Set up the Page that will Display your Login Button
You'll probably want to place your login button somewhere prominent, such as on the home page or on a page about badging. Whatever your choice, navigate to the editing window of that page by clicking Dashboard > Pages > All Pages.
Step 2- Create the Login Hyperlink
Next, you'll need to construct the web address of the login page by modifying UBC's generic WordPress login link. To do this, copy-paste the generic address (below) into Word or NotePad:
https://cas.id.ubc.ca/ubc-cas/login?service=https%3A%2F%2Fsites.olt.ubc.ca%2Fwp-login.php%3Fredirect_to%3Dhttp%3A%2F%2FYour Site URL%2F?badgelogin=1
Next, replace the bolded portion of the generic link with the name of your site. To find the name of your site, log in as a WordPress administrator, then look at the address bar. What you find in the address bar is your site address, minus the https:// and wp-admin part.

For example, if your website is open-badges2015.sites.olt.ubc.ca, your login URL will be:
https://cas.id.ubc.ca/ubc-cas/login?service=https%3A%2F%2Fsites.olt.ubc.ca%2Fwp-login.php%3Fredirect_to%3Dhttp%3A%2F%2Fopen-badges2015.sites.olt.ubc.ca%2F?badgelogin=1
Step 3 - Put the Link to Your Site
Copy your newly constructed login web address. On your chosen WordPress page, highlight the word or the image that will serve as your button.

Click the hyperlink symbol in the editing pane, and paste your new address into the pop-up window.

Press "Add Link" then "View Page" to check out your new button!
Enable Student Comments
Many blogs have a commenting feature, which allows visitors to comment on a blog post. If commenting is a requirement for earning one of your badges, it goes without saying that your WordPress site needs to offer students a space to write their comments.
Step 1 - Theme Options
To turn the commenting on, go to the left dashboard of your WordPress site. Navigate to Appearance > Theme Options

Step 2 - Enable Comments
The Theme Options page has a left menu. Select Display Options.
Once you're in Display Options, scroll down to the Discussion section, which has only one option - "Disable Comments on Pages." If it is checked, uncheck this box.

Give your Students Editing and Publishing Privileges
If earning a badge requires students create a page where they can publish their own content, you'll need to ensure that WordPress permits students to create a page. By default, students are afforded very few privileges in WordPress. To change this, you'll need to take a few steps.
Step 1 - Students as Users
First, your students must first obtain a WordPress CMS account in addition to their CWL.
Next, your students need to be added as users to your site.
Step 2 - Specify your student's role
In the process of adding them as users, you will be prompted to specify your student's role. WordPress details the privileges associated with various roles here. Pick the role that lets students complete your badge requirements.
Creating Post Categories
You may have a badge which requires that students write a post pertaining to a particular topic.
For this to work, you need to present your students with a menu (like the one below) that shows all the possible topics to which they can associate their badge. This section shows you how to create that menu.

Step 1- Dashboard
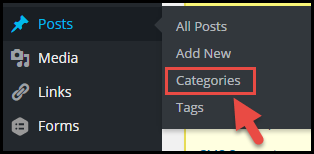
From your Dashboard, navigate to Posts > Categories

Step 2 - Create a Category
Next, add the name of the category.

Note: You can delete categories by hovering over the category and clicking Delete
Find Post, Page, or Media ID
You may choose to use comments on a specific Post, Page, or piece of Media as part of the badge earning process. To do this, you will need to enter the ID of the Post, Page, or Media. This section will show you how to find that ID, using Pages as an example. The steps are the same for Posts and Media.
Step 1 - Dashboard
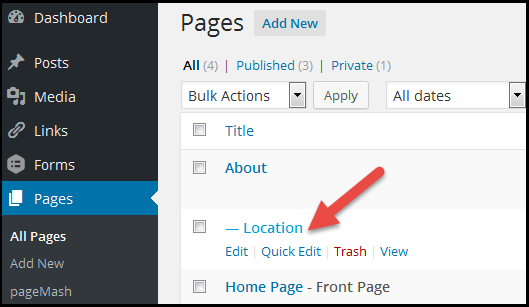
From your Dashboard, navigate to Pages > All Pages
Step 2 - Find ID
Hover your mouse over the particular Post, Page or Media. In the case of Pages, hover over that particular Page's title in the Title column

Step 3 - Copy ID
Look at the status bar (at the bottom of your browser) and the you will find at the end of the line something like "post=123" or "tag_ID=67". In this case the Page ID is 143. Write down the ID.


