Documentation:Open Badges/Create/Wordpress/Required Steps
Before you can issue a badge, WordPress will ask you to detail what the student must do to earn it. For example, does the student have to pass a quiz or write a comment? If the badge is earned by passing a quiz, what is the minimum percentage of questions that must be answered correctly before the badge is issued? For badges earned through commenting, publishing pages, or logging into the website, how many times must the student do these activities before the badge is earned? This toolkit will guide you through the process of setting steps required for earning your badge.
|
Getting Started
Before you can specify the steps for earning a badge, a little set up is necessary.
Step 1 - Getting to the Editing Window
To add requirements for a badge, navigate to its Edit page by clicking BadgeOS > Badges > Badge name
Step 2 - Editing Your Badge
Scroll down the screen until you see a Section that says Achievement Data.

Within this section, go to Earned by: and select Completing Steps from the dropdown menu.

Scroll to the next section. Under Required Steps, click Add New Step.

The following sections will describe various steps that can be used to make a badge.
Login to the Site
You may want to give your students a taste of badges early in your badging program. You can do this by issuing them a badge for the "achievement" of logging into your WordPress site. We assume you've click the Add New Step button (see previous section). In this section, we'll show you how to issue a badge for logging in.
Step 1 - Select the Login Option
From the dropdown menu, select [UBC] Login to Website. In the box next to this dropdown menu, specify the number of times a student must log in to earn the badge.

Step 2 - Save Your Work
- Press Save All Steps
- From the menu on the right, click Publish.
Commenting on a Post or Page
You may want to encourage learners to participate in discussion on your WordPress site by awarding badges for commenting on posts or pages. To do this, go to the Add New Step button.
Step 1 - Select the Comment-on-a-Post Option
Select 'Comment on a Post Type'. After you do this, another dropdown menu will appear, which allows you to select from:
- Any Post Type - Badge will be awarded if badge earners comment on any posts, pages, media or achievements. If you want badge earners to earn a badge only in specific post or pages, you can specify post ID. You can also specify the numbers of comments required to earn the badge.
- Pages- Badge will be awarded if badge earners comment on any pages. If you want badge earners to earn a badge only in specific pages, you can specify page ID . You can also specify the numbers of comments required to earn the badge.
- Media - Badge will be awarded if badge earners comment on any media. If you want badge earners to earn a badge only in specific media, you can specify media ID. You can also specify the numbers of comments required to earn the badge.
- Badges - Badge will be awarded if badge earners comment on any badges.

Step 2 - Save Your Work
- Click Save All Steps.
- From the menu on the right, click Publish.
Creating a New Page or Post
You may want to encourage learners to create their own material on your WordPress site, by publishing posts or pages. To do this, go to the Add New Step button.
Step 1 - Select the Publish Option
In WordPress, there are two ways to publish written material: one can write either a post or a page. It's important to be aware of this distinction when you do your badging. You can read about the distinction at Post vs. Page from WordPress Support. If you want to award a badge to a user when they post a new page, choose Publish a new page. Likewise, choose to Publish a new post when you want to recognize users who publish posts.
Step 2 - Identify Category and Number
- If you want to issue badges for posts published in a specific category, you must first create the category (See: WordPress set up toolkit) and then select it from the "Any Category" dropdown list.
- If you want the badge to be issued after a specific number of new posts or pages, enter a number in the "Times" box.

WP required steps publish
Step 3 - Save Your Work
- Click Save All Steps.
- From the menu on the right, click Publish.
Completing a Quiz
You may want learners to earn a badge after they've demonstrated their knowledge through a quiz. To do this, go to the Add New Step button.
Step 1 - Select the Quiz Option
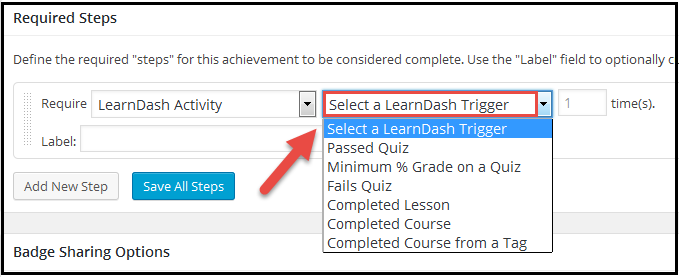
Select LearnDash Activity After you selected LearnDash Activity, you can select the specific requirement. You can choose from:
- Passed Quiz: When a badge earner passes any quiz or a specific quiz, they will earn the badge.
- Minimum % Grade on a Quiz: When a badge earner achieves the minimum grade (by percentage), they will earn the badge. You can set the minimum grade in the next box.
- Fails Quiz: When a badge earner fails the quiz, they will earn the badge.

Step 2 - Save Your Work
- After you select the requirement, click on Save All Steps.
- From the menu on the right, click Publish.
Earning Any or a Specific Badge
Award a Badge When Users Earn any Badge(s)
This feature is useful if you want to award a high-level badge. For example: By earning three badges, you earn a Community Badge.
To do this, go to the Add New Step button.
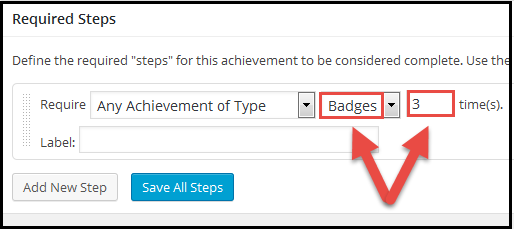
- Select Any Achievements of Type from the dropdown menu.
- From the second drop down menu beside, select Badges. Then type in the number of badges required for badge earners to earn the high-level badge.

WP required steps any badge - Click on Save All Steps.
- From the menu on the right, click Publish.
Award a Badge when Users Earn a Specific Badge
You can also create a step so that badge earner will earn a badge when they have earned other specific badges. For example, a badge earner will earn the Community Badge once they have earned a Subscriber and Contributor badge. To do this, go to the Add New Step button.
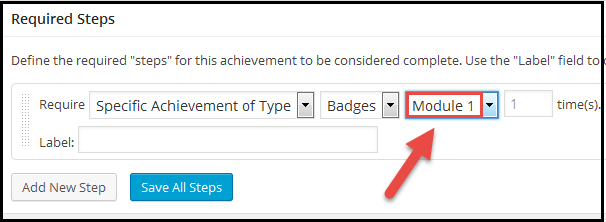
- Select Specific Achievements of Type from the dropdown menu.
- From the second dropdown menu beside, select Badges. Then choose the badge(s) that you will require badge earners to earn the high-level badge.

WP required steps specific badge - Click on Save All Steps.
- From the menu on the right, click Publish.


