Documentation:OpenBadges/Faculty Guide/Web Design/Create/Issuers
Badge System Design
Developing a badge system for your course or program is a complex process, but there are some tips and resources to help you make some early decisions and set a good direction for your badge implementation. Mozilla's Erin Knight calls these the 3 T's of Badge System Design. They are:
Types
These are the general categories or types of badges you will issue based on what sort of learning/ engagement you are aiming for. You'll need to decide on the types of badges you plan to issue. For example, badges may be earned for:
- Participation - a fairly basic level of engagement with the learning environment. Logging in, solving a problem, commenting on posts.
- Recognition - developing a particular skill or competency.
- Achievement - an accomplishment like making something or successfully completing a project or quiz.
- Contribution - Recognition of individual or group contributions that bring about a specific result or advancement
- Certification - Confirmation of a set of characteristics confirmed through a set of combined criteria (e.g. education, experience, etc.)
The suggestion is to focus on, fairly broadly, the types of activities that you will be badging with some fairly light descriptions of each. You can delve deeper into the specifics as you move forward in the design process.
Touchpoints
Touchpoints refer to your first considerations around criteria for the badge - what will learners need to do in order to get the badge? You may also want to consider how the badge will be awarded - which will help in determining technical considerations or working with constraints around badge issue. For example:
- Participation badges will be earned for completing the login process - which will be automatically awarded and act as a motivator to learn more about earning badges.
- Contribution badges will be earned by commenting and replying on blog posts
- Skill badges will be earned by successfully completing quizzes.
- Recognition badges will be earned through community vote on comments or producing creative content (multimedia).
Technology
Technology considerations will be fairly high level and will allow you to think through some basic requirements. Once you learn about what your constraints may be (with regard to the technology), you can go back and adjust the touchpoints or perhaps even badge types. Here are some examples:
- Badges integrated into the course website - which uses a CWL login. What are the implications of using a CWL login?
- Community will vote on best comment for recognition badge. What will be the trigger for badge issue - how many voters? What's a worthy star rating overall?
- Submission form for multimedia - link to downloadable content.
The 3 T process can help you sketch out your badge system and act as a roadmap for your badge issuing. As you refine it and integrate it with your learning pathway, you end up with a solid plan for implementation.
Badge Value
As you are considering and working with your 3T badge design process, you will want to revisit the value proposition for your badges. After all, if they don't hold meaning to the badge earner, they will likely not hold value for the community. Consider:
- Why would an earner want to earn the badge?
- What is the value of the badge to the issuer?
- Does the badge have value to a viewer of the badge?
- Is there value for the badge to be endorsed by a partner (e.g. community, business, campus)?
More on the Value of a Badge.
The following simple design toolkits can be helpful in working through the process of badge design.
Badge Icon Design
Developing a badge icon for your course or program is a creative process. The guides provides you with some tips and resources to help you make good design decisions. The best thing to when designing your badge: Simplicity is key.
Purpose
The purpose of your badge, outlined in the earner criteria, can help you make decisions on how your badge will be designed. Important things to consider:
- Do you want the badge image to visually represent the skill, knowledge, activity or behaviour for earning the badge?
- Do you want words or phrases on the badge to identify who issued the badge and why?
Audience
The demographics of your main badge earning audience may influence the type of badge design you develop. Adult learners from and arts program may have a very different aesthetic than youth learners from technology programs. The kinds of images and colours should be guided by those who will be earning the badge and what kind of information you want the badge to convey (e.g. skill, knowledge, behaviour, etc.)
A part of many badge programs is the development of badge icons by the earners themselves. This will make the badge icon the most meaningful to the earners and develop a greater investment in the badging program.
Fonts and Typeface
Understanding compatible fonts is important in developing a visually appealing badge image. There are numerous fonts to choose from and some are more complimentary than others. Typeface, also know as a font family, is a set of one more more fonts that share a common design. Within the typeface the font will remain similar but the weight, style, width and ornamentation will differ. For example, here is the Futura family of fonts:
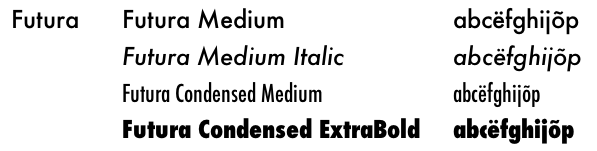
When selecting fonts for your badge, you can choose within the same font family but you can also choose fonts from different families to compliment each other. The following guides will help you recognize how to combine typefaces for the best effect.
Colours

For badges, the best practice for choosing colours is to select colours that compliment each. Complimentary colours create balance and harmony to the badge image. While vibrant colours can be used and contrasting colours are often easier to look at on a screen when there is a lot of text, the use of these types of colours will affect the overall design quality of your badge. If you choose to use vibrant or contrasting colours, do so sparingly. Additional things to consider when choosing colours, use no more than three in a single image. Finally, darker hues tend to look better on screens. To select colours for your badge, use the following tools:
Images
For a badge design, using shapes, symbols or icons that are simple and recognizable will make for a more impactful badge. If your program has a specific brand, this can be incorporated into the badge image; however, it should not be the badge itself. While a brand will connect it to the program, the badge needs to be unique and limited to those who have earned it.
Badge Creator Tools
When using the UBC Wordpress integration, you will be given the choice to create a badge in Credly. Credly offers limited choices for badge creation. The following tools provide you more options to design your badge image.