Documentation:WordPress Basics/CMS Basics Guide
Workshop Overview
This CMS at UBC workshop is geared towards members of the UBC community that have a need for the common look and feel (CLF) website such as faculty units, administrative departments, campus initiatives, etc. Participants will be introcuced to CLF theme options including layout, navigation, frontpage display, as well as ways to change the look and feel of your site, embedding external media, custom menus, domain mapping, utilizing short code for further customization, and much more. There will also be a brief introduction to copyright issues and creative commons licensing.
Need more info about CMS at UBC: Please visit http://cms.ubc.ca/ to register for a site
Prerequisite
For individuals seeking a personal web publishing solution it is recommended that you look at UBC Blogs. Please visit http://www.blogs.ubc.ca for more information.
Training Guide: http://wiki.ubc.ca/Documentation:WordPress_Basics/CMS_Basics_Guide
Workshop Agenda
- Introduction: You, Us
- zack.lee@ubc.ca - Educational Resources Developer, CTLT
- emily.renoe@ubc.ca - Learning Technology Specialist, CTLT
- Session Objectives
- After this workshop, participants will be able to:
- Customize the look and feel of either their own site
- Embed multimedia into their pages or posts
- Change the way visitors can navigate through their site
- After this workshop, participants will be able to:
Agenda
- Burning Question: What burning questions do you have about CMS at UBC that you would like to learn the answer to during this session?
- Recap
- Getting Started with CMS @ UBC (and Activity 1:Show and Tell)
- Activity 2:Hands-on WordPress
- Wrap-up, Questions
- Where to get support
- Copyright
- Feedback
Recap
What was covered in WP Basics I?
- Pages vs Posts
- Tags vs Categories
- Widgets
- Customization
UBC's WordPress Service

Note: If you are interested in some further training for UBC Blogs, please register for WordPress Basics II
Getting Started with CMS at UBC
The CMS service is geared toward members of the UBC community that have a need for a common look and feel website, and as such, are often faculty units, administrative departments, campus initiatives, etc. It is recommended that individuals look at UBC Blogs for personal web publishing solutions.
Requesting a site is a two step process:
- Go to https://cms.ubc.ca/ (bookmark this for the future!) >> click on the LOGIN button and enter your CWL information.

- The “Get your own CMS @ UBC account in seconds” screen appears

- Enter a Username (only the lowercase letters a-z and numbers allowed), Email address, and Display Name
- Agree to to the terms: "I have read and agree to the terms of service" at the bottom of the page
- click the NEXT button
Examples
A showcase of more websites currently using CMS at UBC can be found at http://cms.ubc.ca/showcase/
Support
- Email
- You can send your support questions to cms.support@ubc.ca
- Drop-in Sessions
- There are regular drop-in sessions on Mondays and Thursdays, 1:00PM - 3:00PM at the 2nd Floor offices of the Centre for Teaching, Learning and Technology at the Irving K. Barber Learning Centre.
- Online Manual
- Search for answers to your questions in the CMS at UBC Online Manual at http://wiki.ubc.ca/Documentation:UBC_Content_Management_System.
Activity 1: Show and Tell: Would you like to showcase your site?
Activity 2: Hands-on with WordPress
Logging into a Workshop Sandbox
Even though you are probably working on your own unit/dept CLF webspace, we would like everyone to use a workshop sandbox today - this will help keep us all on the same page ;)
Step 1: go to http://cms.ubc.ca

 Step 2: log in with train 01-16 (facilitator will let you know which number you are!)

 Step 3: Password is "4training"
CLF Theme Options

The Common Look and Feel (CLF) is a WordPress them developed by CTLT in collaboration with UBC Public Affairs. It provides users with the UBC branding on their website as well as a variety of customization options.
All CMS at UBC sites have the CLF theme activated by default.
We will be looking at the following customization options:
- Theme Options Index
- UBC CLF Options
- Layout Options
- Font and Colour Options
- Navigation Options
- Display Options
- Frontpage Options
- Custom Fields Options
- SEO Options
- Export Option
- Import Option
You can access these options by going into your Dashboard and under Appearance, click Theme Options.
More information at http://wiki.ubc.ca/Documentation:UBC_Content_Management_System/CLF_Theme

Hands-on Activity - Customizing the CLF
Experiment with customizing the CLF in the Sandbox course
Widgets

WordPress Widgets are designed to provide a simple way to add various elements to your sidebar or footer without changing any code. They can help visitors easily navigate through your site or find the specific information they need.
Take note though that widget areas are theme dependent. Not all themes will have the same places to put widgets in.
Widgets Section

The Widget Section contains three important elements:
- Available Widgets
- This box contains all the available widgets you can use for your blog.
- Widget Areas
- Depending on your blog's theme, you can have different areas to add widgets to. Some areas are for your left sidebar or the right sidebar. There are also themes that allow you to add widgets to your blog's footer.
- Inactive Widgets
- You can archive widgets you have used by placing them in this box. All the widgets placed here will retain all their settings, ready to be used if you choose to do so.
- When you change themes, all of your widgets will not be transferred automatically but placed in the Inactive Widgets area.
How to Add Widgets
You can add widgets by simply dragging a widget from the Available Widgets box and dropping them into any of the Widget Areas.
How to Remove Widgets
Remove widgets by dragging them outside of the Widget Areas or dropping them into the Inactive Widgets box.
You can add widgets that will help visitors navigate around your site. Depending on how your structured your content, you have a number of options at your disposal.
- Tag Cloud Widget: Creates a text cloud based on the tags you have used on your posts. The more a tag is used, the larger it will appear in the tag cloud.
- Categories Widget: Create a list based on how you categorized your posts. You can also create drop-down menus by using subcategories.
- Pages Widget: Creates a list based on the pages you have created.


Text Widget

The Text Widget provides you added flexibility with an area to add custom text, images, or any other media onto your sidebar. Some knowledge of HTML is needed for more advanced and customized uses.
If you don't know HTML, try creating your content as a post and then copying the code in HTML View.
Take note that space for the sidebar area is limited. You may need to adjust or experiment a few times to get the sizing correctly.
Examples
Example
Section/Section (Tabbed) Widget
The Section widget allows you to add content only to specific areas within your site such as only the frontpage or specific post categories. There is also the Tabbed Section widget that allows you to create multiple tabs.


Hands-on Activity: Adding Widgets
Try adding Widgets in the Sandbox course
Plugins

Plugins are software components that you can add to larger applications to extend or customize its capabilities. In WordPress, you can install and activate a variety of plugins to perform more advanced tasks such as including a wiki page with your post/page or allowing visitors to receive notifications for new comments on a post.
You can find the Plugins area by going into your Dashboard and under Tools, click Plugins.
If you want to turn on/off a plugin, just click on the corresponding Activate/Deactivate link under the Actions column.
If you have a need or use case that cannot be met by the available plugins, you can fill out a Plugin Request Form. Each request is evaluated on a case-by-case basis as the support team will work with you to find potential solutions and perform testing to maintain the stability of the system.
For more information about plugins, visit the following resources:
Examples
- Easy FancyBox
- With this plugins, when site visitors click on images or videos, it creates an overlay window instead of opening to another page. Once activated, you can customize Easy FancyBox by going to Settings and clicking on Media.
You must set the image link to go the source URL.
- Gravity Forms
- This plugin enables the ability to create forms that you can embed into your page, posts, or widgets. You have the ability for extensive customization such as entry fields, notifications, and design. Once activated, a new sidebar item called Forms will appear in your Dashboard.
- Embed a form into a page or post by typing in [gravityform id= name=].
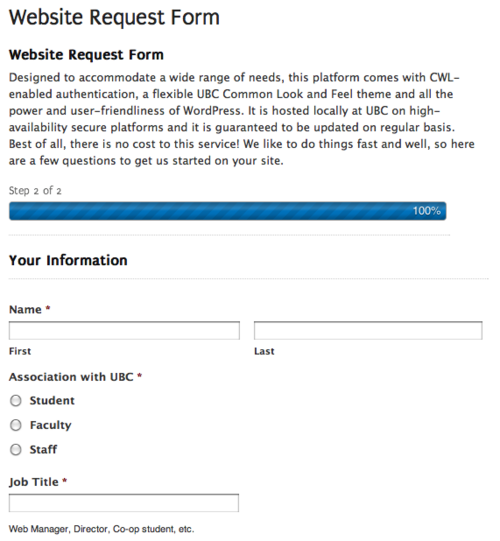
The Website Request Forms is a great example of a Gravity Form embedded onto a page.


Hands-On Activity: Adding and Configuring Plugins
Try adding and configuring PLUGINS in the Sandbox course
Documentation:WordPress Basics/Embedding External Content
Custom Menus

In some themes in WordPress (Coraline, TwentyTen, TwentyEleven, UBC Common Look and Feel) you can customize your navigation using custom menus. This allows you to select which main pages, sub-pages, links and categories will be added to the header.
You can have multiple custom menus for a variety of audiences and diverse ways of navigating around your site.
Start creating custom menus going into your Dashboard and under Appearance click on Menus.
Creating a Custom Menu
- Click on the "+"
- Note: Only available when you haven't made a custom menu before
- Enter a name for your custom menu in the box beside Menu Name
- Click Create Menu

- Add pages, external links or post categories to a custom menu
 |
 |

|
- Organize your custom menus and create hierarchies via drag and drop
- Remove a menu item by clicking on the drop-down arrow beside its name and clicking Remove
- Click Save Menu

- Under Theme Locations, click the drop-down box and choose the name of the menu you want to use as navigation for your site
- Click Save

Hands-on Activity: Creating a Custom Menu for your Site
 Intermediate Activity
- To create a custom menu for your site begin in the Dashboard view* From the sidebar click on Appearance
- From the drop-down menu that appears select Menu
- Add a name for your menu in the Menu Name form* Select the pages and, links you wish to add to your navigation and click Add to Menu
- From this view you can drag and drop the pages to change their order or their position as main pages and sub-pages
- Under Theme Locations use the drop down menu to select the menu that you just created as primary navigation
- Click Save Menuand return to your site to see the changes that you have made.
 Advanced Activity
- From your Dashboard view select Appearance and then select Menu
- From the Menu view try adding Categories to your menu as top level page titles.
- (Optional) Create two menus and use one menu in the sidebar and one as the sites primary navigation.
- Once you have saved this return to your site to view the changes.
Domain Mapping
Domain Mapping is changing the url of a CMS site from mysite.sites.olt.ubc.ca to mysite.ubc.ca.
You can request a custom ubc.ca url from UBC IT at http://www.it.ubc.ca/service_catalogue/internet_telephone/network_management/ubcsubdomain.html
The process usually takes 2 - 3 business days and it is important to include the following information with your request:
- your site is hosted at CTLT
- the IP address is 137.82.234.137
Changing Your Site's URL
Once your custom url has been approved, take the following steps to change your site's domain:
- Go into your Dashboard and under Tools, click on Domain Mapping
- Add your custom url in the box under Add New Domain
- Check the box Primary domain for this blog
- Click Add


If you need to change the name your site and correspondingly change your custom url, you can easily add and change to a new domain by following the same procedure above.
If you have more than one domain already available just choose the one you want to use and click on Set Primary Domain. Take note that you cannot delete your primary domain.

Short Codes
Short codes are is named after what it means. Instead of inputting long lines of codes to take advantage of specific functionalities in WordPress, you only need to type in shorter ones.
For example, the short code [wp_get_archives] will automatically create an indexed archive of all of your posts.

You can add short codes to either pages or posts and unlike regular code, you can add these in either the Visual View or HTML View.
See a list of all available shortcodes on CMS at UBC.
Examples
- Putting a "slideshow rotation" on an additional page(s) on your site:
[slideshow width ="560" height=300"]
- [column]
- Divide your content into columns or a grid system. The size of a regular post is defined as 12 where if you want to 4 columns, you will use [column size=3].
- For more information, please see Column Shortcode.
[column size=4 border]
We shall be in column 1
[/column]
[column size=4 border]
We shall be in column 2
[/column]
[column size=4 border]
We shall be in column 3
[/column]

- [tabs]
- Divide your content into tabs. It's an easy way of organizing your content in order to avoid, long scrolling pages.
[tabs]
[tab title="tab1"]
   tab 1 content
[/tab]
[tab title="tab2"]
   tab 2 content
[/tab]
[/tabs]

Hands-on Activity: Using Shortcodes
Try inserting the above codes in some Pages/Posts in the Sandbox course
Import/Export/Backing-up

WordPress makes it easy for you to import your blog content from a variety of other blogging platforms, including Blogger, LiveJournal, Movable Type, and many more. You can also easily import content from another WordPress.com site!
You can also export a WordPress webspace. Why would you do this? Let's say you have created a Science course site at UBC (Science 201) using Wordpress. You have put a lot of time and energy in this ONE site, (i.e. a ton of pages, posts, multimedia, etc). But, you are actually teaching THREE sections of this course at the same time and each section needs their own wordpress site. The fastest and easiest way to duplicate a WordPress webspace is to export the master (or template) course and then import it into 3 blank wordpress sites, giving each of them a different - Science201LevelOne, Science201LevelTwo, Science201LevelThree, etc.
This should really go without saying, but backing up your WordPress website on a regular basis is extremely important. Although a lot of web hosts (UBC does daily backups) may offer free backups, it is still your responsibility to keep recent backups yourself, preferably hosted on a local hard drive.
Hands-on Activity: Import/Export/Backing-up
 Beginner Activity
Importing
- If you have an external blog - for example on wordpress.com and would like to import it into blogs.ubc.ca, follow these instructions:
- From the Dashboard, click on Tools, and the select Import
- From the long list, click on the blogging platform to import from
- Browse and locate the required format
- Click the Upload File and Import button
Exporting
- If you have a webspace on blogs.ubc.ca - and would like export your blog to another web-based blogging application, follow these instructions:
- From the Dashboard, click on Tools, and the select Export
- Browse and adjust the various Filters (you can also leave all the defaults)
- Click Download Export File button (an .XML file is created and saved on your computer)
Wrap-Up
Your questions answered (hopefully...)
Where to Get Support
- Email
- You can send your support questions to cms.support@ubc.ca
- Drop-in Sessions
- There are regular drop-in sessions on Mondays and Thursdays, 1:00PM - 3:00PM at the 2nd Floor offices of the Centre for Teaching, Learning and Technology at the Irving K. Barber Learning Centre.
- Online Manual
- Search for answers to your questions in the CMS at UBC Online Manual at http://wiki.ubc.ca/Documentation:UBC_Content_Management_System.
Copyright
Another other copyright questions?
Feedback
Help us help you better! At the end of the session, please complete the feedback form.