Documentation:UBC Content Management System/Knowledge Repository
| UBC CMS Codex | |
|---|---|
| Welcome to the support documentation for the UBC CMS Service. | |
| Contents | |
| UBC Collab Theme | |
|
UBC Collab Theme Overview | |
This is an informal page for documenting specific questions that are asked about the CMS WordPress service.
Links
Is it possible to shorten or change an internal link on my site?
You can use redirection plugin to redirect a link to a specific url. For example, you can set up redirection to have yoursite.ubc.ca/apps to redirect to the post at yoursite.ubc.ca/apps/2011/0652558/student_applications. You can find the redirection plugin at Dashboard > Tools > Redirection.
SEO
I need a Google Sitemap, why isn't there a Google Sitemap Plugin?
Do you need a Google Site Map? According to experts (Google) small sites say less than a hundred pages do not need a sitemap your content will get indexed. See support thread for details . Also Google Sitemap does not work on a WordPress multisite install which CMS is so for those reasons we will not be adding this feature to the service.
Images, Files, PDFs, Videos and Other Media
Is there any way to create folders in the Media Library so I can organize the images/PDFs?
Unfortunately, there is no way to create folders in the Media Library.
I have lots of PDF documents I want on my site. Can they be hosted on the CMS server or will I have to continue to maintain them myself?
PDFs can be uploaded into the WordPress Media Library. When they are in the MediaLibrary, WordPress will assign the file a specific URL. You can then use that url to create direct links to the files.
How can I create an image gallery on my site?
In order to enable the gallery functionality, simply do the following:
- Go to the page or post you'd like to add the gallery to
- Click on the "Add an Image" button (found next to "Upload/Insert")
- Select all the images you'd like to add from you computer and click "Save all changes"
- Click on the "Gallery" tab and arrange all the images in the order you'd like them to appear in (if you click on the "Show" link you can also edit each of the images' attributes as well)
- Click "Insert gallery" to insert the gallery into your post
- Click on the "Update" button to update your page/post
See also:
Visual step by step guide to WordPress galleries
WordPress gallery FAQ and overview
Can I upload videos into CMS?
Rather than upload videos into CMS/WordPress, you should instead upload the videos to a streaming media service (such as YouTube or Kaltura) and then embed them into your website.
How do I add a Twitter feed?
Using the default RSS widget:
- Go to the Dashboard -> Appearance -> Widgets (make sure the theme you're using has a widget area and you have that widget area enabled)
- Drag and drop the "RSS" widget into the primary widget area
- Enter your twitter RSS feed URL (it should be in the following format: "http://api.twitter.com/1/statuses/user_timeline.rss?screen_name=account-name" where "account-name" is the twitter account you wish to pull content from)
- Enter a title for your feed and decide on any of the additional settings offered by the widget
- Click on the "Save" button
Using the Twitter profile widget:
- Go to the Twitter Widgets page
- Select Widgets for... -> My Website
- Click on the Profile Widget link (or you can choose one of the others for different purposes like the search widget)
- Select the profile to follow and adjust the settings to your preference (you can click on the Test Settings button to see what your settings will look like)
- Click on the Finish & Grab Code button and copy the embed code that appears on the page
- Go to Dashboard -> Appearance -> Widgets on your site (make sure the theme you're using has a widget area and you have that widget area enabled)
- Drag and drop the "Text" widget into the primary widget area
- Paste your embed code into the content area and give the widget a title
- Click on the Save button
Custom Coding
How do we change the site's stylesheet or add our own css?
If you would like to use CSS to add custom style to your site, you can do so using the Custom CSS plug-in. You'll first need to activate the plug-in by going to Dashboard -> Tools -> Plugins and then clicking on activate next to the Custom CSS plug-in. After reloading the dashboard, you'll then see a CSS link at Dashboard -> Appearance -> Custom CSS which takes you to a page where you can add custom styles.
Widgets
Administration
How can I add non-UBC parties to a site?
If you'd like to invite a non-UBC party to your site, you'll have to set up a guest CWL for them first. To learn how to sponsor a guest, follow this link.
Once you have completed this step, you can follow the instructions on this page.
Frequently Asked Questions
When using the TablePress plugin, the table is unable to be saved if the number of the total row or total column is changed. The error message shows 'Saving failed: AJAX call successful, internal saving process failed.'.
On March 9th, 2021, the TablePress plugin has released version 1.13 which uses newer version of the jQuery library 3.x. This change could cause site owners unable to save tables within the TablePress plugin if the changes includes any forms of table row/column addition or deletion. The recommended solution is to go to site Dashboard -> Tools -> jQuery Migrate and change 'jQuery Version' from 'Legacy 1.12.4-wp' to 'Default from WordPress'. If the problem persists after applied the recommended solution, please contact lt.hub@ubc.ca.
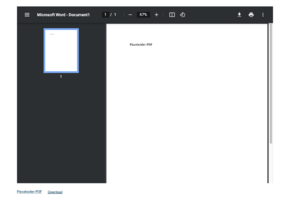
When using the 'file' block to embed a PDF file with the block editor, the embed is correctly showing on preview, but not on the live page.
This often happens if your site is domain mapped. When you embed a file using the file block, WordPress will use the default domain that provided by CMS team as part of the file URL, eg site-name.sites.olt.ubc.ca. This will not cause any problem when you preview the page because the preview is using the same domain site-name.sites.olt.ubc.ca.

However, on a live page, the embed will not show up because your live domain is different from the domain that is part of the file URL. And for security reasons, WordPress has decides not to embed the file and will only provide link to download.

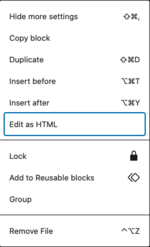
In order to fix that, you will need to manually change the file URL from using the default domain to the live domain. Please select the file block and a toolbar will show up. Click the three dots button for more options and click 'Edit as HTML'. Replace the domain from 'site-name.sites.olt.ubc.ca' to your live domain 'yourdomain.ubc.ca'.

How to integrate Query Loop block with facets created by FacetWP plugin?
FacetWP is an WordPress plugin that provides advanced Ajax-based filtering system. Before dive into the Query Loop integration, please make sure that you understand what facet is and how the plugin works. For more information, please go to https://facetwp.com/help-center/.
In short words, the integration is intended to replace 'Facet Template' with 'Query Loop' block. Below is what the steps are in order to create a filtering system using FacetWP plugin and Query Loop block.
1. Enable 'FacetWP Addon - Query Block Integration' plugin. If you do not have permission to enable it, please contact UBC CMS team by submit a support ticket at https://support.cms.ubc.ca/submit-question-form/.
2. Create facets and display them on the page using shortcodes. https://facetwp.com/help-center/facets/.
3. Create a Query Loop block and ensure the Query Loop block and the facets have shared contents. For example, if a facet is filtering based on Post Category, but the Query Loop block is pull Pages instead of Posts, then the facet won't be able to work as expect. For more information on how to set up Query Loop block, please read https://wordpress.com/support/site-editing/theme-blocks/query-loop-block/.
4. Once the Query Loop block is create, click the 'Document Overview' button on the top-left corner.

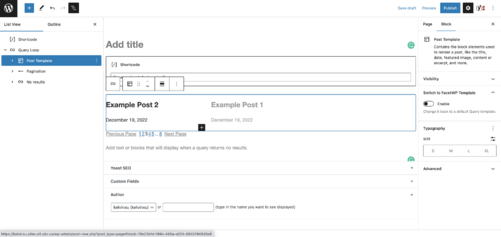
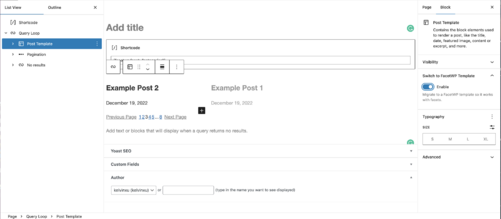
5. Expand Query Loop block and select the Post Template block.

6. Within the block setting on the right side panel, check 'Switch to FacetWP Template'.

7. The FacetWP plugin should now automatically detect the Query Loop block as its template for filtering.
How to add site-wide custom CSS?
On UBC CMS, our team installed a plugin called 'Custom CSS'. The plugin allows site administrators to add custom CSS code that will affect every single page on your site. The plugin can be activated at Dashboard -> Plugins. Once the plugin is activated, go to Dashboard -> Appearance -> Custom CSS to add CSS code.
While using the Custom CSS plugin, how to make sure the code affect both the frontend and block editor?
Go to Dashboard -> Appearance -> Custom CSS. Within 'Settings' metabox on the right side of the page, select 'Include CSS in the block editor' checkbox. Once the checkbox is selected, the custom CSS saved on the page will affect both frontend and block editor.
I have 'Include CSS in the block editor' checkbox select. Why some of the CSS code does work in the block editor, some of the code doesn't.
There are a couple of reasons:
- The HTML markup between the frontend and the block editor are quite different because the block editor includes content editing functionality that require extra markups to accomplish. Therefore, please inspect the page element and make sure the CSS selector is still correct in the editing page.
- There are additional CSS files enqueued to the admin pages that might affect your CSS code because of Specificity. Try using a CSS selector with higher specificity value or add '!important' to the end of the property rule.