Documentation:WeBWorK/How to set up WeBWorK in your Canvas course
Before setting up a WeBWorK course through Canvas, see below for more information on setting up WeBWorK for single and multi section courses:
- Single-section course: See instructions "How to set up WeBWorK for your Canvas course" in the next section.
- Multi-section course: Each instructor can set up a WeBWorK site specific to their section. If homework is shared across sections, however, it is strongly recommended to set up a merged WeBWorK site common to all sections. While both merged and non-merged configurations have limitations (more information on the pros and cons of merged vs non-merged WeBWorK courses are available here), the merged set up is more efficient and easier to manage.
- To set up a merged WeBWorK site, the instructor in charge of the course must contact the LT Hub or their faculty support contact and request to have all course sections merged in Canvas first. Once the sections are merged in Canvas, the instructor in charge can create a common WeBWorK site by following the instructions, "How to set up WeBWorK for your Canvas course", below.
- To sync membership, students will either need to click the link in order to be added to the WebWork course or through the auto sync job that happens once a day. Instructors can also manually sync their classlist. Please see this page for more information.
- Note for Instructors: If you set up a merged site for your multi-section course, WeBWorK does not automatically load section information for the students. If later in the term you need to sort students by section or make section-specific changes to an assignment, you will need to enter the section information in WeBWorK manually. Instructions on how to do this are posted in the following link. Note that these instructions are also relevant if you would like to bulk update other class list fields.
How to set up WeBWorK for your Canvas course
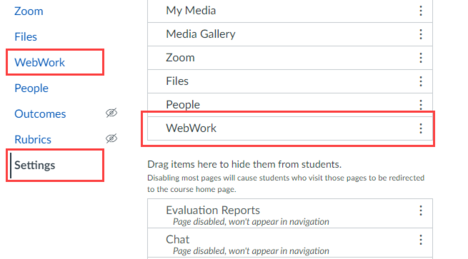
Instructors can set up a WeBWorK course link in the Course Navigation menu and a direct external link to a WeBWorK assignment as shown below.
- Log into Canvas.
- Click Settings.
- Click Navigation.
- Find WeBWorK in the menu, and drag it into the the visible navigation group.
- Click Save at the bottom of the page.
- Once the course navigation WeBWorK link has been set up, click the WeBWorK link in the left menu to create the WeBWorK course site.
Creating an external link to WeBWorK through an assignment:
- Log into Canvas.
- Click Assignments.
- Click + Assignment.
- Enter an Assignment Name such as "WeBWorK Link."
- Scroll down to Submission Type.
- Select External Tool from the drop-down menu.
- Next to Enter or find an External Tool URL, click Find. Note: If you skip this step and manually enter a URL without using the Find function, WeBWorK will not sync with Canvas.
- Find and select WeBWorK, and click Select.
- Select Load in a new tab. Note: If you skip this step, WeBWorK will not sync correctly with Canvas.
- Click Save & Publish.
- Click Load [Assignment Name] in a new window.
Once a general link has been created in Canvas, instructors and students will be able to access WeBWorK via this link.
Note: Deleting the Canvas assignment will break the classlist sync between Canvas and WebWorK.
The course navigation WeBWorK link in Canvas can provide students with an entry point to the WeBWorK course site, but will not automatically sync the WeBWorK assignment grades to the Canvas gradebook. To sync WeBWorK grades with Canvas, please see: How to set up Canvas Grade Sync.


