Documentation:UBC Content Management System/How to/How do I customize the top navigation menu
| UBC CMS Codex | |
|---|---|
| Welcome to the support documentation for the UBC CMS Service. | |
| Contents | |
| UBC Collab Theme | |
|
UBC Collab Theme Overview | |
The top navigation menu found in the UBC CLF Advanced theme can be adjusted in both structure and appearance.
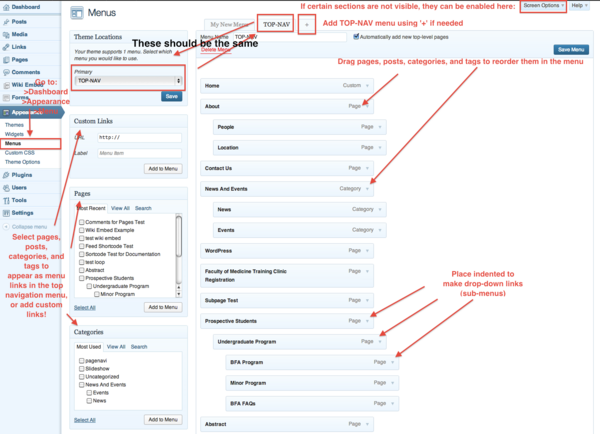
To adjust the structure of the menu bar, first go to Dashboard -> Appearance -> Menus.
The "Menus" page in the dashboard allows the user to create their own customized menus. Any of these menus can be used as the top navigation menu in the "UBC CLF Advanced" theme.
The current top navigation menu of your site is most likely called "TOP-NAV" or holds a similar name. The following image displays a custom top navigation menu - note that the selection in the "Theme Locations" section is the same as the menu's name):

NOTE: If your site does not have a "TOP-NAV" menu for some reason, you can create a new one by simply clicking on the "+" tab at the top of the page.
Before you make any changes to the "TOP-NAV" menu, make sure that the "Header Menu" selection under "Theme Locations" matches the name of the menu you are currently working on.
Simply select desired posts, pages, categories, or post tags from each respective section's checklist and click the "Add to Menu" button (note that each of these sections has three tabs: Most Recent, View All, and Search).
If you wish to create a menu item that links to a page that someone else has created, you can use the Custom Links section. Simply type in the website address in the URL field, write the desired menu Label and click the "Add to Menu" item.
Don't forget to Save Menu once you're done!
Simply type the URL of the external site you wish to link to click to under Custom Links URL and type the the desired menu Label in the Label below and click the "Add to Menu" button.
Don't forget to Save Menu once you're done!
Reordering menu items is as simple as dragging and dropping each item to the desired position.
To make an item be a sub-menu, simply place it indented below the menu item it should be a sub-menu of. Sub-menu links can also have their own sub-menu items.
Don't forget to Save Menu once you're done with all your updates!
To edit or remove a menu item, simply click on the downward arrow of the desired menu item header. Changing the Navigation Label will change the appearance of the menu item in the actual menu (this is useful for shortening long page names). The Title Attribute, on the other hand, changes the text that appears as a user hovers over the menu item. Lastly, the Remove link removes the item from the menu.
Don't forget to Save Menu once you're done with all your updates!
To adjust the appearance of the top menu navigation menu, go to:
Dashboard -> Appearance -> Theme Options and then click on the "Navigation" tab.
The "Style" section changes the main look and feel of the navigation header. You can click through each selection and look at a preview menu at the top in order to decide which style will look best for your site.
Lastly, each of the option sections has an "info" link that describes that section's features and selections in more detail.
See Also
- Creating Custom Menus
- Case Study: Working with Custom Menus
- Navigation Options
- This is another tutorial you may find helpful: WordPress Custom Menus.