Learning Commons:Student Orientation/Working With Content/Adding Media and Links/Adding an Image
Appearance
We are working on a public website and it is essential that we abide by the copyright guidelines set for UBC. Please familiarize yourself with UBC's copyright guidelines and documentation on Creative Commons License for website administrators and use the resources listed on this page for acquiring images and proper image attribution.
To add an image to a page/post, follow the steps below:

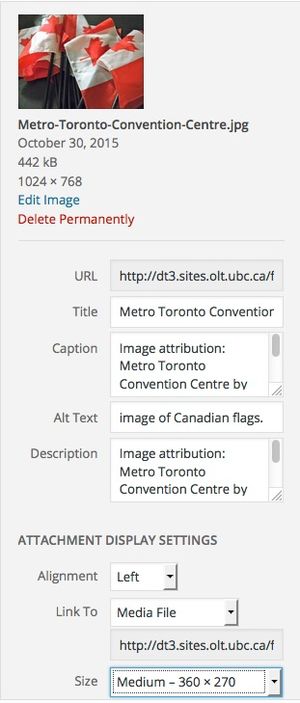
- Use the title of the image as supplied by the author or provide one of none is given
- Add the image attribution in the Caption field. It should look something like this: Image attribution: Metro Toronto Convention Centre by Jason Paris on <a href="https://flic.kr/p/9FnWdP" target="_blank">Flickr</a> - CC:BY. Note that you MUST include a link back to the original source for the photo.
- If the image is a diagram , or non-decorative image add the description about what the diagram or image is about in ALT Text or Caption. This should be a brief description of the image. This is so that an electronic screen reader can translate the content of an image to a user who may be visually impaired. If the image is purely decorative (i.e. image that makes it look nice as oppose to a diagram), ALT text is not required.
- Repeat the image attribution in the description.
- adjust the image size settings (the best choice is usually medium).
For more information on how to attribute images taken from external sources, refer to the following resources: http://wiki.ubc.ca/Library:Copyright_Resources/Image_Sources/Citation_Guide
http://search.creativecommons.org/
Adding a Featured Image to your post
- Once you have created your post you will need to attach an image to it. Whether it's a graphic or photo you've created or an image from the Learning Commons Flickr site, there are a few important steps to ensure that it appears properly in the blog feed on the home page.
- Image Size: 2210 X 1050. - In the current version of the homepage, the featured image must be this ratio
- The feature image will also appear as a thumbnail in the carousel. Something to keep in mind when creating the feature image is that the left and right sides of the image will get cropped off in the thumbnail. Make sure that the subject of your image is in the center to avoid anything important getting cropped out.
- Try to keep the file size of your image as small as possible while maintaining image quality. The max file size you can upload to Wordpress is 19Mb, but that is far too large for the site to load quickly. If you are working in Photoshop, the most efficient way to save a compressed version of your image for posting to the carousel is to click on File --> Save for Web and Devices and select PNG-24 in the preset drop-down menu in the top right hand corner of the window that opens up. The web loves PNG files, they look great while compressing the photo to web standards and to a tiny file size so that they load instantly on the website. JPEGs are most commonly used, but the problem with JPEG files is that they get re-compressed every time you save them and they can end up looking very pixelated and blurry if you aren't careful.
- It's always good practice to work on an original image that is at larger dimensions than your final image size of 560 x 250. You can always set the final image to smaller dimensions than your original, but you can never save an image to larger dimensions than the original or it will lose its resolution and become pixellated. Having a large original image stored somewhere can be handy if you ever want to use it elsewhere on the site.
- Uploading or Inserting your Featured Image: click on "Set featured image" in the bottom right hand side of your Post window. You can either attach a photo from your hard drive or the Wordpress media folder.
- When uploading your image, make sure that you give the photo a detailed, descriptive file name so that it is easily searchable. For example, a default file name for a photo from a camera is something like "IMG_00231.png" and this ambiguous file name is impossible to search for in the media folder. It would be much easier to search for if it was named as a description for what's in the photo, such as "Students_working_for_UBC.png"
- Note: Uploading a "featured image" is different from inserting an image into your actual blog post. To insert and image into your post, click on "Upload/Insert" at the top left above your HTML content editor, upload or insert the image you want, and place the html code for the photo where you want it within your post.