Learning Commons:Student Orientation/Content Editing/Student Toolkit(Learning Wrapper)/Creating an Apply Quiz
Overview
In Student Toolkit page, there is an Apply Quiz question. When users click on the answer of the quiz and press submit, the feedback for each multiple choices will show up. The Apply quiz uses a WordPress plugin called Gravity Forms- which is a powerful plugin that can be used to crate a quiz
Example on how the quiz will be like on live:
Log in to the Learning Commons website and https://lc2016.sites.olt.ubc.ca/?gf_page=preview&id=20 to take a look at what will quiz look like on live.
Example on how the quiz is structured
Log in to the Learning Commons website and access https://learningcommons.ubc.ca/wp-admin/admin.php?page=gf_edit_forms&id=20#to take a look at an example of what the quiz will look like in the back end.
Step1:Create a gravity form
- Log in to the Learning Commons website
- Go to Dashboard>Forms. Click on add new to create form.
- In Form Title, type in the title of the quiz (For example, if the Apply Quiz is in Critical Thinking Toolkit, you can call it "Critical Thinking).
- In Form Description, type in brief description of the quiz.
- press ave.
Step2: Adding a quiz question
- After you created a quiz, click on edit.
- Under Standard Fields, drag and drop the Radio Buttons to create a multiple choice question.
- Under Choices, type in a choices for multiple choices.
- Once you added choices for multiple choices, press save.
Step3:Adding quiz answer
- Go to Setting>Confirmation
- For confirmation type, click on text.
Add an intro/thankyou
Add a simple "thank you" to users who took the quiz: For example, you can write something like "Thank you for taking the quiz! Below are your answers and the feedbacks. Don't forget to participate on Discussion and go over links for additional resources. If you want to take the quiz again, please refresh the page. "
Display the choice users picked for the questions
In the quiz feedback , you will want to add a short paragraph that shows the question of the quiz, and the choices that users picked for the quiz. In order to show the choices that users picked for the quiz, you will have to use what's called the merge tag. What merge tag does is- it will show the value that user has submitted. For example, it has ability to display the choices users picked in the quiz.

You click on small "notebook icon" located beside the editor, it gives you choice of what's called a merge tag. For example in the case of Exam Prep quiz, when you select the merge tag "Study sessions should be...:", the tag will automatically show the choice user picked for the question "Study sessions should be"
Display the answer/feedback of the quiz
To create the customized answer/feedback, you will have to use what's called Conditional Shortcode.
[gravityforms action="conditional" merge_tag="{Number:Field ID here}" condition="is" value="Multiple choice user picked"]
Put the quiz feedback here.
[/gravityforms]
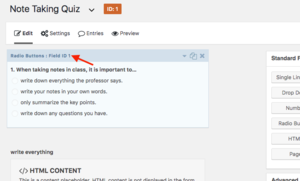
- Field ID: To find the field ID, you can edit the quiz, then beside the quiz question, you will see "Field ID". In the example of the screenshot, the field ID will be 1.
Field ID is located beside the quiz question - value: Value is the choice user picked for the multiple choice of the question. For example for the question - "When studying it's best to..." when user answered "set goals", the value will be set goals. You can double check the value of the multiple choice by editing the quiz, and click on the checkbox "Show values"
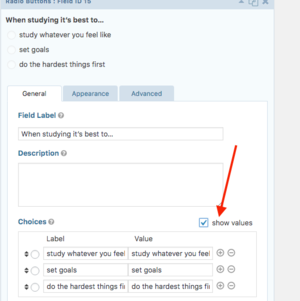
You can click on the checkbox "Show values" to double check what is the value of the choices. Usually the value is same as the quiz choices. (For example, if the quiz choice is "set goal" , the value will most likely be "set goal" as well)


For example:
[gravityforms action="conditional" merge_tag="{Number:1}" condition="is" value="Analyzing."]
When you start analyzing, you are more than halfway up Bloom’s Taxonomy and quite deeply into the world of critical thinking, though you are not quite at the top yet. Analyzing generally means that you understand a concept well enough to break it down into its components. This means that you can understand its meaning, how it works and why it works that way. This often involves comparing, contrasting, questioning and relating.

However, in order to truly think critically you must work your way up the levels of Bloom’s Taxonomy from analyzing, to evaluating, and hopefully eventually you will take the knowledge you have acquired and use it to create something new.[/gravityforms]
multiple choices with the same feedback
If all of the answers have the same feedback, you can try using show content if a certain field is not empty
Step 4: Making sure with the form setting
- Enable Anti-spam bot: Go to Setting> Form Setting> . Under Form Options, tick Enable anti-spam honeypot
Step 5: Embed the quiz to a page
- Go to the page you want to add the quiz. Then press edit.
- Click on Add Form.
- From the dropdown menu under Select a form below to add it to your post or page, Select the form that you want to add to the page.
- Untick Display Form Title and Display form description . Tick Enable Ajex. When you Tick Enable Ajex, what it does is, the page of the toolkit will not be refreshed even when users submit the quiz.
Tips 1: Getting rid of spacing in the confirmation screen
Sometimes when you add feedback (i.e. conditional code) to the cofnirmation screen, it gives extra spacing. To get rid of spacing, switch to text mode, try:
- removing the spacing between [/gravityforms] and [/gravityform action]
- removing spacing after [/gravityform