The Learning Wrapper used in the Student Toolkits page is divided into 5 sections
Learn - which is where the video goes.
Apply - which is where the quiz goes
Visualize - which is where the infographic goes.
Links - which is where the related resources goes
Your Turn - which is where "challenges" and comments go.
Before you are working with Learning Wrapper(Important)
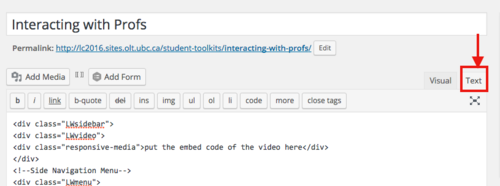
click on text mode tab, then refresh the page.
Best practice is to work on with text mode when you edit the content. If you are on visual editor mode before editing the text, make sure to switch to text mode, then hit refresh, then edit the page. Hitting a refresh after switching to text mode is an important step as this step will prevent WordPress to strip out HTML code. Since the Learning Wrapper is entirely in HTML, it may be overwhelming for the first time, but don't worry - what you will be doing is editing the text.
If you are unsure why the page looks broken, you can check and compare with the other pages that are not broken.
Step 1: Paste the HTML template
Edit the page
Above the editor, Switch to text
4.Copy and paste the HTML code below to the editor:
<div class="LWsidebar">
<div class="LWvideo">
put video embed code here </div>
<p style="text-align: center;">Video Credit here</p>

</div>
<!--Side Navigation Menu-->
<div class="LWmenu">
<ul class="LWtab">
 	<li class="select videobig hidemobile"><i class="icon-youtube-alt"></i> Learn</li>
 	<li class="videoside"><i class="icon-check"></i> Apply</li>
 	<li class="videoside"><i class="icon-picture"></i> Visualize</li>
 	<li class="videoside"><i class="icon-link"></i> Links</li>
 	<li class="videoside"><i class="icon-user"></i> Your Turn</li>
</ul>
</div>
</div>
<div class="maincontent">
<div class="content_wrap"></div>
<!--Content for the Apply section-->
<div class="content_wrap disnon">
<h2><i class="icon-check"></i>Apply</h2>

</div>
<!--Content for the Visualize section-->
<div class="content_wrap disnon">
<h2><i class="icon-picture"></i>Visualize</h2>
put a picture here

<div class="content_wrap disnon">

<!--Content for Links section--->

<h2><i class="icon-link">
</i>Links</h2>
</div>
<div class="content_wrap disnon">

<!--Content for Discuss section--->
<h2><i class="icon-user"></i> Your Turn</h2>
Put a question here

[display-comments]

</div>
</div></div>
put a poll here
Step 2: Add a video to Learn section
Get the embed code of the video by clicking on the video on YouTube>Share>Embed and copy the embed code.
Copy and Paste the embed code of your video you want to add in between <div class="video"> and </div>. Make sure you are in the text (HTML) mode.
After you copy and pasted the video, credit the video. You can credit the video by editing between <p style="text-align: center;"> and </p>
Note: This step may change if we are using H5P for quiz
After you make a quiz using gravity forms (To learn how to make a quiz in gravity form, watch the video here
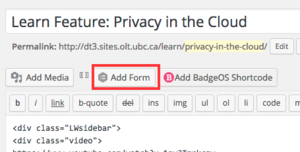
Add the gravity form by clicking on the button highlighted in red click on the button highlighted in red in between: <!--Content for the Apply section--> <div class="content_wrap disnon"> and </div>
As a result it will look something like this:
<!--Content for the Apply section-->
<div class="content_wrap disnon">
<h2><i class="icon-check"></i> Apply</h2>
[gravityform id=12 name= Self Assessment title=false description=true]<!--Add Gravity forms here-->
</div>
Step4: Add an image to Visualize
In between <h2><i class="icon-picture"></i>Visualize</h2> </i>Visualize</h2> and </div> </div> , click on the Add media above the editor to add an image.When you add an image, make sure to add an alt text.
Step5: Add links to Links
You can add a link in between <h2><i class="icon-link"></i> Links</h2> and </div>
For example:
<div class="content_wrap disnon">
<h2><i class="icon-link"></i> Links</h2>
<ul>
<a href="http://www.google.ca"><li>Google</li></a>
<a href="http://learningcommons.ubc.ca"><li>Learning commons</li></a>
</ul>
</div>
Add a link here
</div>
For more detailed instruction, take a look at this video to learn how to add links in text mode. The explanation starts from 3m 21s~ 4m17s.
Step 6: Add a discussion question/challenges to Your Turn
inbetewen <h2><i class="icon-user"></i> Your Turn</h2> and [display-comments]
, type a challenge/discussion questions.
For example:
<h2><i class="icon-user"></i> Your Turn</h2>
Visit a prof, and share your experience about your office hours in the comment below.
[display-comments]
Step 7: Add a poll
Add a poll at the end of the student toolkit so that it gives viewers an opportunity to answer the survey.
To add a poll:
Go to Dashboard>Poll
Under Question, type the question in the format of "Tell us what you think of the __ Toolkit. Please select a response."
Under Poll Answers, type in the following 3 poll answers:
This will not change how I learn.
Good information and I am thinking about it.
This will definitely change how I learn.
Press Add Poll.
After you published a Poll, you will get a message saying "Poll... added successfully. Embed this poll with the shortcode:" Copy the shortcode that is displayed
Go back to the student toolkit that you are editing. Paste the shortcode at the end(after all of the codes) of the Student Toolkit.
Step8:Check and Review
Click on Preview Changes to check if all of the Learning Wrappers are working or not. If it is working, double check, and then press ;Publish;.