Documentation:WeBWorK/How to reuse individual assignments from term-to-term
These instructions cover copying the WeBWorK assignments from a previously-offered course to a current or future course in nearly all cases.
If the previously-offered course you want to copy from includes customized problems that use locally-stored files in any of its WeBWorK assignments, please follow these instructions instead. If you don't know what "customized problems" or "locally-stored files" means in this context, you can just follow the steps below.
How to reuse individual assignments from term to term
- Log into the WeBWorK course of a previous term with your CWL.
- Click on Hmwk Sets Editor in the left sidebar. This will display a list of all the homework sets in the course. Navigate to the Export tab, and using the dropdown menu, select whether to export all sets, listed sets, or selected sets. When exporting only selected sets, make sure to check off all the assignments you wish to copy over to the new course. Click the Export button to proceed.

Export Homework Sets
- The new page that opens up will display the list of problem sets to be exported. Double-check the selected sets. Then, making sure you are still on the Save Export tab, click the Save Export button to complete the export. This will generate .def files of the homework sets in the File Manager.
- Select File Manager from left sidebar. Select the homework sets (the ones with .def beside them). If the .def files are scattered through the directory, you will have to hold down Ctrl key if you are using a Windows device or Command (Cmd) key if you are on a Mac, and click on each of the individual files to select multiple files at once. You may have noticed that the names of the generated files are a bit confusing. For instance, if you exported the homework set “Homework 1” in the previous step, you will need to select “setHomework_1.def” from the list of files. After you have selected all the homework sets, click Make Archive.
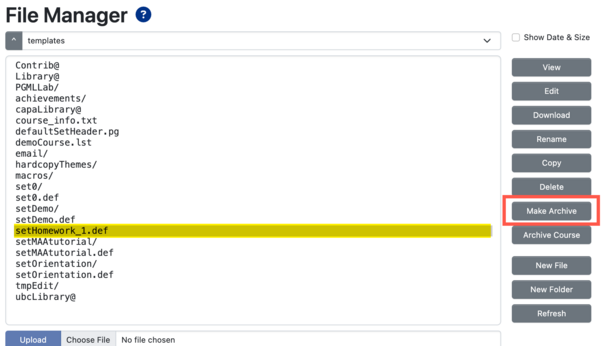
Make archive.
- An archive file will be generated by WeBWorK (ending in .tgz). Look at the system prompt to see what the file name is and select it. Click on Download.
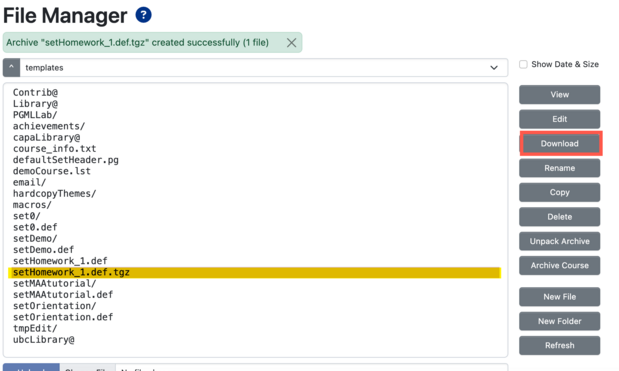
Download .tgz file
- The next step is to upload these homework sets into the course for a new term. Log into the WeBWorK course for the new term via Canvas and then navigate to File Manager from the left sidebar. Click Choose File and select the .tgz file with the previous homework sets. Before clicking on Upload, ensure that Unpack archives automatically has a checked box. Finally, click Upload. WeBWorK will extract the problem sets and add them to the course files.
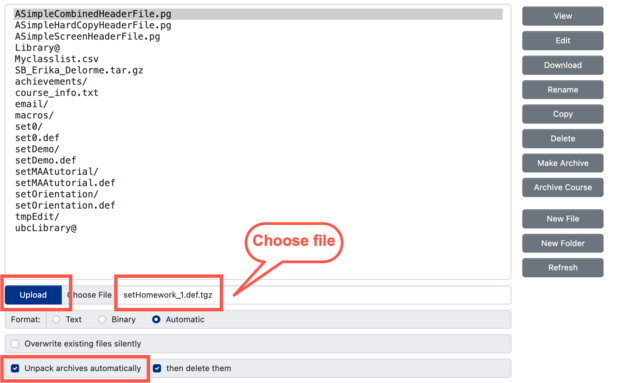
Uploading questions into new termA
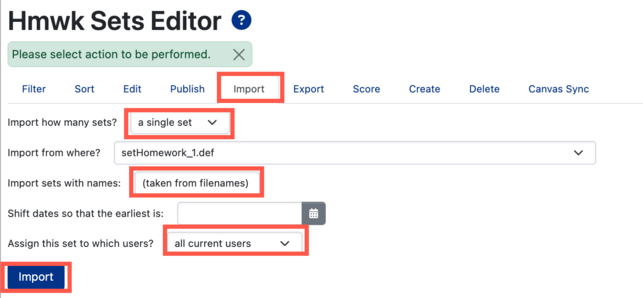
- The next step is to deploy the homework sets and assign them to students. Navigate to Hmwk Sets Editor from the left sidebar and select the Import tab. Using the first drop-down menu, select "multiple sets" or "single set" to import, and select the homework sets you would like to deploy by holding Ctrl for Windows or Cmd for Mac, and clicking on the homework sets. You can keep the original set names and assign the homework sets to all student users. Finally, click the Import button.
Assigning homework to all students - You MUST complete this step to make your homework sets visible to students in WeBWorK. Go to Hmwk Sets Editor from the left-hand sidebar and select the Publish tab. In the first drop-down menu, choose "all sets," if you want to publish all the sets. Otherwise, choose "selected sets," and then click the check boxes next to the sets you want to publish. In the second drop-down menu, choose "Visible." Finally, click the Publish button. Your homework sets are now visible to your students in WeBWorK. Note: To hide the sets from students, follow the same procedure in this Step 8, but choose "Hidden" in the second drop down menu. *If you want to sync the WeBWorK grades to the Canvas gradebook, follow the instructions here.


