Documentation:WeBWorK/How to reuse assignments with customized problems
These instructions cover copying all WeBWorK assignments from a previously-offered course to a current or future course when some or all of the assignments include customized problems that use locally-stored files. Custom problems have images stored in the local/ folder, which is located within the templates/ folder, so to reuse these problems, we will need to export the entire templates/ folder.
In most cases, your previously-offered course will not use these types of problems. If you do not recognize the terms "customized problems" or "locally-stored files" or you find yourself wondering if these instructions are the right choice, please follow the instructions here instead.
How to reuse assignments with customized problems from term to term
- Log into the WeBWorK course of a previous term with your CWL.
- Click on Hmwk Sets Editor on the left sidebar. This will display a list of all the homework sets in the course. Navigate to the Export tab, and using the dropdown menu next to Prepare which sets for export?, select "all sets." Click the blue Export button to proceed.
- On the new page that opens up, you can double check if all of the homework sets have been selected. Make sure the Save Export tab is selected and click the blue Save Export button to complete the export. This will generate .def files of the homework sets in the File Manager.
- Select File Manager from the left sidebar. Expand the drop-down menu at the top by clicking on the downward arrow. Then navigate to the main directory of the File Manager, which should be labelled as the name of your WeBWorK course.
- Select the templates/ folder and click on Make Archive from the buttons on the right.
- Download the file package that is created by clicking on Download (the one with .tgz beside it).
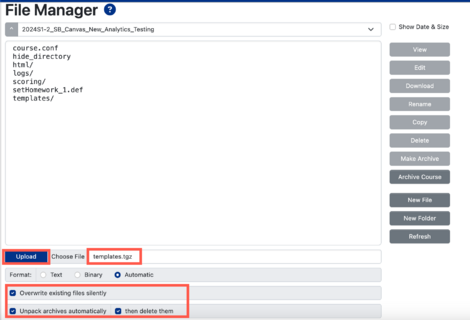
- The next step is to upload the packaged files to the course for a new term. First, log into the WeBWorK course for the new term and then navigate to File Manager from the left sidebar. Make sure that you are in the main directory of the File Manager, by expanding the drop-down menu at the top and then navigating to the main directory, which should be labelled as the name of the destination WeBWorK course.
- Click Choose File and select the .tgz file from your computer. Before clicking on Upload, ensure that Unpack archives automatically and then delete them is checked off.
- If it is the start of the term and you have not made any changes in the WeBWorK course, check off Overwrite existing files silently to replace the existing “Templates/” folder.
- If there have been changes made in the WeBWorK course, leave the Overwrite existing files silently unchecked.
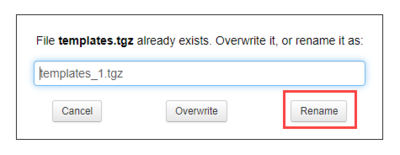
- Finally, click Upload. If you left the Overwrite existing files silently unchecked, you will be prompted to rename the templates folder - you may come up with your own new name or leave the suggested name as is, and click Rename to upload the renamed template.
- The last step is to deploy the homework sets and assign them to students. Navigate to Hmwk Sets Editor from the left sidebar and select the Import tab. Using the first drop-down menu, select "multiple sets" or "single set" to import, and select the homework sets you would like to deploy by holding “Ctrl” for Windows or “Cmd” for Mac, and clicking the homework sets. You can keep the original set names and assign the homework sets to all student users. The process of assigning the homework sets to all student users may take a long time, so you can wait until it is closer to the starting date of the homework set before assigning it. Finally, click the Import button and you’re done!


