If the media is on your computer (e.g. documents), upload it to the UBC Wiki;
If the media is hosted elsewhere (e.g. YouTube), embed the media using widgets.
This module is divided into two main sections based on the two methods mentioned above.
Files on Your Computer
The poster above is a short tutorial on the copyright requirements on the UBC Wiki. (Click to Enlarge)
Any file upload to the UBC Wiki needs to have their copyright status confirmed. Upload only files that you or the instructor own's, files that are openly licensed, and files that you have permission to share.
By default, the UBC Wiki does not allow uploading CC BY-ND images due to limitations in the UploadWizard.
If you would like to upload an image licensed under CC BY-ND, please contact us at lt.hub@ubc.ca and include the image URL in your message.
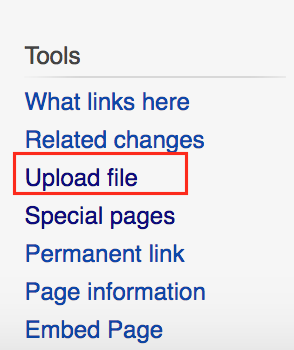
In the sidebar, under “tools”, click “Upload file.”
The Upload file link is under Toolbox on the right-hand side menu.
Click Next at the bottom of the page after browsing the short comic explaining what kinds of copyright permissions your files should have.
Click “Select a media file to upload” to locate the file on your computer.
Click Add another file to upload multiple files or click Upload to upload the file(s).
Click Continue
Choose the appropriate copyright status of the file.
Choose the 2nd option if it's a file created by somebody else. You will be asked to provide the source, author's name, and what kind of license does it have.
If you don't know the copyright status, you have the option of cancelling the upload.
Provide a description of the file.
Click Next at the bottom-right corner of the page.
After you've uploaded a file, you can use it in an article by copying the text under To use the file in a wiki and pasting it into your wiki page.
The following sections go into detail on how to add specific file types to a wiki page.
You can embed an "external" image by simply typing the full URL of the image.
For example:
https://open.ubc.ca/files/2019/09/openubc.jpg
will display the image on screen.
Internal image syntax
After uploading the image, create a link to the image file to embed it on a page. Thus, for the below example, type in the following code into the wiki edit page of the article in which you want the image to be embedded.
In addition to embedding an image, you can also give it alternative text, a frame, or make it centered. There are many different options for how images are displayed. The full syntax for displaying an image is:
[[File:file name.extension|options|caption]]
Choose to have none or multiple options from the list below:
border
frameless
frame
thumb or thumbnail This controls how the rendered image is formatted and embedded in the rest of the page.
These options control how the image is formatted and embedded in the rest of the page. Each option should be separated by pipes (|).
Examples
Formatting
Example of Wiki Code to use
Display
Regular Image with a caption
[[File:File:ExampleImage.jpg|Caption text that shows in mouse over and if image does not load.]]
Image with Frame
[[File:ExampleImage.jpg|frame|Caption: This is an example image]]
Caption: This is an example image
Thumbnail Image
[[File:ExampleImage.jpg|thumb|CCaption: This is an example image]]
Caption: This is an example image
Note: Images without a frame automatically align left, while images with a frame automatically align right.
Adding Documents and PDFs
Use the following wiki codes when adding documents and PDFs to your wiki page.
Make sure you're in wikitext mode when you are adding the code below.
This message box is using an invalid "type=notice (optional)" parameter and needs fixing.
Embedding media from other sites to the UBC Wiki works slightly different than on a platform such as WordPress or Connect where you will need to use widgets.
This section will show the most commonly used widgets. For a complete list, visit Help:Widgets.
Youtube
This widget allows you to add YouTube video player to your wiki page.
To embed YouTube videos, follow the step below
How to add YouTube (in visual editor mode)
On visual editor, go to insert>Template to go to the add template optionGo to insert>template to go to the add template option
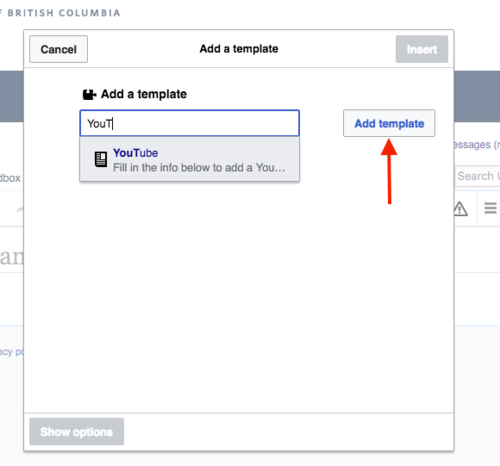
Under Add a template, type in YouTube, then click on Add template. Under Add a template, type in YouTube, then click on Add template.
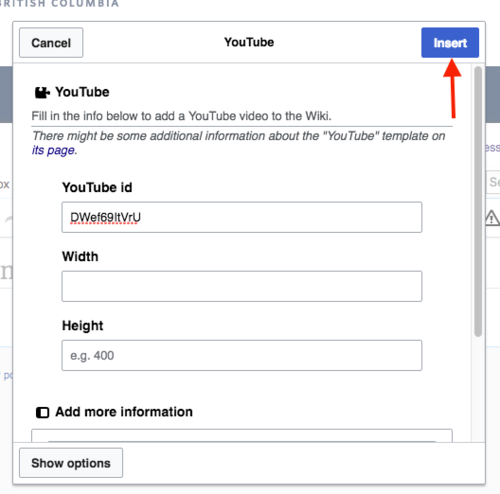
Add parameters (see the bullet point below) for YouTube Video, then click on Insert. If you want to add a playlist, click on Add more information. :
YouTube id - video id (from the URL)
playlist - playlist name (starts with PL) - first clip is played (id is ignored).
height and width define view dimensions, 420x350 is default Adding parameter for the YouTube video
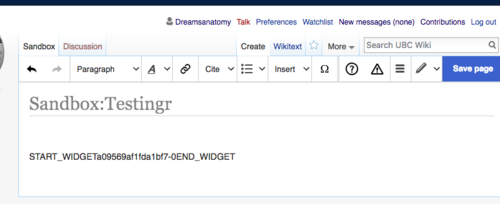
After you have inserted the template, there will be a code that says "Start Widget.."appearing on Visual Editor. Ignore this and then click on save page. a code that says "Start Widget"
Done! You have now added a video on the page.end result of the embed video
Sample results
Playlist
Adding YouTube in text editor mode
This widget allows you to add YouTube video player to your wiki page.
playlist - playlist name (starts with PL) - first clip is played (id is ignored)
height and width define view dimensions, 420x350 is default
Sample results
Playlist
{{#widget:YouTube|playlist=PL6FD8256CD24CFF1F}}
Kaltura
This widget allows you to add Kaltura video to your wiki page.
Adding Kaltura video in visual editor
On visual editor, go to insert>Template to go to the add template option
Under Add a template, type in Kaltura Cloud, then click on Add template.
Add parameters (see the bullet point below) for Kaltura Video, then click on Insert. If you want to add a playlist, click on Add more information. :
id - video id (from the URL)
height and width define view dimensions, 420x350 is default
After you have inserted the template, there will be a code that says "Start Widget.."appearing on Visual Editor. Ignore this and then click on save page.
Done! You have now added a video on the page.
Adding Kaltura video in text mode
To insert this widget, use the following code:
{{#widget:Kaltura Cloud|id=0_pr2anncr|width=400}}
Parameters
id - url to the video from the embed code (after the entryid=)
width and height define view dimensions, 400x285 is the default.
Sample result
Prezi
This widget allows you to add Prezi presentation player to your wiki page.
To insert this widget, use the following code:
{{#widget:Prezi|id=recyyolzxm3e|linktext=How to make a great Prezi}}
Parameters
id - Prezi id (from the URL)
width - define width, default is 550
height - define height, default is 400
linktext - creates link text to click on to open presentation on Prezi
When you insert a widget code (including YouTube, Slideshare, etc.) to the Visual Editor, copy the code then paste it to the Visual Editor. Then click on the code, and press edit. Then, you can change the parameter and press Apply Changes.
Paste the example code to the visual editor. Click on the code, and press edit. Then, change the parameter and press Apply Changes
Slideshare
This widget allows you to add SlideShare slideshows to your wiki page. It replaces original SlideShare extension.
Sample result
To insert this widget, follow the step below:
On editor, select Insert>TemplateOn editor, select Insert>Template
Under template, type in "Slideshare" then click on Add Template.
Enter your SlideShare id in the "id" parameter. You can find the SlideShare id when you "share" your SlideShare. There is also 'player' parameter that defaults to '2' and allows you to switch to other players. If you want to modify the height and width, click on "Add more option" to add parameter for the size. If you are satisfied with the setting, press Insert.
After you insert the template, you will see a block of code that looks like "Start Widget.." . ignore the code and save the page.
You're done! You have embedded Slideshare to your page.
Google Presentations
This template allows you to add Google Presentations to your wiki page. In order to make the Google Presentation visible on the wiki, make sure to publish it on the web. Detailed instruction on how to publish a google presentation can be seen on Publishing your Google Presentation
Sample result
How to add Google slides
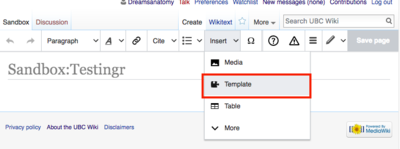
On editor, select Insert>TemplateOn editor, select Insert>Template.
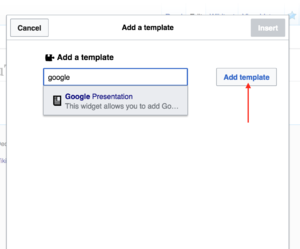
Under template, type in "Google Presentation" then select Add template Under template, type in "Google Presentation" then select Add template
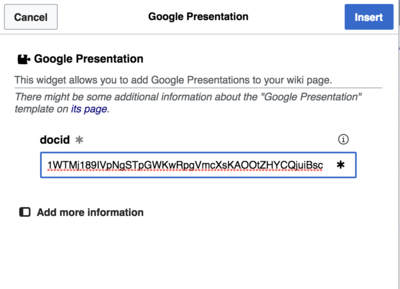
The parameter for the Google slideThe docid is the parameter in document URL. Find the docid for your presentation and enter the doc id. For example, if the URL of the presentation is https://docs.google.com/presentation/d/18PBCgIGhxHWR9KxeSnbSXClyVBob1vL-98orPuiOQIQ/edit#slide=id.p ,the doc id is the bolded part of the URL. If you want to change the size of the Google slide, you can click on "Add more option" to change the size of the google slide. If you're satisfied with the option, click on Insert. The part highlighted by red is the doc id
After you insert the template, you will see a block of code that looks like "Start Widget.." . ignore the code and save the page.
You're done! You have embedded Google slides to your page.
Adding Google Prensentation via wikitext mode
You can use the code below to embed the google presentation:
{{Google Presentation|docid=presentation ID here }}
Parameters
docid - docid parameter in document URL
size - (optional) allows you to change the size of presentation from small (388x342) to medium (555x451) or large (700x599)


 .
.


