Help:Uploading Files
If you want to add an image, pdf, or other file to your UBC Wiki page, you'll need to upload it. You will also need to confirm the copyright status of any file you upload.
Upload only files that you own, openly licensed or have permission to share.
You can upload:
- images (.png , .jpg,.jpeg gif format)
- powerpoint files(ppt, pptx)
- excel files (xml)
- pdf files
Uploading
| By default, the UBC Wiki does not allow uploading CC BY-ND images due to limitations in the UploadWizard. If you would like to upload an image licensed under CC BY-ND, please contact us at lt.hub@ubc.ca and include the image URL in your message. |
- In the sidebar, under “tools”, click “Upload file.”
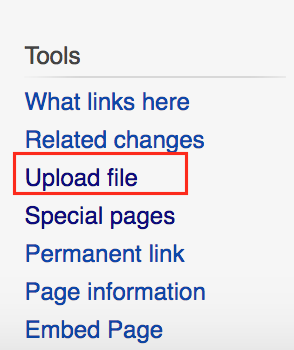
The Upload file link is under Toolbox on the right-hand side menu.
- Click Next at the bottom of the page after browsing the short comic explaining what kinds of copyright permissions your files should have.
- Click “Select a media file to upload” to locate the file on your computer.
- Click Add another file to upload multiple files or click Upload to upload the file(s).
- Click Continue
- Choose the appropriate copyright status of the file.
- Note:
- Choose the first option if you created the file. You will have give it a Creative Commons/Public Domain License.
- Choose the 2nd option if it's a file created by somebody else. You will be asked to provide the source, author's name, and what kind of license does it have.
- If you don't know the copyright status, you have the option of cancelling the upload.
- Note:
- Provide a description of the file.
- Click Next at the bottom-right corner of the page.

Using images and file description pages
After you've uploaded a file, you can use it in an article by copying the text under To use the file in a wiki.
See Help:Adding Media for more information on adding your files to pages.
Your file gets its very own “file description page” within the File namespace of the wiki. You can edit this page to provide more information about the file in the future.
List of files in the UBC Wiki
There are a number of special pages to help you view and manage files which have been uploaded. Go to “Special pages” (in the tools on the left) and then see...
- Gallery of new files - If you just uploaded one, you will see it here.
- File list - Shows all of the files.
- Unused files - Helps you track down files which might not be needed.