Documentation:Kaltura/Upload a Video (How to)
In Kaltura instructors and students in a course can view, publish and share videos in Connect and in the various galleries available. Videos can be applied to course content, assignments, lectures, etc. to enrich and improve learning and teaching. For example, instructors can include video in an assignment or content item and students can use videos to respond to a discussion post or submit an assignment.
You can upload a video directly into course content with the Mashups tool. In addition, you can upload a video from Course Gallery and My Media.
This document includes:
- Questions about Copyright?
- Best Practice
- How to upload a video in your content editor through the Mashup feature
- How to upload a video using the Kaltura Uploader
- How to access the Kaltura Uploader from Course Gallery and My Media
- Video Recommendations
| This page has been archived for reference purposes and is no longer being updated. You can view this page’s version history.Connect was decommissioned on August 31, 2018, and was replaced with the online learning platform Canvas. Information about Canvas and supported learning technology integrations is available on UBC’s Canvas website for instructors. |
Video
Effective Practices
- Running a [blank] search will show all available videos when publishing a video via the Mashup Tool or as a standalone item.
- When deleting a standalone video item in a course, the video will still exist in your My Media and/or Course Gallery (if added there previously).
- Create a standard hashtag for your course and notify all course members about it.
- Assign video categories and add metadata to easily locate files later. For recommended guidelines on metadata, click here.
- Keep in mind that adding a video to the Faculty Repository means that all UBC faculty are able to view it.
- Regarding ownership and copyright of media, please refer to Share and Manage Videos in Course Gallery (How To).
Effective Practices for Instructors
- Accessing the Kaltura Uploader from the Course Gallery will allow you to directly upload your video to the Course Gallery and My Media.
- Regardless of how you access the Kaltura Uploader, you can only contribute to Faculty Repository in My Media.
- Enable Course Gallery as a tool link visible to course members as it promotes sharing of student project videos and acts as a gallery of all videos in a course for students to search through.
- To transfer ownership to another instructor, please contact the UBC IT Help Desk.
Access Kaltura Uploader via Mashup feature
The following section about accessing mashups feature in the content editor is useful for instructors when including videos in an assignment or content item and for students when responding to a discussion post or submitting an assignment.
- When creating a course item in the content editor, click the Mashups button
 .
. - From the Mashup drop-down menu, select Kaltura Media.
- Choose a media file that already exists in My Media and Faculty Repository by clicking select for a video
OR
Choose to upload a new media file by clicking the Upload media or record from webcam button located in the top right corner. If recording from a webcam, please refer to the Create and Upload Video from Webcam (How to).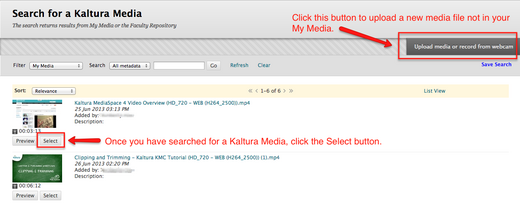
Choose a media file that is already in your My Media by clicking select for a video OR choose to upload a new media file by clicking the Upload media or record from webcam button.
- Click Submit on the Create Mashup Item page that appears. The video you selected or uploaded now appears in your content editor.

Upload a Video with Kaltura Uploader
- Once you have opened the Kaltura Uploader window, make sure you are on the Upload tab on the left. On the right, click the Browse button.
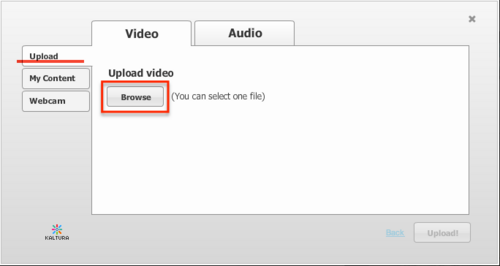
On the Kaltura Uploader, double check you are on the Upload Tab and click on the Browse button to select the media file you would like to upload.
- Select a video from your computer files.
- Once you have selected your video to upload, click Upload!
 located on the bottom right hand corner. The system begins transcoding the file, which can take a few minutes depending on the size of the file. Your video will now upload and you are done with the Kaltura Uploader.
 - Confirm the Copyright and Privacy information for your video and click Ok.
- If you want your audience to be able to download and share your video, check the options under Share and download permission.
- Once your video has finished uploading, its status will change to Done.
- Click Next at the bottom right hand corner.
- Fill in the fields for Title, Tags, and Description. A Tag is a non-hierarchical keyword or term assigned to a piece of information. This kind of metadata helps describe an item and allows it to be found again by browsing or searching. For recommended guidelines on metadata, click here.
- Click Next button on the the bottom right hand corner when finished.

- Student: Your video is now uploaded to your My Media page.
- Instructor: If you accessed the Kaltura Uploader from Course Gallery, your video is now uploaded to Course Gallery and My Media. If you accessed Kaltura Uploader from My Media or via the Mashups tool your video is uploaded to My Media where you can select public access, contribute to the Faculty Repository, add your video to the Course Gallery and delete video.
Other Ways to Access Kaltura Uploader
You can also upload a video using the Kaltura Uploader from Course Gallery and My Media.
Access Kaltura Uploader in Course Gallery
- Once you have added the Course Gallery tool link to the course menu bar, click the Course Gallery's tool link located on the course menu bar to the left of the screen. If you have not done so please refer to the Create a Tool Link (How to). When selecting the type of tool link please select Media Gallery.
- On the Course Gallery page, click on Upload media or record from webcam button located in top left side.
Access Kaltura Uploader in My Media
- On the My Media page click on the button called Upload media or record from webcam located on the top left side. Once you have done so, the Kaltura Uploader will appear.

Video Recommendations
Here are the following recommended containers when uploading media files. Optimal playback experience includes desktop and mobile devices (such as iPhone, iPad, and Android).
| If you are using Camtasia, it is recommended to upload the video in HD (High Definition) quality. On tutorial on how to export a HD video in Camtasia, see Documentation:Camtasia_Toolkit/Tips/Recommended_Video_File_Option#Setting_the_canvas_size. |
| Container | Recommended |
|---|---|
| Container | MOV, MP4 |
| Bitrate | X 1.5-2 of the highest flavor |
| Frame Size | Multiples of 16 recommended; do not scale/zoom |
| Compressed Source | H.264, ProRes |
| UBC Formats |
|
| Max Upload | 5 GB (1.5-3 hours) |
Related Links
- Kaltura Toolkit
- Kaltura Video Building Block 4.0 for Blackboard 9 Quick Start Guide
- and upload video from webcam (How to)
- Course Gallery Quicksheet
- a Clip (How to)
- Share and Manage Videos in Course Gallery (How to)
- My Media Quicksheet
- Contribute to the Faculty Repository (How to)
- UBC Copyright Guidelines
- Kaltura Quicksheet
- Kaltura Guidelines for Metadata