Library:WordPress and Wiki Tutorial
Welcome to the WordPress and Wiki Tutorial! We hope to cover all the basics in just 15 minutes. Please don't hesitate to ask questions or make suggestions either of your moderators (if this applies) or using the talk page.
TLAC Forum Presentation
Decisions, Decisions, Decisions
The first thing you'll need to do is decide whether your information should reside in WordPress or Wiki. Generally, if it has greater library use (such as a tutorial), consider putting it on the wiki for everyone to share.
Not sure? Check out our When to Use the Wiki page to help you decide.
If you decide the information should be on WordPress, you then need to decide between pages and posts. If you're not sure, take a look at a list of differences between pages and posts.
Using Wiki
Login and Access the Library Namespace
- Login to the wiki using your CWL
- Visit any library page, such as Library:Home
- You should see the 'Edit' tab in the top right between 'Read' and 'View History'. If you do not see the 'Edit' tab, please contact LSIT with your UBC Wiki username (it's the name you see next to 'UBC Wiki' on the left of the top gray bar).
Best Practices
Before creating (and editing wiki pages), please take a look at the Library's Wiki Guidelines.
Create a Wiki Page
Help:Create_New_Page tells you all the ways to create a new page, and points 1-3 of Library:Home#Wiki_Guidelines discuss best practices when creating a new page.
Namespace
Library pages should always have the format "Library:Page name" format. Library pages are restricted to library staff. If you are a Library staff requiring access, please locate your wiki Username at http://wiki.ubc.ca/Special:Preferences and then send a Web Services request at http://helpdesk.library.ubc.ca/ to be added to the Library namespace. If you do not prefix your page to put it into the Library's namespace (like a directory or folder), it will be editable by anyone with a CWL.
Subpages
You can create subpages for articles related to your page using a forward slash. For example, if your main page is Library:My_Branch then you can have Library:My_Branch/More_Info_Page.
Import Content
If someone has created a (sub)page that you want to use, then please make use of transclusion or importing of content. More on that through Help:Templates.
Editing a Wiki Page
- Insert the content you want in the edit box.
- If you have something written up, you can just copy/paste, but the formatting will disappear.
- If you want to convert an existing webpage, see Help:Converting_HTML_to_Wiki_Syntax.
- Format your text using the toolbar. Click on 'Advanced' for more options. See Help:Formatting_Toolbar for details (which also provide links to other help articles related to formatting).
- Note: When inserting links, we recommend to place your cursor where you would like it and use the insert link option (i.e. without selecting any text prior to pressing the button).
- Categorize!
- Search for existing ones, or browse the Category:Library page for library related ones. Add categories at the bottom of your wiki page using the format: [[Category:categoryname]] (case and space sensitive!). See Help:Categories for more information.
- 'Show Preview' at any time and finally, 'Save page'.
The Library's Learn to Use the Wiki also provides a more flushed out tutorial on wiki formatting basics.
Wiki Page Tips
When creating or modifying a wiki page, it is best to keep a few things in mind when you expect to use it in WordPress through wiki embed.
- Images: should be no wider than 560px (pixels). If images are wider, wiki embed will automatically resize the width only, and resulting pictures will looked squished.
- Tables: should be 1-3 columns. Obviously, depends on how and what you are using a table for. Just remember that in the typical 2 or 3 columns themes in WordPress, your table will be automatically resized to something smaller. You should use the built-in "Insert Table" function in the wiki toolbar (which can then be styled in WordPress).
- Tabs: If you intend to use the 'Top section converted into tabs' option (which translates to any Heading Level 2 becoming a tab), then you need to make sure there are either only a couple of level 2 headings or that they are short.
- As an example, take a look at the UBC Library's Community Users & Visitors' page, which corresponds to the wiki page Library:Help_for_Community_and_Visitors. Notice that there are 5 tabs, but they are relatively short to fit on one line. Also, any text before the first level 2 heading shows above the tabs and thus always shows on the page.
- Links: As there are different options on how to deal with wiki links, always use an internal wiki link when available/appropriate.
- For example, if you're on the wiki and you decide to link to the Community Users & Visitors page mentioned above, you should link to the wiki page using an internal wiki link, because each WordPress site may have its own relative links to it (though unlikely, it's possible).
Also keep in mind that changes on the wiki will appear immediately on the wiki, but depending on the wiki embed settings in WordPress, it may take anywhere from 5 minutes to never for changes to appear.
- Please note that these may change as wiki embed is updated. This section was last updated March 2011.
Using WordPress
Accessing your WordPress Site
If you do not have it bookmarked, the easiest way to access your WordPress site is to add "wp-admin" to the URL of your site in your browser's address bar.
For this tutorial, the site that we are using is: http://library-training.sites.olt.ubc.ca , so in order to access the WordPress Dashboard, use http://library-training.sites.olt.ubc.ca/wp-admin
You should then be prompted to login using your CWL. Once you have access, you should see the WordPress Dashboard.
Accessing a WordPress site through another WordPress site?
If you're already logged into a different WordPress site, here's another way to get to the one you want.
- Click on Dashboard or the arrow to show the submenu.
- Click on 'My Sites.'
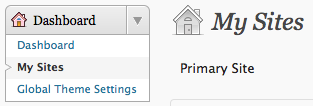
- Click on 'Dashboard' underneath the site you wish to change.

Create a Page
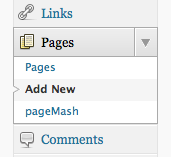
To add a new page to your WordPress site:
- Click on Pages or the arrow to show the submenu.
- Click on 'Add New'.
- Add a title and your content using the WYSIWG (what you see is what you get) editor. The 'Kitchen Sink' (last icon on the top row) gives more options/buttons.
- For library sites, we suggest using headings to organize your page, but not to change the font, color, or size for these to keep pages looking consistent between sites (and what you see in the editing box may be different from how the page will actually look).
- 'Preview' your page to see how it looks, and 'Publish' once you're done to save and make it public.

At any time, you may see your list of pages and edit them by selecting 'Pages' from the WordPress menu.
Add Images and Media to Your Page
- From the Dashboard, click Pages on the left-hand menu bar.
- Select one of the pages (About or Resume) to edit.
- On the Add Media toolbar click the first icon in the row. (see Figure 5 image at right)
- Add media files from your computer window appears.
- In the Choose files to upload box, click Select Files. From your computer, select an image and click Select (OK on a PC).
- Enter a caption, a description of the image, and select an image size to be displayed on your page. (Note: the default in Full Size). Click Insert into Page.
- When you have finished formating your page, click Update on the far right-hand side and visit your site.

See Also
Note: If the image or media lives on the web, use the 'From URL' option instead. If you uploaded it previously, use the 'Media Library' option.
For more tutorials/help, see CTLT's WordPress Basics or Video WordPress Tutorials.
Create a Post
Following the same method as with pages:
- Click on Posts or the arrow to show the submenu.
- Click on 'Add New'.
- Add a title and your content using the WYSIWG (what you see is what you get) editor. The 'Kitchen Sink' (last icon on the top row) gives more options/buttons. Adding images/media is the same as on pages.
- On the right hand side of the page, add categories by checking off the applicable boxes or 'Add New Category' (at the bottom of Categories) to make a new category for your post.
- Below Categories, add tags (either new ones through text box or click on 'Choose from the most used tags').
- What's the different between categories and tags? Try Elearning's explanation or WordPress' explanation.
- Scroll down and look for 'Discussions' (in the centre area) to allow or disallow comments.
- 'Preview' your page to see how it looks, and 'Publish' once you're done to save and make it public.
At any time, you may see your list of post and edit them by selecting 'Posts' from the WordPress menu.
Create a Carousel
To add a new carousel/slideshow to your WordPress site:
It is assumed that the [slideshow] shortcode has been added to a page/post with the category parameter set to 'carousel'; see http://wiki.ubc.ca/Documentation:UBC_Content_Management_System/CLF_Theme/Slideshow
[slideshow category="carousel"]
- Login to the Dashboard of your site, http://sites.olt.ubc.ca/wp-login.php, and navigate to your site.
- Under 'Posts', click on 'Add New'.
- Enter a post title and/or permalink.
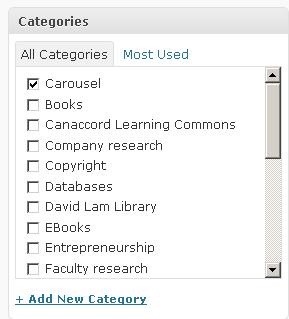
- Under 'Categories', select 'Carousel' or 'Slideshow':
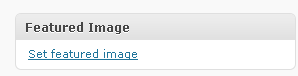
- In the 'Featured Image' section, select 'Set featured image'. This will be the carousel image:
- In the next 'Set featured image' screen, under the 'Upload Files' tab, click on 'Select Files' to upload a new carousel image or click on 'Media Library' to choose an image already on the WordPress site.
- Once the image is uploaded or you have chosen one from the Media Library, click on the 'Set featured image' button to exit out of the 'Set featured image' screen, returning to the 'Add New Post' screen. Ensure that the feature image is present:


- Click on 'Publish':
 .
. - Double check by accessing the page/post where the [slideshow] shortcode was added.
Please note: Adding a featured image to a post does not mean that the image will appear in the post - instead, it is 'attached' to the post and becomes the representative image of the post for the carousel.
UBC Collab Theme
If using the UBC Collab Theme, please ensure that the Portfolio Slideshow Plugin is enabled for the shortcode to function properly.
In the UBC Collab Theme, you can also set the Spotlight Rotation to appear on the site frontpage without using a shortcode by going to Appearance->Theme Options->Frontpage in the WordPress dashboard and selecting one of the layout options that includes a slider; you can then adjust the feature slider settings to achieve the same results you would with using shortcode parameters (Note: you can still insert a slideshow on any page by using a shortcode).
Regardless of whether you use Theme Options or the shortcode, it is recommended that you choose only images with a width of 770 to appear in the slideshow. Images with different widths may appear blurry or stretched (this is because the default behaviour of the slideshow plugin is to first resize every image to 770 px). It is also recommended that you do not use the shortcode width parameter as its use will sometimes override the height settings.
[slideshow category="carousel" height="200"]
Other things to keep in mind:
- Parameters in the shortcode will override those in the feature slider settings; this means that it's possible to create multiple slideshows of different sizes, styles, and that pull content from different categories.
- Check to see if the navigation arrows in the slideshow are aligned:

If they are not, you can use CSS to achieve the look you want
ul.flex-direction-nav {margin-bottom: 0 !important;}

Embedding Wiki Pages in WordPress
Inserting Wiki Pages in WordPress
In order to insert wiki pages, you will need to have access to the WordPress pages section. This usually means you need to have editor or admin access (though it depends on the site settings).
- Add New Page (or use existing one).
- Click on the Wiki Embed icon. (The [[ ]] icon just above where it says Wiki Embed.)

- Copy and paste the full wiki page link (including the http part) into the box. (See the CLF Documentation for an example.)
- Choose your options. First one is tabs on/off, second is to not show the table of contents, and third is for links to edit the wiki page.

Remember that the wiki embed function is like an "insert" function, which means that you can have things in the WordPress page before and after if you wish.
Setting Target URLs
If you have the 'Internal Wiki Links' opens as WordPress page option, then you will want to set target URLs for any internal wiki links on your pages, meaning that if someone clicks on a wiki link, it will open a page that you specify instead.
- Go to Dashboard>Wiki Embed>Settings
- Under Global Settings, choose WordPress Page — links open a WordPress page with the content of the wiki for the internal links option.
- Embed a wiki page as discussed above.
- View the WordPress page where you have embedded wiki content.
- Click on the internal wiki link(s), which will open the wiki page in a sort of temporary WordPress page. Do this for all internal wiki links.
- Scroll down to the bottom of each temporary Wordpress page. If you do not want this temporary page to be part of your WordPress site, click on "in Wiki Embed List" and skip ahead to step 8; otherwise, click on "Create a New Page." In Edit mode, change the title of the page, update the wiki embed source if necessary, and set page attributes such as parent and order to make sure the page is located where it should be in the site architecture.
- Click on Wiki Embed then Wiki Embed List in your WordPress menu. You should see a list of internal wiki links on your WordPress site. Such as,
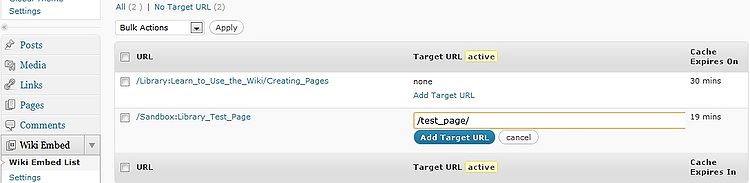
- Add a Target URL for each internal wiki link. The target URL is a sort of redirect, so you set "when someone clicks on this wiki link, go to this specified page". The link can be either a relative link (within the WordPress site, see above image) or an external URL, for example, a URL that points back to the original wiki page.

The wiki embed list will have a full list of wiki pages including all the pages you are embedding. You do not need to set a Target URL for pages you have embedded, only the internal wiki links.
In case you missed any, there is an option to enter an e-mail for notification when a new temporary WordPress page is created so that a target URL can be added. (As of March 2011, however, it is still under development and the person may be notified of links other than internal wiki links.)
Resources
WordPress
Wiki
- Library:Learn_to_Use_the_Wiki
- Wiki Help Articles
- Library Categories
- Library's Space Home page including Wiki Guidelines