Documentation:UBC iClicker User Guide (Windows)/iGrader: Interfaces, Session Grades, and Session Reports
iGrader looks a bit complicated. There are so many features! How do I use it?
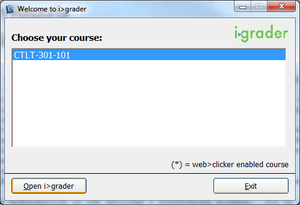
- In your "iClicker Win - UBC" folder, open the iGrader applications.
- Select your course and press the "Open i>Grader" button.
- The main interface of iGrader has a table with your students in each row and each clicker session in each column:
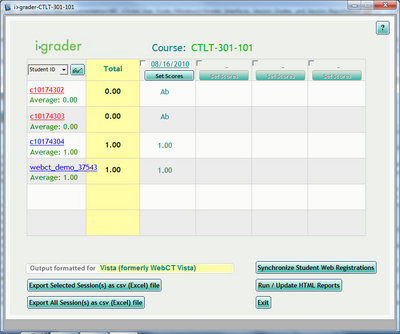
- Students with registered clickers are in blue; students without registered clickers are in red. Unregistered clickers that participate in sessions appear at the bottom in red.
- You can click on each student’s name to see their name, student number, and a list of registered clickers. If you click on "Add New Clicker", you can manually register a clicker ID to a student.
The newly added clicker ID would not be overwritten even if you reimport your class roster from Vista later on, however it would not be added to the database that Vista reads from. Your students MUST register their clicker on WebCT Vista so that all their instructors can download their clicker IDs through Vista. (See Adding iClicker Registration to Your Course).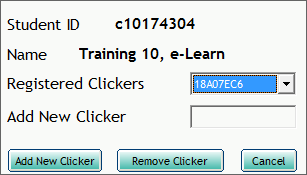
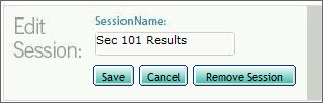
- Each clicker session is labeled by date. If you run more than one session in a day, the second session will have “‐2” appended after the date and so on. Click on the date to rename the Session Name.
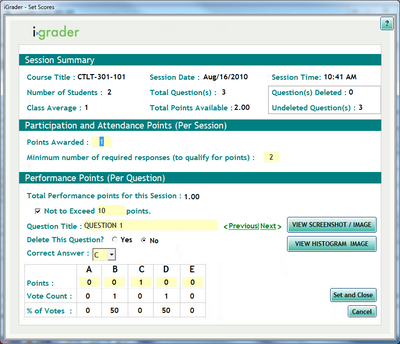
- If you press “Set Scores”, the “Session Summary” screen below will appear. You can edit Participation/Attendance Points and Points for that specific session.
- NOTE: You have set the marks distribution in the Settings & Preferences already. You do not need to modify them here. You can add answers to give students more points.
- NOTE: You have set the marks distribution in the Settings & Preferences already. You do not need to modify them here. You can add answers to give students more points.
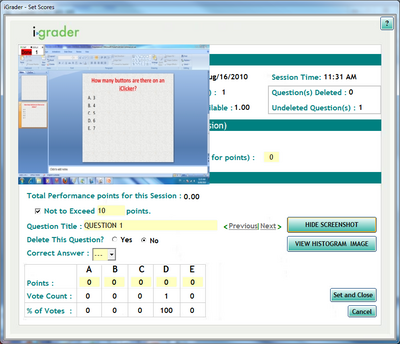
- iClicker takes a picture every time you ask a question. You can view the screenshot using the “View Screenshot” button.
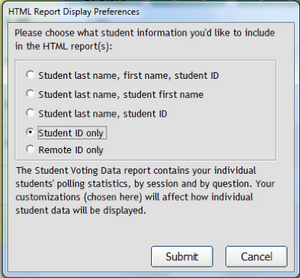
- In the iGrader main interface page, iGrader can create Reports and view them. Press the “Run/Update HTML Reports” button.


![]()
- A. The following Display Preferences pop-up will appear. Select your preference and press "Submit".
- Note: "Remote ID only" is only available beginning in version 5.5.x.
- Note: "Remote ID only" is only available beginning in version 5.5.x.
- B. A Report Summary (shown below) will pop‐up with a description of each option. You can click on each blue, underlined link to view the report.

- A. The following Display Preferences pop-up will appear. Select your preference and press "Submit".

