Documentation:UBC iClicker User Guide (Windows)/iClicker: Running Sessions
How do I run clicker sessions and how do I control my clicker sessions?
- Before starting a session in class, plug in the iClicker receiver hub. Ask your students to turn on their clickers and if needed, change their frequencies.
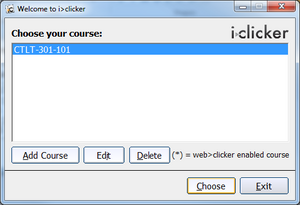
- In your "iClicker Win - UBC" folder, open the iClicker application.

- Select your course and press the "Choose" button.
- Choose from the two session tabs:
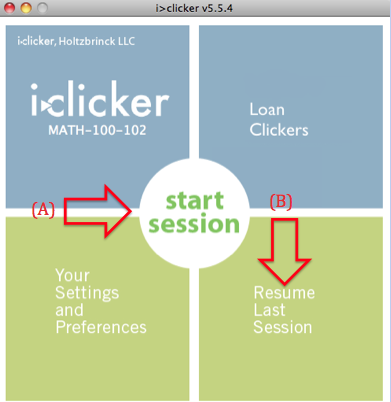


- A. Start Session: For each lecture, you will start a new session. Each session will have its own column in iGrader.
- B. Resume Last Session: If in the middle of your lecture, you close iClicker or your computer crashes, you can resume your previous session and the clicker marks in that session will not be erased.
- A. Start Session: For each lecture, you will start a new session. Each session will have its own column in iGrader.
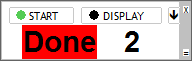
- Plug the base into your computer and press “Start Session”. The main screen disappears and is replaced by a floating menu bar (shown below).

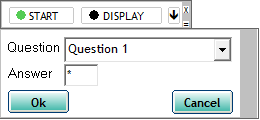
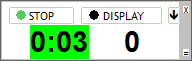
- Press the “Start” button when you start asking students questions. Press the “Stop” button to stop polling your students. If you selected "Show question information before each question" in the Polling Session tab under Settings & Preferences, a pop-up will appear to edit question information.
- A Timer will appear and will count up/down depending on your settings. A counter shows the number of student votes.
- NOTE: iClicker will take a screenshot of your screen for each question, meaning if you use a presentation software (e.g.: Powerpoint), it will take a screenshot of the slide shown to students. This allows you to later review your questions without having to open the lecture slides.
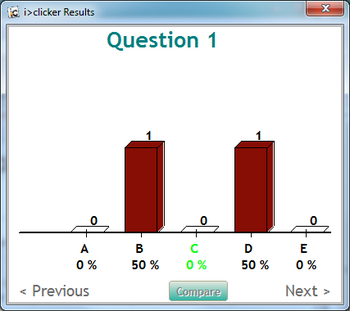
- You can press the “Display” button at any time during your session to show a bar graph of your students’ responses with percentages and number of votes for each choice. If you want to show the correct answer after the question, you can click on the correct answer on the display graph. Press the “Hide” button to hide the graph.
- Press the "Stop" button to stop polling your students. A brief summary of the session will be displayed.
- The down arrow button
 is your Options button. Pressing it will give you a drop-down menu to:
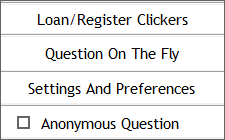
- Loan/Register Clickers – Students MUST register their clickers in WebCT Vista (See Adding iClicker Registration to Your Course). Clickers SHOULD NOT be registered using this feature.
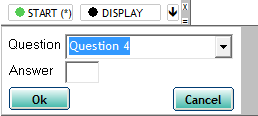
- Questions On The Fly – Use for spontaneous questions that are not part of your planned lecture without interrupting your regular presentation.
- Settings and Preferences – Change your settings without closing and reopening iClicker.
- Anonymous Question - Checking this will only record the responses of your students but NOT who voted. A star (*) will appear beside the "Start" button for anonymous questions.
- Press the X button on the top right corner to close iClicker when you are done your session.


