Documentation:Kaltura/Share and Manage Videos in Course Gallery (How To)
The Course Gallery is a central location in each course that both instructors and students can use to submit videos. The Course Gallery contains all media submitted to the course (from the Faculty Repository or My Media), or when directly uploaded into the course. This centralized locations allows an instructor to easily find, delete and manage all the content in their course.
This resource will discuss:
- Student Uploads
- Instructor Approval and Hide Videos from Student View
- Search and Filter Media
- Featured Videos
- Add the Course Media Module
- Students and Metadata
- Embedding a Video
- Mashup
Video
Effective Practices
- Utilize the search function at the top of the course gallery to assist with finding the exact video you would like to post about. There are a variety of options, including searching by name, tags and whether or not the video is featured in the course.
- Following the UBC Metadata Guidelines will assist in your organization and retrieval of videos. See the Metadata section for more tips on naming and organizing your videos.
- Feature videos on the front page of the course to bring it to a student's attention.
Student Uploads
After students upload a video to My Media, they can choose to submit the video to a course gallery of a course they are enrolled in. After they submit the video to a course, it will appear in the Course Gallery awaiting Instructor approval
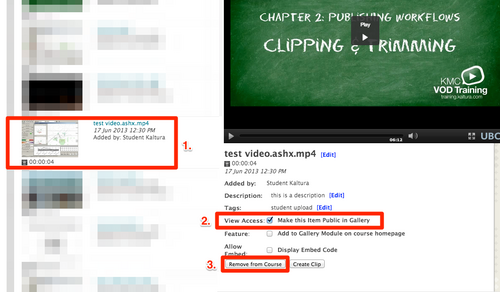
(1) After selecting a video, an instructor can choose to (2) publish it to a course, or (3) remove it from the course entirely.
Instructor Approval and Hide Videos from Student view
| The following feature is for instructors only. |
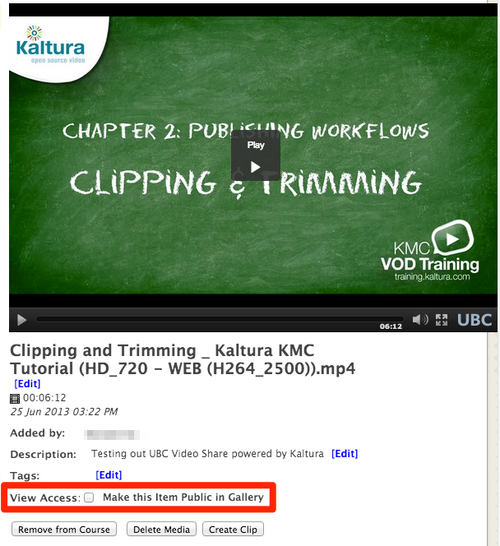
In order to hide an uploaded video you are not ready to show to the class, simply uncheck the View Access checkbox.
When the box is checked, you will be given more options to manage the video including the ability to embed the video to an external site.

Search and Filter Media
Below the Upload Media button, you can search for any media currently contributed to the Course Gallery. There are several options here that can help narrow your search.
- In the Filter dropdown menu, you can choose to search between the following items:
- All Media
- My Media in this Course
- Hidden Only
- Featured Only
- Saved Search
- In the Search dropdown menu, you can choose between the following options:
- All metadata
- Title
- Tags
Choosing these options will limit your search to the options chosen. Type the query into the Search Box beside the Search dropdown menu.
The last three buttons allow you to complete the following:
- Refresh: Complete another search with new parameters.
- Clear: Clear the search field.
- Save Search: Save the current search and its parameters for future use.
Featured Videos

After you make a video public, you can also choose to feature this video. This allows you to highlight videos that you feel students should watch. You can use this to highlight new videos an instructor or a student has uploaded, or you can choose to highlight an example video for an assignment for the class. The featured video appears in the Course Media module on the home page.
Add the Course Media module
After featuring a video, you need to add the Course Media module on a course module page. If not, the featured videos will not appear in a special location. To turn on the module:
- Begin in the course module page and make sure you are in edit mode.
- Click the Add Course Module button, near the top of the screen.
- In the search box on the left, search for Course Media.
- Once the results appear, click add to the result. The module will appear at the bottom of the course homepage.
Students and Metadata
When uploading media onto Kaltura, naming methods may vary on the files themselves. UBC recommends following these following guidelines to assist human readability, provide consistency across videos on Connect, and help make videos easier to locate through tagging.
Titles
- Use sentence case – only uppercase the first letter of the title, proper names (people, places) and acronyms.
- Drop initial articles like “A” and “The”.
- Separate a sub-title from the title proper with a colon (:)
Tags
- If possible save this tag for subject keywords only
- Separate the words or phrases with a comma.
Description
- Include items such as the date or the affiliation of the video creator/uploader.
- This may also be used for an abstract or brief summary of a resource, a table of contents, etc. It can also been used to record notes about the resource.
Embedding a Video
Instructors can enable course participants to embed videos contributed to a Course Gallery to an external site, blog or any page that accepts HTML (ie: websites, blogs, etc.)
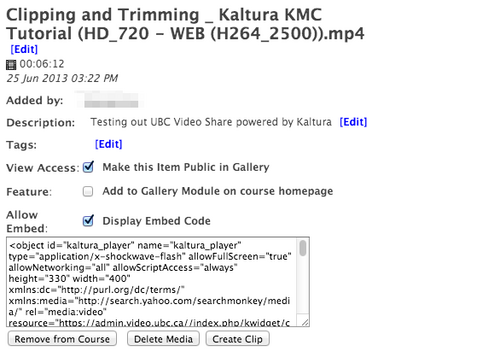
Embedding a video is as easy as enabling a checkbox. Make a video public in the Course Gallery and more options will appear, allowing you to check off the embed code option. This will display the embed code, which users can copy and paste the video into any desired destination.
Mashup
Kaltura Media Mashup allows you to integrate media into your text. You can place videos to assist you in providing your students with a better understanding of what you want, what an example would look like, and give them a clearer picture that you couldn't have done otherwise with text, or photos alone.

- Start by creating a new assignment post for example. This process also applies to other Connect tools and items where the Content Editor is available.
- In the Content Editor, if the chevron is pointing down, click it to access the expanded toolkit.
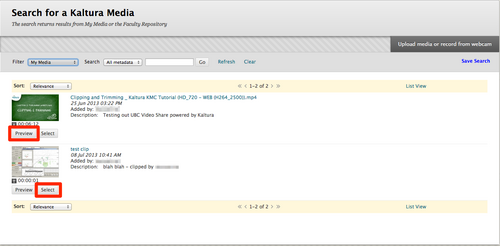
- Click the Mashups button and choose Kaltura Media. In the Search for a Kaltura Media window, choose the video you would like to add. You can search using the guidelines described in the Searching and Filtering Media section above.
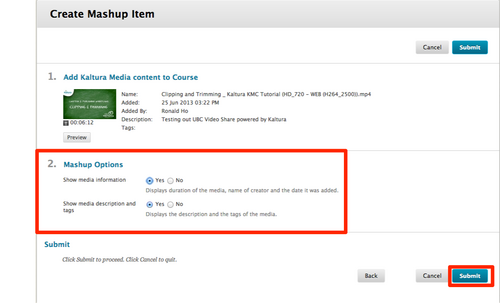
- After selecting a video, Kaltura will present more options for you to choose about your video. For example, you can have Kaltura display only the video, without its metadata.
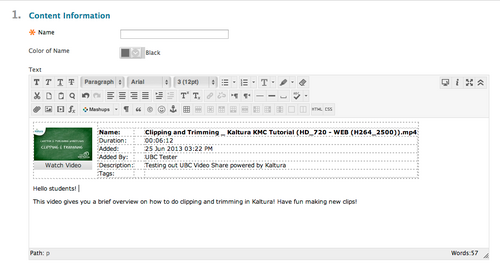
- After selecting all the options, Kaltura will return to the editing page to allow you to add more content.
- When you are finished, click Submit and your post will be published.
