Documentation:Kaltura/Create and Upload a Video From a Webcam (How to)
Instructors and students can record and upload videos from a webcam directly in Connect for various purposes such as user generated content, an assignment submission, a lecture recording, and class summary.
This document includes:
- Questions About Copyright
- Video
- Best Practice
- Record and upload using webcam feature in Kaltura Uploader
- Access the Kaltura Uploader webcam feature via the Mashups feature
- Other ways to access Kaltura Uploader webcam feature
| This page has been archived for reference purposes and is no longer being updated. You can view this page’s version history.Connect was decommissioned on August 31, 2018, and was replaced with the online learning platform Canvas. Information about Canvas and supported learning technology integrations is available on UBC’s Canvas website for instructors. |
Video
Effective Practices
- Make sure a mic is close to you and that the recording site is quiet to ensure quality sound.
- Test your audio for sound, pace, and clarity.
- Use the preview button to ensure the video recording is to your liking before publishing.
- Create a script before recording the audio.
- Assign video categories and add metadata to easily locate files later. Check out the Kaltura Guidelines for Metadata for best practices on metadata.
- Create a standard hashtag for your course and notify all course members about it.
- You can use the clipping tool to trim the beginning of a webcam recording.
- It is important to realize that videos uploaded is owned by one person and not the course. Ownership rights allow you to edit, delete, and reuse content. Therefore if your TA uploads media into the course, s/he is the sole owner.
- Regarding ownership and copyright of media please refer to copyright.ubc.ca.
- (Instructor Only) To transfer ownership to another instructor please contact the UBC IT Help Desk.
- (Instructor Only) Enable Course Gallery as a tool link visible to course members as it promotes sharing of group project videos and acts as a gallery of all videos in a course for students to search through.
Access the Kaltura Uploader webcam feature via the Mashups feature
When creating a course item, use the Mashups button ![]() located in the content editor.
located in the content editor.
- In the content editor, click the Mashups button.
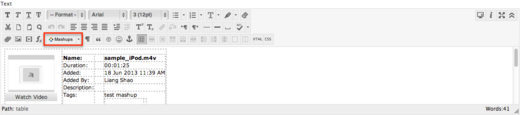
The Mashups button highlighted in the content editor.
- Select Kaltura Media from the drop-down menu and the Kaltura Uploader window will appear. Once the Kaltura Uploader appears please refer to the following section for how to record and upload using webcam feature in Kaltura Uploader.

Record and upload using webcam feature in Kaltura Uploader
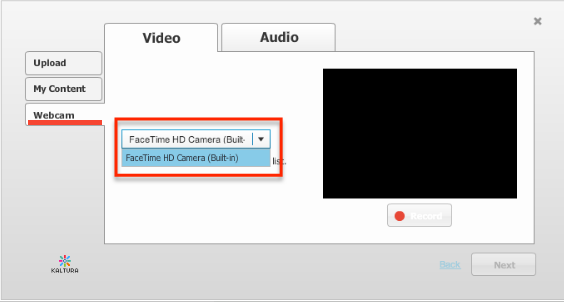
- Once the Kaltura Uploader opens, select the Webcam tab from the left side of the window. Click Allow if a flash player message is displayed. Click Allow if your browser prompts permission for webcam use under the bookmarks and web address.
- Select your webcam from the list to the right of the Webcam tab. Click the Record button. Note that this record button does not begin recording yet.
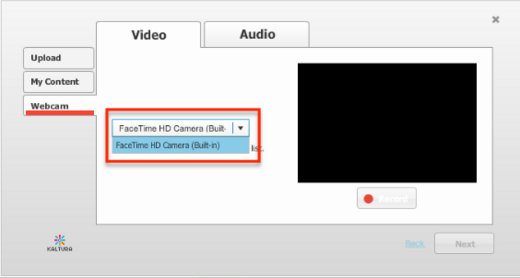
Select your webcam from the list on the right.
- Confirm the Copyright and Privacy conditions for your video by selecting various options and click Ok when finished.Important Note: When you click OK, you will immediately begin recording. You can use the clipping tool to trim off the beginning of a webcam video or record again on the next page.
- When recording you will also notice the time stamp of the recording on the top right hand corner. To finish, pause, or stop, click Stop. When you stop the recording:
- a. (Optional) To view the recording, click Play.
- b. (Optional) To record again, click Record.
- c. To upload the recording, click Next.
- Enter metadata in the fields (title, tags, description). For guidelines on metadata, click [1].
- Click Next. Your video will be stored in My Media.
- Student: On your My Media page, you can choose to allow clipping, select public access, add your video to the Course Gallery, and delete the video. When students add media to Course Gallery from My Media, it is first added as hidden until approved by an instructor. This is used to moderate students uploads.
- Instructor: On your My Media page, you can allow clipping, select public access, contribute to the Faculty Repository, add your video to the Course Gallery and delete video.
Other ways to access Kaltura Uploader webcam feature
You can also access the Kaltura Uploader webcam feature from Course Gallery and My Media.
- To record and upload a webcam video in the Kaltura Uploader in Course Gallery or My Media, click Upload media or record from webcam located on the left side. Once you have done so, the Kaltura Uploader will appear.
- When the Kaltura Uploader appears follow the steps in the section for Record and upload using webcam feature in Kaltura Uploader.
Related Links
- Kaltura Toolkit
- Upload a Video (How to)
- Kaltura Video Building Block 4.0 for Blackboard 9 Quick Start Guide
- Course Gallery Quicksheet
- Share and Manage Videos in Course Gallery (How to)
- Media Quicksheet
- Contribute to Faculty Repository (How to)
- Create a Clip (How to)
- UBC Copyright Guidelines
- Kaltura Overview Quicksheet
- Manage Videos in My Media (How to)