Help:Infobox
What is an Infobox?
An infobox is a fixed-format table usually added to the top right-hand corner of articles to consistently present a summary of some unifying aspect that the articles share and sometimes to improve navigation to other interrelated articles. Infobox are often like fact sheets, or sidebars, in magazine articles. They quickly summarize important points in an easy-to-read format. On the UBC Wiki they are often used to help organize course pages and projects.
| Note: Creating an infobox template will be all done in wikitext mode/wiki mark up mode. |
Example of Infobox:
If you are only planning to use Infobox template to one few pages, Adding infobox manually section.
Step 1:Open this documentation on separate tab, and use the Create an infobox using the box below
| Note: Open this documentation (https://wiki.ubc.ca/Help:Infobox) on the separate page/tab so that you can follow through the steps while creating an infobox. |
From the box below, type the name of the infobox.For example: "Resource Guide" and click on create a new infobox
Step 2:Create a documentation for the infobox
At this point, you have already created an infobox. It will look something like the screenshot below. The next step is to create a documentation for the infobox.
1.
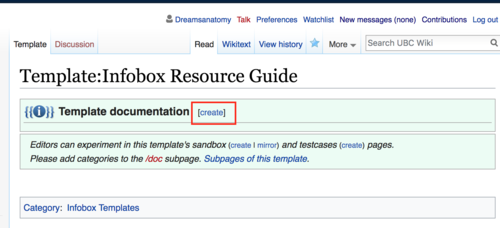
Click on create beside the green Template documentation box.
2. On the template documentation page that you are about to create, copy and paste the code below. Replace the part of the code that says Put-the-name-of-the-infobox-here to the page of your infobox. (For example, if your inbox is called Resource Guide, then it will look something like {{Infobox Resource Guide}}
This is the template page for resources related to the Name of the resource/course.

==Usage==
This  template is a general infobox used for resources related to the website page

==How to use==
To include an Infobox name-of-the-infobox in your article, copy and paste the following code onto your page.

<nowiki>{{Infobox Put-the-name-of-the-infobox-here}}</nowiki>

==Example==

{{Infobox Put-the-name-of-the-infobox-here}}
3. Edit the message according to the template that you are creating. Then press save
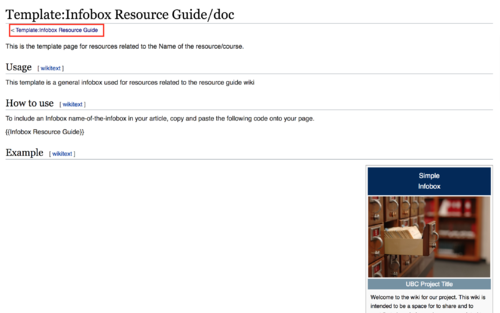
4. After you save, it will look something like below. Then click on the breadcrumb below the title of the page to go back to the template.
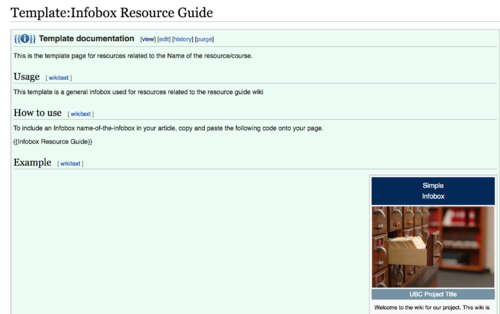
5.When you go back to the template, your template page will look something like the image below:
Step 3: Customize the infobox template
Now the final step is to customize the infobox template. Follow the step below depending on the text you would like to change:
Replace the text(Title, subtitle and headings within the infobox)
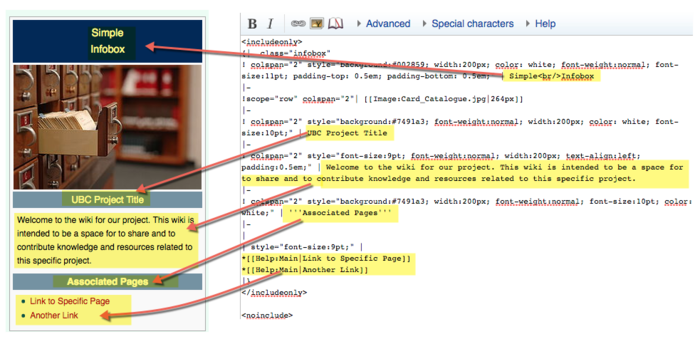
Replace the Title text
Replace the text that says Simple<br/>Infobox with the title of the Infobox
Simple<br/>Infobox
For example,if you want to change the title to Resource Guide Infobox:
Resource Guide<br/>Infobox
Replace the subtitle text
Replace the text that says UBC Project Title with the subtitle of the Infobox
UBC Project Title
For example, if you want to change the subtitle text to Resource Guide, it will look something like:
Resource Guide
Replace the project description text
Replace the text that says "Welcome to the wiki for our project.... this specific project" with the project description
Welcome to the wiki for our project. This wiki is intended to be a space for to share and to contribute knowledge and resources related to this specific project.
For example, if you want to add your project description, it will look something like
Welcome to the Resource Guide wiki page. This wiki is intended to be a space for to share and to contribute knowledge and resources related to Resource Guide.
Replace the "associated page" text
Replace the text that says "associated page" with another text
'''Associated Pages'''
For example, if you want to change the Associated Pages text to Related Pages, it will look something like this:
'''Related Pages'''
Replace the link within the text
Replace the link that says
*[[Help:Main|Link to Specific Page]]
*[[Help:Main|Another Link]]
with another link.
For example:
*[[Help:Contents|Wiki Help]]
*[[Documentation:Resource_Guide|Resource Guide]]
*[[Documentation:Resource_Guide/Getting Started|Getting Started]]
Replace the image within the infobox

In order to replace an image, replace:
[[Image:Card_Catalogue.jpg|264px]]
with another image. For example, if you want to replace an image to http://wiki.ubc.ca/File:Open_UBC_card.png , it will look like this:
[[Image:Open_UBC_card.png|264px]]
To learn how to customize the image more, please refer to Help:Adding_Media/Images_and_Pictures#Adding_a_Picture_to_a_UBC_Wiki_Page_using_wikitext
Change the color within the infobox
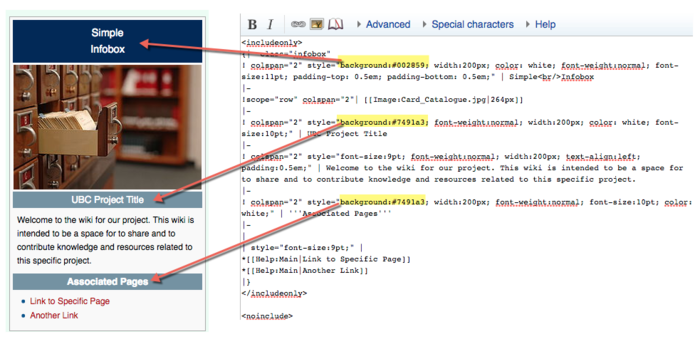
You can change the color within the infobox by changing the part that says background:#.... . You can replace color with any HTML/Hex color code. To look for HTML color code, use the online picker here https://htmlcolorcodes.com/color-picker/
For example, if I want to change the background color in the infobox title text to dark red (Hex color code - #5D1000), and subtitle text and "Associated Pages" to lighter red (Hex color code - #BD5039 ), it will will look something like this:
<includeonly>
{|  class="infobox"
! colspan="2" style="background:#5D1000; width:200px; color: white; font-weight:normal; font-size:11pt; padding-top: 0.5em; padding-bottom: 0.5em;" | Simple<br/>Infobox
|-
!scope="row" colspan="2"| [[Image:Card_Catalogue.jpg|264px]]
|-
! colspan="2" style="background:#BD5039; font-weight:normal; width:200px; color: white; font-size:10pt;" | UBC Project Title
|-
! colspan="2" style="font-size:9pt; font-weight:normal; width:200px; text-align:left; padding:0.5em;" | Welcome to the wiki for our project. This wiki is intended to be a space for to share and to contribute knowledge and resources related to this specific project.
|-
! colspan="2" style="background:#BD5039; width:200px; font-weight:normal; font-size:10pt; color: white;" | '''Associated Pages'''
|-
|
| style="font-size:9pt;" |</includeonly>

*[[Help:Main|Link to Specific Page]]
*[[Help:Main|Another Link]]
|}
Alternative Method:Adding infobox manually
If you do not intend to re-use infobox in multiple places, the method below will be more releavant.
1. Copy the code below:
{|align="right" class="infobox" style="border-width: 1px; border-style: solid; width:300px;"
! colspan="2" style="text-align:center;background:#002859; color: white; font-weight:strong; font-size:12pt;" |
|-
| colspan="2" style="text-align:center;width:300px;" | You can insert an image here.
|-
| colspan="2" style="text-align:center;background:#002859; color: white; font-weight:normal; font-size:9pt;"| '''About'''
|-
| colspan="2" style="font-size:9pt; padding-left: 5px;" |
|-
| colspan="2" style="text-align:center;background:#002859; color: white; font-weight:normal; font-size:9pt;" | '''Main Contact'''
|-
| style="font-size:9pt; text-align: right;" | ''website:''
| style="font-size:9pt; padding-left: 5px;" |
|-

| style="font-size:9pt; text-align: right;" | ''Main phone:''
| style="font-size:9pt; padding-left: 5px;" |
|-
| colspan="2" style="text-align:center;background:#002859; color: white; font-weight:normal; font-size:9pt;" | '''Main Location'''
|-
| style="font-size:9pt; text-align: right;" | ''Address:''
| style="font-size:9pt; padding-left: 5px;" |
|-
| style="font-size:9pt; text-align: right;" | ''Building:''
| style="font-size:9pt; padding-left: 5px;" |
|-
|}
2. Paste this code to the wiki page that you want to add an Infobox
3. Change the infobox accordingtly. To learn how to edit the table, see Help:Tables