Documentation:Wimba Voice Tools/Voice Direct
Voice Direct
Wimba Voice Direct helps facilitate online meetings and synchronous discussions between instructors and students. You can hold conversations in real time through this audio conferencing tool in your WebCT Vista course. We will walk you through on setting up and using Wimba Voice Direct in your WebCT Vista Course. Setup requires access to the BUILD tab. If you don't please consult with your Faculty's Instructional Support Unit.
Setting Up Voice Direct

Please login into WebCT Vista and choose the course you want to work with. Once you are in your course:
- Click on the BUILD tab on the upper left-hand corner.
- Under COURSE TOOLS' on the left-hand sidebar, choose COURSE CONTENT to go the course's home page.
- In the middle of your screen, click on the ADD CONTENT LINK to open a drop-down menu of tools arranged alphabetically.
- Choose VOICE DIRECT and click on the CREATE VOICE DIRECT button.
- A new window will ask you to give a TITLE for Voice Direct. Write in a title that will make sense for you and your students in relation to the activity you want to do. You can change the title later. Click CONTINUE wen you are finished.
Settings

After adding Voice Direct to your course, you will be brought to a new window where you can choose a few options on how you want to use the tool.
General Settings
- Title: Provide a name for Voice Direct. It can be the activity you want to do or the name of the assignment.
- Description: Write a more detailed description of the activity you want to use the tool for such as assignment instructions, discussion expectations or your office hours.
Audio Settings
- Audio Quality: Set the audio quality of Voice Direct by choosing between Basic, Standard, and Good. Keep in mind though that the higher the quality, the more data is transmitted. Everybody has different levels of access to the technology and Internet speeds. It is recommended that you set the quality at STANDARD to reduce barriers to access.
Detailed Settings
- Archives: Checking this box gives instructors the option to archive a Voice Direct session. Both students and instructors can review archived sessions.
Once you have chosen all your settings, just click CONTINUE and Voice Direct will be added to your course homepage or your COURSE CONTENT page. If you'd like to change any of the settings in the future, just go into Voice Direct and search for the EDIT SETTINGS link on the upper right-hand corner of the screen.
Using Voice Direct

Voice Direct has a very simple user interface that makes it easy for a lot of people to use. Let's go through each of the areas and tools to help you familiarize with Voice Direct.
- Archives: Click on this button to go to the Voice Direct archives for your course. You will be brought to another window where you can review and export previously archived discussions.
- Options: Choose when to start and stop archiving a discussion or session on Voice Direct. Only instructors have access to this feature.
- Chat History: Found in the middle of the page, the Chat History box contains all the typed discussion by the participants. It also indicates if the session is being archived or not.
- Chat Entry Box: Below the Chat History box is the area where participant can type in text for discussion.
- User List: On the right-hand side, you will see a list of participant currently using Voice Direct.
- Talk: The talk button is denoted by an open-faced hand. Click it once to start talking. Only one participant can talk at a time and will have the microphone icon right beside their name in the user list.
- Stop: Denoted by the large X symbol, click on this to stop talking.
Students have the same view as the instructor with the exception of the OPTIONS button. As mentioned before, the instructor is the only who can archive a session.
Calendar

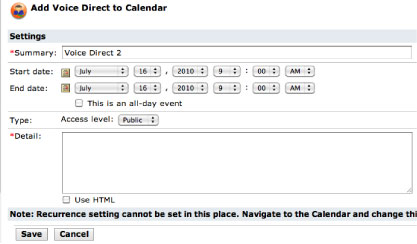
On the upper right-hand corner of the screen beside the EDIT SETTINGS link is the ADD TO CALENDAR feature. You can add Voice Direct activities to the course's calendar.
You will have to provide a name for the calendar entry, when the activity starts and ends as well as a detailed description of the activity such as instructions.
When you're finished, just click SAVE and you will have an entry in your course's calendar.
Unfortunately, the calendar feature does not automatically take down Voice Direct once the deadline has passed. If you want to hide Voice Direct from your students:
- Go to the TEACH TAB and choose COURSE CONTENT under Course Tools
- Click on the drop-down arrow beside the Voice Direct link
- Choose HIDE ITEM to hide Voice Direct from your students
- To check, go to the STUDENT VIEW TAB