Documentation:Wimba Voice Tools/Podcaster
Wimba Podcaster
Wimba Podcaster helps you to easily produce podcasts for your classes through your WebCT Vista course. Once students subscribe, they can easily receive and download new episodes to their music player. We will walk you through on how to make your own podcasts using Wimba Podcaster. For more information on podcasting in general, visit our Podcasting Basics page on the e-Learning at UBC.
In order to add Podcaster, you need access to the BUILD TAB. If you don't, please contact your Faculty's Instructional Support Unit.
Adding Wimba Podcaster

Login into Vista using your CWL. Choose the course you want to work with and do the following steps:
- Click on the BUILD TAB found on the upper left-hand corner of the window.
- Under the COURSE TOOLS, open the COURSE CONTENT page.
- In the middle of the page, press the ADD CONTENT LINK button and a drop-down menu will appear. It alphabetically lists all the tools you can add to your course.
- Click on the WIMBA PODCASTER link and then click CREATE WIMBA PODCASTER.
You will be brought to a new window where you will be asked to give a name to Wimba Podcaster. It could be the name of an activity you are planning on doing or the name of podcast series you will be recording. In any case, you can always change the name at a later time.
Once you are finished, just click CONTINUE and you will then be able to choose the settings you want.
Settings

When you've given a name to Podcaster, you can customize its settings to suit your needs.
General Settings
- Title: You are required to give the Podcaster a name. Again, it can be the title of your program or the activity you want to do.
- Description: Provide a short description on what the podcast will be about or instructions on how you want students to use the tool.
Audio Settings
- Audio Quality: Set the recording quality between 4 different settings namely, Basic, Standard, Good, and Superior. Take note that the better sound quality creates more data and not all students will have the same level of access to technology or Internet speeds. It is recommended to keep the setting at STANDARD to reduce barriers to access.
Detailed Settings
- Allow students to post to podcast: Checking the box will allow students to record their own messages either on a completely new but related topic or as a response to your podcast. Keep in mind that any new messages will be available for download for all class participants.
- Display short message titles: Only display the message's title and author. Currently this setting is not supported.
- Podcast auto-publish after: Delay the publishing of any message enabling you to edit them. Messages can be delayed as long as 1 hour.
Once you've chosen all of your settings, just click CONTINUE and Wimba Podcaster will become available for instructors and students.
Creating a New Podcast

Now that you have added Wimba Podcaster to your WebCT Vista course, it is time to start creating a new podcasts!
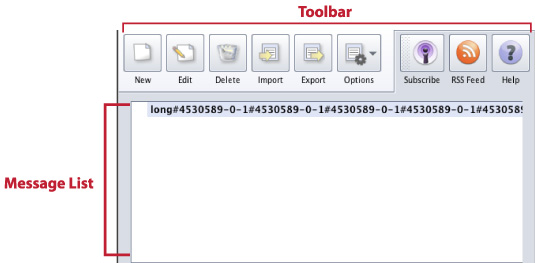
Familiarize yourself first with the user interface, especially the Toolbar.
Toolbar and Message List
The Podcaster Toolbar can be found on the top of the page and it has the following functions:
- New: Create a new message or podcast recording.
- Edit: Edit the title, description, and recordings of any message on the Message List. Take note though that students need to redownload edited podcasts to hear or see any of the changes. Only instructors can edit messages or podcasts.
- Delete: Remove any message from the Message List area.
- Import: Bring in previously recorded material from your computer. Files must be 10MB or smaller and in the following file formats: mp3, wav, and spx.
- Export: Export all or specific messages as mp3, wav, spx, or wvb file formats.
- Options: Choose to either play messages as you click them or play all of them continuously.
- Subscribe: You or your can click on this button to automatically open iTunes and add the Podcaster activity in your podcast lists.
- RSS Feed: If you or your students want to use other tools to subscribe to this podcast, you can click on the RSS Feed and pull that into other applications such as RSS Readers.
- Help: Provides a description on what will happen when you subscribe to Podcaster.
The Message List is right below the Toolbar. It's where all messages from both you and your students will appear.
New Podcast Message

Now that you've familiarized yourself with the Toolbar, you can start a new podcast by clicking on NEW to open the recording window.
- Click on the small square icon on the right hand side of the window's control panel to check if the right devices are being used for both your microphone and speakers. Podcaster will be using the ones with a check mark beside them.
- Provide a subject to this recording so listeners will know what it will be about.
- Provide a description to listeners such as a short introduction or instructions.
- Start recording by clicking the RECORD button. When are finished just click the STOP button.
- Go over the subject, description, and recording for a final review. Click POST to publish the new podcast and make it available for students to download.