Documentation:UBC Blogs/nsync
What is nsync?
nsync is a plugin that allows to syndicate UBC Blogs, which allows you to create connected course similar to this site.
Note: In order for this plugin to work, you will need to make sure that:
- you have created the main course site through UBC Blogs (NOT UBC CMS). This site will be used as a "central hub" to connect students' blog posts in one space.
- your students have an access to your blog as a Subscriber, Group Leader, Contributor, Editor, Author or an Administrator. Giving an access to the students to your course blog allows you to provide
- your students create their blogs through blogs.ubc.ca
If you intend to syndicate blogs that are not from UBC Blogs (For example your students will use external blogs) , and/or your site is created using UBC CMS, you may want to try syndicating the blog with another method. We will go through the process in the steps below.
Step1: Let your students create their blog and give them access to your main course site.
- Ask your students to sign up at http://blogs.ubc.ca/ to create their own blog.
- Add your students to your main course site using the Add User Widget plugin or via email. You can add your students as either Subscriber, Group Leader, Contributor, Editor, Author or an Administrator depending on the level of the access to you want students to have. See here to learn more about the level of access you can give to your students.
Step 2: Activate the plugin in the main course site and set up
- Login to your main course site. Go to Dashboard>Plugins and activate Nsync 1.1
- Go to Dashboard> Post>Categories to add new category. For example "Students' voice" or "Blog Hub "All of the syndicated blog posts will go to this new category.
- Go to Dashboard>Settings>Writing. Beside Network Sites Publisher you will see three main tabs. The three main tabs are Current, Add Sites and General. Under the current tab you should see “There are currently no external sites that are able to publish content to your site”. The reason you are receiving this message is because you have not chosen any sites to publish content.
- Click on the Add Sites tab. You will now see all the modules that allow you to add publishing sites to your network.
- Type in a keyword that would be included in the sites url you are looking for. Click on search and you will see all the network sites with that keyword in the url. You can quickly select a group of sites this way or click uncheck all and select manually.
- Under the Available Publishing Sites you can see all the sites you belong to and select one/many which adds it/them to the publishing list.
- Under the User List you can click on the user name and view all the sites this specific user belongs to. You can then check which ones you want to add to the publishing list. you may want to double check with your students which blog will they want to use for the course.
- After selecting the sites you want to be able to publish to your network, click on the Save Changes button found at the bottom of the page. You will be redirected back to the Current tab. All the sites you had checked previously should appear under the Current Publishing
Making changes to the options (optional)
- Click on the General tab. Under the general tab you will find settings for the posts that are being pushed to your site. Under Category for Nsync you can select a category that will automatically be added to every pushed post. By doing this it ensures the post will show up in the selected category archive page. Under Post Information there are many settings:
- Select Post Status - All posts being pushed to your site will be given set status
- Copy attached files – Files attached to the students pushed post will be copied over to your sites uploads.
- Only Authors, Editor and Administrators can publish - Only users of the mentioned type can push their posts to your site.
- Restrict source categories – All categories the students post have that your site does not, will be ignored. If not checked, any category the student attach to their post will be created on your site.
- Make permalink go to original – When a user is on the archive of the selected category and the user clicks on the title of the post that was pushed. Then the user will be redirected to the original post on the students site.
- Show source before – Displays the source of the original post before the main content of the post.
- Show source after - Displays the source of the original post after the main content of the post.
- Template – One can change the way the source link displays on the posts.
2. You can save all your settings by clicking on Save Changes at the bottom of the page.
Step 3: Ask your students to publish a blog post
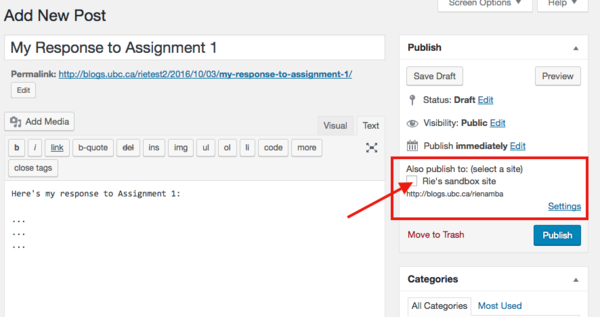
Now your course site is ready to be syndicated. If students want to show up their blog posts to the main course site, they can just tick on the name of the course site which is located under Publish. (See the screenshot below)

Step 4: Check your students' blog posts
All of the syndicated blog posts will be published as a post on your site . If you don't see students' post, double check if your students have published to the course site in Step 3: Ask your studnets to publish a blog post.
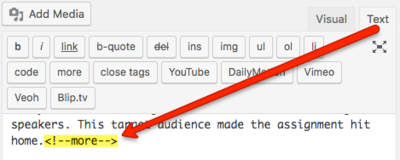
If you want to display only an excerpt of the students' posts to make the reading easier, you can insert a read more option into their post. Edit a student post in your blog site and In the text editor, paste the following shortcode:

Here is how it looks in the live view of your blog site:

Additional Information
- You can see what posts have been pushed to your site by going to the left menu and clicking on Posts. When you hover over the posts in the table, the ones that have been pushed to your site will show -

- As a student you can see what posts you have pushed by going to the left menu and clicking on Posts. When you hover over the posts in the table, the ones that have been pushed will show -

- When posts are copied over they keep their revision history. To see when a student has last edited and pushed their post to your site do the following.
- In the left hand menu click on Posts
- Click on the post in the table you want to check
- Under the posts text editor there should be a Revisions module. If there is not then at the top of the screen click on Screen Options and check the Revisions checkbox.
- All the revision history on the pushed post can be seen.
- Click on a date listed in the revision history. You can now compare the post to the previous version. You can see what was changed.
Additional Resources
Nsync - Arts ISIT has useful resources on how to use Nsync in a course.