Documentation:REEF/Information for Instructors
Software Download
To start, download REEF Education from here.
Setting Up the REEF Education Software
- Open the REEF Education software.
- Create an account or log in with your existing REEF account.
- Create a new course by clicking on the "New Courses" icon on the top menu bar.
- Click on "Create" after inputting the institution and course information. Make sure to type in the full name "University of British Columbia" and select your campus.
- 5. You can click on the "Settings" icon then "REEF:Polling" to configure your settings for polling and scoring.
- You can modify the options under the "Polling" tab to choose whether and when you want to send a picture of your screen and class results to student's devices.
- For example, students can view the screenshots and the results after the in-class polling and use this as a study guide if you select "Automatically whenever polling ends" for both the "Screenshots" and "Results" options.
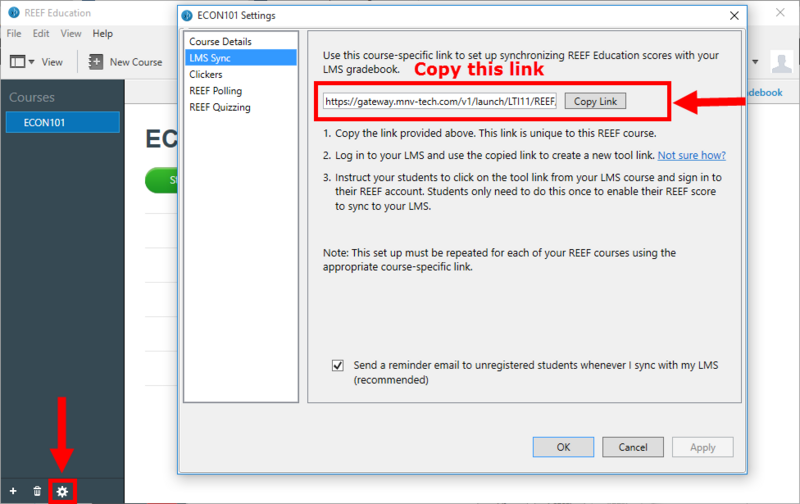
- 6. To link your REEF course with Connect course, click on the "Settings" icon.
- Go to the "LMS Sync" tab and click on "Copy Link".


Syncing with Connect
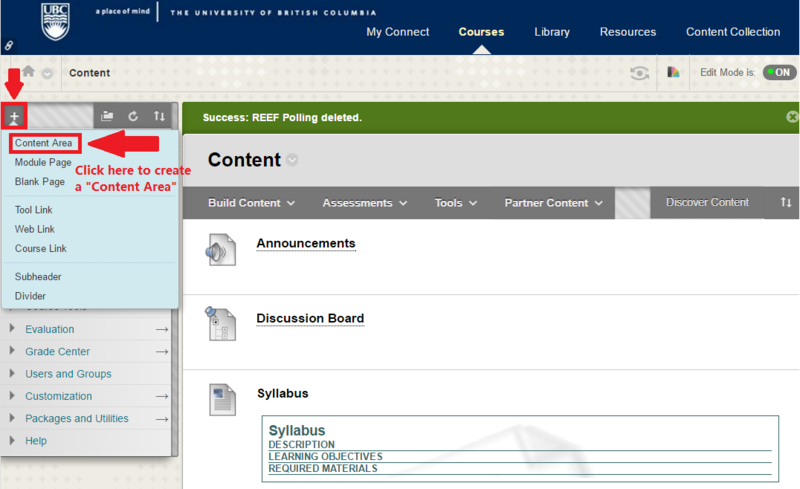
- 1. Login to UBC Connect and go to the Course Content page
- a. If you do not have a Content page available, go to the "+" on the left side tool bar to select "Content Area" from the drop down list
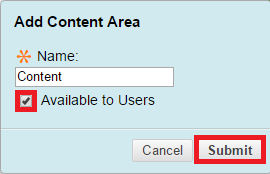
- b. Name it "Content", and check off the box for "Available to Users"
- 2. Go to "Tools" and select the "Basic LTI Tool" from the drop down.
- 3. Choose the "By URL" tab.
- 4. Name your tool link for REEF and paste the link copied previously from REEF software to the Launch URL text box.
- 5. You can modify the "Grade Column Options" here as well.
- 6. Click "Submit" when you are done.
- 7. Instruct your students to go to http://wiki.ubc.ca/Documentation:REEF/Information_for_Students to connect their REEF account with UBC Connect.
- IMPORTANT: Failure to link the REEF account with UBC Connect will result in incorrect grades for the student.
- Students using physical clickers will also need to go through the same steps above to sign up for a REEF account then register their clicker there.


Using REEF Education in your class
- Open the REEF Education software and sign in to your account. You should only check off the automatic sign-in box if you are using your own laptop.
- Plug in the iClicker base if you want to allow students to use their physical clicker to participant. The students will only be able to respond to the multiple choice questions using the physical clickers.
- Click on "Start Polling Session" so your students can join the session on their mobile devices. The REEF menu window gives you 3 options: POLLING, RESULTS, and ATTENDEES.
- 4. Click on "ATTENDEES" to view the students that have joined the session.
- 5. Click on "POLLING" to bring up the REEF Polling toolbar.
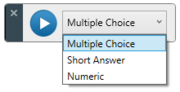
- You can select the appropriate question type here and click on the blue start button to collect responses: Multiple Choice (A-E), Short Answer (maximum 140 characters), and Numeric (0-9, - . ^ E; maximum 8 characters).
- The toolbar will turn into a timer, and you can click on the red stop button once polling has ended.

- 6. Click on "RESULTS" to show the result chart, you can then click on the correct answer to grade the question. You can mark more than one answer as correct.
- 7. After you have completed polling for the class, make sure you quit the session completely by exiting the REEF menu window using the "x" on the top right corner. Confirm that you want to end the session.
- 8. You can now close the REEF Education software and your session data will be saved to your REEF account.


After your class
- Open the REEF Education software.
- Under the "Session History" tab, you can view and grade each session by clicking on its name, and export the grades into a .csv file by clicking on "Export All".
- Update the roster by going to the "Roster" tab, then click on the "Refresh" icon on the top menu bar.
- 4. Click on "Sync Scores to LMS" to send scores to Connect's Grade Center.
- "Total %" is the running total as a percentage for each student. This is the grade that will be synced to the REEF column in Connect's Grade Center every time you sync.
- The green dot in the "LMS" column indicates successful synchronization with Connect for the student.
