Documentation:Pterygopalatine Fossa VR
Introduction
Background
Dissections have been among the best tools in anatomy education. However, they are expensive and have limited use when trying to reach deep, small, detailed structures. One such area is the Pterygopalatine Fossa, an important super-junction of nerves and blood vessels in the skull. Where dissections fail, the burden is placed upon students to visualize these dynamic, three-dimensional objects from static, two-dimensional photos. As such, there is a clear need for advancements in this field of education.
Objective
To create an interactive educational virtual reality tool to aid anatomy education with regards to the Pterygopalatine Fossa. Stretch goals include expanding to other similarly small, complex, and important areas in the body.
Why Virtual Reality?
Our experience of the world is in three dimensions. Thus to learn about real world objects, a three-dimensional space is a potent asset. Dissections use the real world as said space, but are limited by real world constraints. Technology can bypass real world constraints through projecting three dimensional models onto two dimensional interfaces, such as computer monitors. But these are limited by the disparity in dimensions and difficulty in mapping controls. In Fossa Finder, the Pterygopalatine Fossa is a defined space that the user can enter and explore — an experience made possible only with virtual reality.
Primary Features

The primary features in this application were chiefly developed to give a sequential display of the following anatomical points of interests inside the Pterygopalatine Fossa:
Bone:
- Pterygomaxillary fissure
- Sphenopalatine foramen
- Foramen rotundum
- Pterygoid canal
- Palatovaginal canal
- Superior orbital fissure
- Palatine canal
- Inferior orbital fissure
Nerves:
- Maxillary nerve
- Nasal nerve
- Orbital branches
- Zygomatic nerve
- Middle superior alveolar
- Infra-orbital nerve
- Posterior superior alveolar nerve
- Greater and lesser palatine nerves
- Pharyngeal nerve
- Nerve of the pterygoid canal
Labels and Demarcation
Each of the above points of interest have their own dedicated (1) label and (2) demarcation.

Labels have two functionalities: (1.1) can be triggered by the user and are disabled automatically as the application transitions from one scene to the next, and (1.2) tilt their angle to adjust to the user’s headset to ensure legibility and visibility.
The points of interests are (2) demarcated by a uniquely coloured ‘highlight’ that emphasizes the shape of the anatomy. ‘Highlights’ change their colour by having their material enabled and disabled - enabled when the highlight demarcating point of interest is the focus on a given scene, and disabled when the highlight is no longer the focus. This reduces the cognitive load of both the user and the student, and concentrates attention on anatomy under consideration.
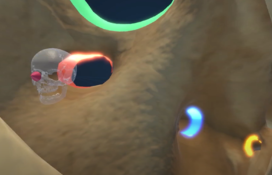
Fossa Finder gives students the ability to experience the P. fossa as a physical space, giving this otherwise inaccessible part of the skull dimension and navigability. To further emphasise this spatial dimension, navigation aids such as a skull ‘compass’ or ‘zoom out’ options are available for users to relate anatomical structures on varying scales and perspectives and to orient themselves relative to their current position inside the P.fossa.
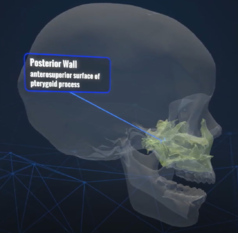
In order to give a consistent experience, navigation of the P. fossa is constrained. Individual paths going to and from specific points of interest were sketched out to optimize the viewing perspective of the anatomical point of interest in question. This sequential presentation of points of interest using pre-mapped paths guarantees that all the key anatomy of the P. fossa is visited in a way that maximizes pedagogical utility.
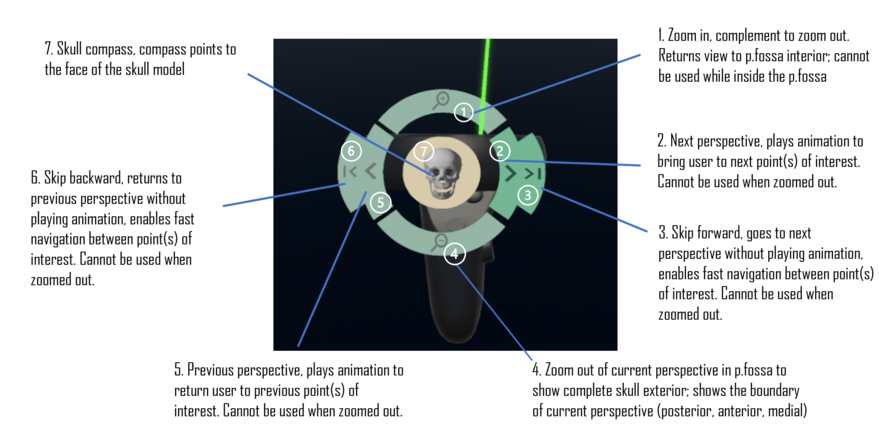
When viewing the finer structures inside the P. fossa, two orientation features are at the user's disposable: (1) a skull 'compass' and (2) zooming in and out.
(2) a visual of the entire skull can be accessed, and the P. fossa boundary that is currently being actively occupied by the user will be demarcated. This involves changing the user’s entire view, shifting the perspective from inside the fossa to the outside i.e. zooming out, and vice versa i.e. zooming in. For example, if the user is viewing the Foramen rotundum on the posterior wall boundary of the P. fossa, the zoomed out external perspective of the skull would indicate that the user is currently occupying the posterior wall boundary.
(1) a skull model can be triggered when navigating inside the fossa. This model will be attached to the controller, and shows the relative position of the user to the forward-facing portion of the skull, i.e. facie. A waypoint arrow indicates the direction of the face, and aligns itself to the skull model that the user is occupying. This is analogous to a compass, where ‘NORTH’ is the face of the skull.
Radial Menu
A radial menu interface was designed for easy access to the core features mentioned above:
Dual Perspectives
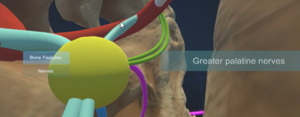
While Phase 2 utilized the exterior perspective of the nerves, Phase 3 applied a combination of the exterior perspective and a new rollercoaster approach, where the user is taken on a journey along the path of the nerve to show the beginning and end point of select nerves.
Scene Transition UI
Workflow
Anatomical accuracy
Fossa Finder is an application that rests on high anatomical accuracy and provides visualisation to the Pterygopalatine fossa. As such, anatomical accuracy was considered the highest priority and constituted the greatest challenge faced during the project cycle. Lectures were delivered virtually by the Primary Investigator (PI) Dr. Kindler to ensure all project members had basic knowledge of the subject matter at hand. Furthermore, many virtual meetings were held using third party tools such as Sketchfab to aid in the 3D modelling process, verifying the placement and structure of individual nerves within the P. fossa. Transcribed lectures, or 'scripts' written by the PI were used as principal reference material throughout the project cycle.
Scoping
In scoping out the project, Fossa Finder was divided into three phases:
Phase 1: the Pterygopalatine fossa “cave”
Phase 1 focused on the anatomical points of interest inside the negative space of the Pterygopalatine fossa. It was visualised as a physical space, i.e. a cave as we confronted a number of pain points. A photoscanned bone model containing the P.fossa (PPF_Region_v5.fbx) was used and no 3D modelling was required.
Demarcation and Labels
Pain point: Upon entering the P.fossa, an effective way of visually marking the boundaries and points of interest while maintaining visualisation was needed. All labels appeared simultaneously and were attached from a haphazard distance from the point of interest, the points of interest were demarcated by a solid green sphere.
Solution: The ‘highlight’* is a separate model created by cutting out the relevant part of the original bone model on Autodesk Maya, then importing to Unity to where the material of the model is changed, and overlaid onto the original bone models.
*Reference 'Primary Features'
Navigation and Orientation
Pain point: unrestricted navigation means that the user must use a different combination of rotating and scaling each time they wish to reach a certain point of interest -- the path to and perspective of the same point of interest changes every time. This poses several disadvantages. One, it risks the camera clipping the object plane, second, it risks an inconsistent pedagogical experience, and third, there is inherent user hardship in navigating in situ -- live in a lecture environment before an audience.
Solution: each perspective was mapped into a ‘scene’ on a ‘storyboard’ that was rigorously based on a ‘script’ written by the PI. A specified number of anatomical points of interest were earmarked to be the focus on a particular ‘scene’. In this way, all the previous pain points were circumvented to guarantee a consistent experience for both the user and viewer. This was achieved by creating dedicated animation clips transforming the bone model were created for each 'scene' using Unity's Animation window. Zooming in/out was similarly achieved by creating animation clips for exiting/entering the P. fossa for each 'scene'.
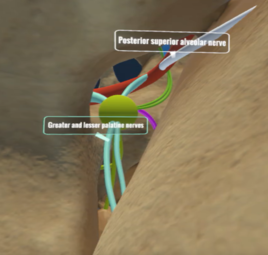
Phase 2: populating the Pterygopalatine fossa
Phase 2 focused on populating the P. fossa with a nerve model and representing the relationships between nerves and the bone structures inside the P. fossa. Unlike Phase 1, where the team started with a photo scanned model, Phase 2 involved modelling the nerve system** from scratch using Autodesk Maya. Respecting high anatomical accuracy meant that there was frequent communication between the 3D modeler and the PI. Sketchfab was used as a platform for annotation and feedback.
**Reference 'Art Assets'

Phase 3: radiating from the Pterygopalatine fossa
Phase 3 focused on the nerves’ relationship with the rest of the skull anatomy. The scope of this phase was defined to include demonstration of where the nerve begins i.e. the P. fossa, to its destination point of innervation.
Additionally, iterations on the Phase 2 prototype proposed implementation can be found:https://docs.google.com/document/d/10JjEuy_nLTs5Dv7InhXboc2YqDRP7_cuCuMpajOLTxc/edit?usp=sharing
as well as under 'Code', 'Render Texture and Phase 3'
COVID-19: developing for remote learning
Pivot to 360 Youtube Video
Midway through development, COVID-19 impacted the project and the deliverable pivoted to a 360 YouTube video due to the inaccessibility of VR equipment and implementation of remote learning in classrooms.
Livestreaming
The shift from development in VR to optimisation for 360 YouTube viewing experience was an abrupt one. As a result, many features endemic to a VR medium, and the user experience of live immersion, viewing the application in situ i.e. in a lecture environment, were lost in translation. This semester, the team proposes to find a solution that strikes a balance between the compromises made due to pandemic conditions and the original hypothesis of using the VR application in situ live proposed by the Principal Investigator. Furthermore, we aim to generalise this solution for VR pedagogical tools and promote the accessibility of such applications using live streaming, with a focus on ease of implementation for faculty members and accessibility for students.
Using second stabilized camera* in a second monitor display**, we would like to have this view be streamed to students. The proposed solution here is to apply OBS Studio. OBS Studio can be set up to stream game capture, which can in turn be live-streamed to your videotelephony platform of choice, e.g. Zoom or Microsoft Teams. Since we are using 3rd party software for this, we created detailed instructions to produce this setup to be repeatable and intuitive for people who aren’t savvy with the technology.
*Refer to 'Helmet UI' under 'Code', 'Solution to label problems: centralized labelling system'
**If the user has only one monitor display at their disposal, a virtual secondary display can be set up. This is included in the instructions.
Code
Phase 2
(May-August 2020)
Design Flaws / Limitations (deprecated)
Phase 2 implementation was optimized for the VR 360 recording, so the following issues needed to be addressed for normal usage:
- The "Look At Camera" script is not reliable: it changes the position of the label background and text based on the orientation of the headset, but not the line generated by two separate LabelDotBackground game objects. This means for labels that need to be activated in multiple scenes in phase 2, it is very likely that you will see them in one scene (e.g., the label text/background faces you) but not the other (e.g., the label still faces your direction, but the line protrudes in the wrong direction, resulting the label text/background being blocked by the skull model)
- We had a fix for this: for labels that were meant to be enabled in multiple scenes, we create multiple versions of the same label, so that we only enable one version of the label at one time (e.g., we have a label that needs to be enabled in scene 2.3 and scene 2.4. So, we create two labels, one marked for 2.3 and the other for 2.4, so that in scene 2.3, we enable the version of the label marked for 2.3, and in 2.4, we enable the version of the label marked for 2.4).
- However, this fix becomes part of the reason for the following issues ...
- We had a fix for this: for labels that were meant to be enabled in multiple scenes, we create multiple versions of the same label, so that we only enable one version of the label at one time (e.g., we have a label that needs to be enabled in scene 2.3 and scene 2.4. So, we create two labels, one marked for 2.3 and the other for 2.4, so that in scene 2.3, we enable the version of the label marked for 2.3, and in 2.4, we enable the version of the label marked for 2.4).
- Some nerve models were responsible for activating multiple labels instead of one (some will activate labels that are not within its own region; ideally, only one nerve model should be responsible for one label - its own). This is partly due to the aforementioned fix, but more importantly due to the way "Trigger_labels" is currently engineered - it will simply activate the labels based on the list of public labels you have currently.
- Also, because the collider component for each nerve and highlight game object was always enabled throughout phase 2, you could technically enable labels of nerves/highlights not meant for the current scene (e.g., a label meant to be enabled in 2.3 can be enabled in 2.5). We do not have any additional logic to prevent this at the moment.
Ideally (and hopefully), the fix to all these issues is:
- Don't create multiple label versions. Instead, we modify the "Look At Camera" script so that a) the line also moves according to the movement of the headset and b) the script moves the label according to which scene you are currently in (you can read/write the label states from/to the scriptable objects)
- Modify "Trigger_labels" so that it only needs to accept one public label game object.
- Create additional logic so that only appropriate colliders will be enabled, which prevent you from enabling labels not meant for the current scene
Phase 3
(Sept-December 2020)
Render Texture
In phase 3, the goal was to observe the nerve model from a more "exterior" perspective. The idea is that the users are still using the controllers to navigate among various perspectives/scenes around the fossa region, but instead of users constantly transforming the skull model, they still stay within the fossa region and are given a render texture to look at to gain an outside perspective of the nerve model. This is possible because the render texture captures the perspective of a camera that exists outside of the skull model, and can be animated using the VR controllers. In other words, once the users transition into phase 3 scenes, they control the animated camera instead of the skull.
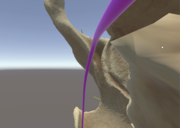
This was done:
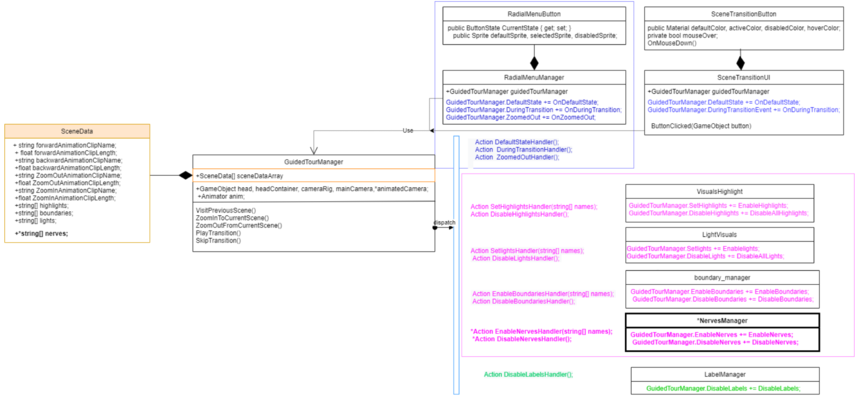
ExteriorSceneData.cs- extends normalSceneData, but has an additionalRenderTexturefield.RenderTextureManager- similar to other "managers" likeboundary_managerorNervesManager, will listen to events fromGuidedTourManagerand call the appropriate event handlers to enable or disable the render texture.

Rollercoaster Perspective
While Phase 2 visualized the exterior perspective of the nerves, Phase 3 utilized a rollercoaster approach, where the user is taken on a journey along the path of the nerve to show the beginning and end point of select nerves.
Bezier Solution
For complicated scenes such as the movement of preganglionic and postganglionic parasympathetic fibers, the Bezier Solution in Unity was used for the visualization of these nerve fibers.
Final Build
(Jan-May 2021)
Solution to label problems: centralized labelling system
In an perfect world, our user interface system would have labels that point out nerves and other features out, always being comfortably visible an never interrupting other sections of the project. For the reasons describe above this is not the case. In this excerpt a solution to this problem in the form of a "helmet UI"
Helmet UI
- Using a Unity Rigidbody, it is possible to make a GameObject follow another GameObject's position and rotation. With some drag and mass applied to the Rigidbody, this movement can be made to "lag behind" the object being followed, creating a sense of weight.
- Arbitrary GameObjects can be made to follow the above rigidbody in 1:1 motion. If this is applied to a rigidbody that follows head movement, a "helmet effect" can be achieved.
- The justification for this feature is that, generally, user interfaces that are attached to the user's head movement can take away from immersion, and make the experience more uncomfortable. We haven't found a study to cite on this effect, but based on Dante's experience in developing an application that does just this, giving some weight to the user interface, instead of making it follow head movement 1:1 results in a less intrusive interface.
- Using the setup described above, it is possible to then have only one place where labels appear. Based on which element in the scene was clicked, this one label would change its text, and potentially also change colors to match the object pointed at.
LabelManager
- In this iteration of the project, our goal was to create a label that would follow the user’s view and display the name of the mesh that has been clicked.
- Upon scene transition, the label returns to the default colour and displays no text.
- In the high-fidelity version of the label manager, we implemented a feature so the colour of the label changes according to the colour of the selected mesh.
Scene Transition UI
In previous implementations of Fossa Finder, users were constrained to traversing through the animations in a sequential manner. This meant that if the user wanted to view the animations from Phase 2, they would have to skip through all the animation clips of Phase 1. We developed the Scene Transition UI to address this problem. This interface consists of two buttons (one for each phase), which allows users to switch between the animations of Phase 1 and Phase 2 without any time lost. When a button is clicked, the user is taken to the first animation of the associated phase. A quick "fade to black" animation effect is triggered when the user switches phases to prevent jarring transitions between animations. The buttons in the Scene Transition UI change material based on it's current state (i.e. depending on whether it is selected, disabled, or hovered over). The code architecture for Scene Transition UI closely resembles RadialMenuManager.
Potential suggestions for improvement
- Overall design: The design of the Scene Transition UI is very "bare bones". The design and placement of the interface components could be iterated upon and improved in the future.
- "Remembering" where the user left off: At the end of the term we modified the functionality of the Scene Transition UI buttons to "remember" the animation that the user viewed last before switching phases (to allow them to return to that animation clip later on, rather than starting from the first animation of that phase). However, we decided to leave this feature out of the final build because it was insufficiently tested and, more importantly, because we were unsure of whether this type of behaviour would be "expected" by users. Future work on this project should employ a user-centric approach (where users are involved throughout the ideation, design, implementation, and testing stages) to ensure that new features, such as this one, meet users' expectations and requirements.
Engineering Notes / Lessons Learned
Building for Web GL in Unity
3rd party plugins may not work when exporting to WebGL in Unity because they may be trying to reference code that is not supported for the web. Example: Trying to load C# code via. over the web will throw 'dlopen' errors during runtime, and will prevent the program from functioning.
See: https://forum.unity.com/threads/webgl-build-for-oculus-wont-build.1116703/
One way to fix this issue is to strip away all plugins that are doing these references, (ex: removing Oculus SDK from the assets folder completely), but a more elegant solution is to use Web Assembly Definitions to enable or disable certain plugins / dll's for specific targets, such as WebGL.
Art Assets
Radial menu: /Assets/Textures
Nerve model: /Assets/Models/splitnerve3.fbx
Poster
https://docs.google.com/presentation/d/1Pv3oz0bo810B013T8hDkFLgx2ynxxVG_T8sdplUUOkY/edit?usp=sharing
Development Team
Principal Investigator
- Pawel M. Kindler, PhD, Professor of Teaching, Department of Cellular and Physiological Sciences, Faculty of Medicine, UBC
Staff Developer
- Dante Cerron, Lead Developer (April 2020 - April 2021)
Students
- Julia Chu, Project Lead (Jan 2021- April 2021)
- Rosaline Baek, Developer (Jan 2021- April 2021)
- Pedro Leite, Developer (Jan 2021- April 2021)
- Hala Murad, Designer (Jan 2021- April 2021)
- Frances Sin - Developer, UX/UI Designer (Jan 2021- April 2021)
License
|
|
