Instructors and students can upload a video to ‘My Media’, their own personal video library or via the ‘Course Gallery’, the shared course video library accessible by all members of a course.
Note
This section demonstrates how to upload a video in ‘My Media’. You can also use this step by step guide to upload a video in the ‘Course Gallery’. To do this you must first go to your course and go to the ‘Course Gallery’ by either the ‘Course Media’ module or the navigation link if one was created.
Video Tutorial
Quicksteps
Go to My Media;
Click ‘upload a video or record from webcam’ (top left side of the screen),
From the Upload Tab, click on the Browse button to select the media file you would like to upload.
Confirm the Copyright and Privacy information for your video and click Ok.
If you want your audience to be able to download and share your video, check the options under Share and download permission.
Once the video has finished uploading, click ‘Next’ and fill in the Title, Tags, and Description.
Click ‘Next’ and wait for the video to be transcoded. The video will be available in ‘My Media’.
Step by Step Guide
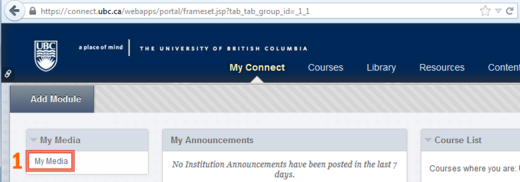
From within Connect go to your ‘My Connect’ dashboard and select ‘My Media’ (1) from the dashboard module you added previously (Figure 1).
Figure 1. My Connect - My Media module
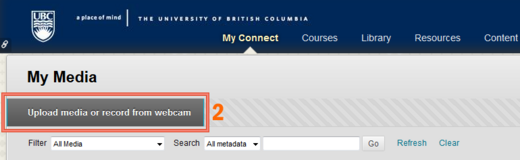
Select the ‘Upload media or record from webcam’ button (2) (Figure 2) from within ‘My Media’. You may not have any existing videos in your ‘My Media’.
Figure 2. Upload media or record from webcam
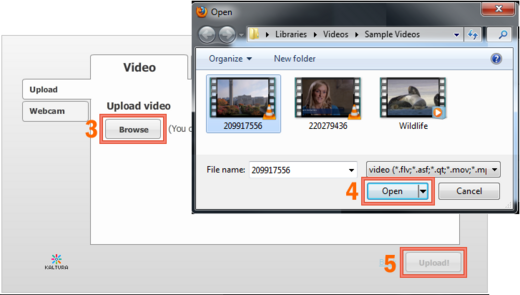
Upload tab (Figure 3) will be selected by default. Select the ‘Browse’ button (3) to find the video file you wish to upload. Once located, select ‘Open’ (4) followed by ‘Upload’ (5).
Figure 3. Upload tab
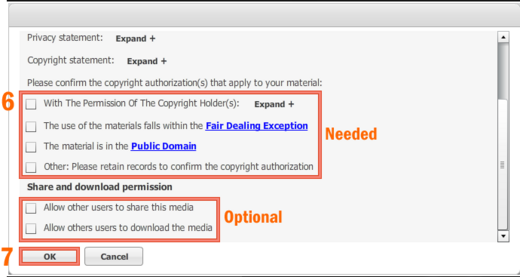
Before a video can be uploaded you must first check the relevant tick boxes to confirm copyright authorization(s) (6) and optionally agree to the Share and download permissions (6). Click ‘Ok’ (7) when ready.
Figure 4. Privacy and Copyright
Note
The user has the ability to allow other users to Share and/or download a video when the video is created or uploaded into the system:
When presented with the copyright options there is a section called “Share and download permission”.
This section has two options:
Allow other users to share this media
Allow others users to download the media
Share Media
If you check “Allow other users to share this media”, a share button will appear on the player of your video allowing the students and the instructors registered in your course to share the link of the video or embed it on any web page.
Download Media
If you check “Allow others users to download the media”, a download button will appear on the player of your video allowing the students and the instructors registered in your course to download the video.
If you leave both options unchecked, no one will be able to share or download your video.
Please note that your copyright and “Share and download permission” choices will be permanently applied to your video. You will not be able to modify them later. The only way to change them will be to delete your video and upload it again in order to be able to choose different options.
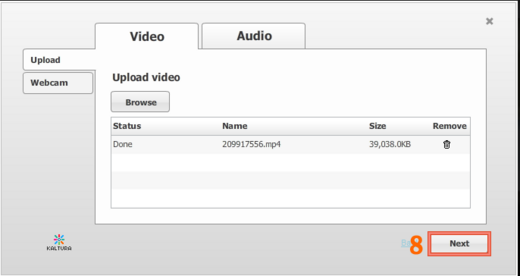
Click ‘Next’ (8) to continue once the file has uploaded (Figure 5). Once your video has finished uploading, its status will change to ‘Done’.
Figure 5. Video Upload
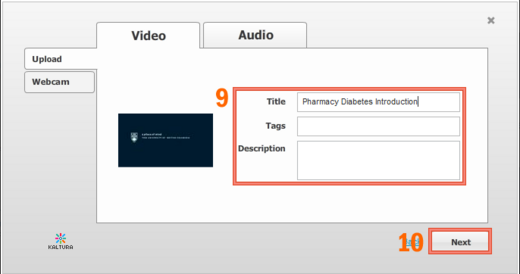
Enter a title for the video, some tags and a description (9). See Guidelines for Metadata for further information. Select ‘Next’ (10) to continue.
Figure 6. Video Upload Metadata
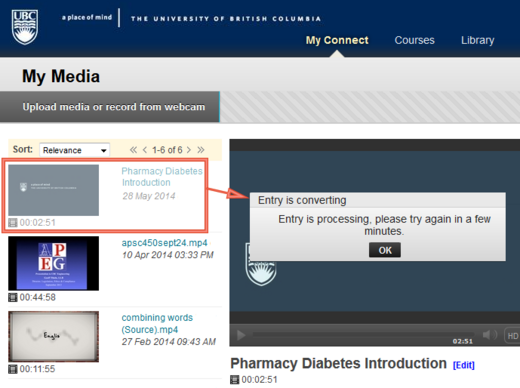
It may take several minutes before the video can be viewed in ‘My Media’ This is dependent on the size of the upload (Figure 7).
Figure 7. Video Uploaded to My Media
Student
Your video is now uploaded to your ‘My Media’ page. If you uploaded your video from the ‘Course Gallery’ it will not become visible until the instructor approves it.
Instructor
If you uploaded a video directly from the ‘Course Gallery’, your video is now uploaded to both the ‘Course Gallery’ and ‘My Media’.