Documentation:Kaltura/UBC Video Share Create and upload videos/Record and Upload a Webcam Video
Instructors and students can record and upload videos from a webcam directly in Connect for various purposes such as user generated content, an assignment submission, or a class summary. Before you begin review Effective Practices for some helpful tips.
| Note
This section demonstrates how to record and upload a webcam video in ‘My Media’. You can also use this step by step guide to record and upload a webcam video from the ‘Course Gallery’. To do this you must first go to your course and go to the ‘Course Gallery’ by either the ‘Course Media’ module or the navigation link if one was created. |
Video Tutorial
| QuickSteps |
|
Effective Practices
- Make sure a mic is close to you and that the recording site is quiet to ensure quality sound.
- Test your audio for sound, pace, and clarity.
- Use the preview button to ensure the video recording is to your liking before publishing.
- Create a script before recording the audio.
- Assign video categories and add metadata to easily locate files later. Check out the Kaltura Guidelines for Metadata for best practices on metadata.
- Create a standard hashtag for your course and notify all course members about it.
- You can use the clipping tool to trim the beginning of a webcam recording.
- It is important to realize that videos uploaded is owned by one person and not the course. Ownership rights allow you to edit, delete, and reuse content. Therefore if your TA uploads media into the course, s/he is the sole owner.
- Regarding ownership and copyright of media please refer to copyright.ubc.ca.
- (Instructor Only) To transfer ownership to another instructor please contact the UBC IT Help Desk.
- (Instructor Only) Enable Course Gallery as a tool link visible to course members as it promotes sharing of group project videos and acts as a gallery of all videos in a course for students to search through.
| Note
Users often notice a difference in video quality between their original webcam video and the one visible in Connect. This is often the result of video transcoding whereby the original webcam video is converted into different flavours i.e. quality / resolution by Kaltura (UBC Video Share) for viewing. Kaltura (UBC Video Share) will display the webcam video at a level below the original. Therefore, if the original video is created in 720p HD with a high bitrate then the maximum video quality that will be visible in Connect will be SD 540. This is the same for videos created in other software applications, for example, Camtasia. Please review the section on Video Quality for further information. |
Step-By-Step Guide
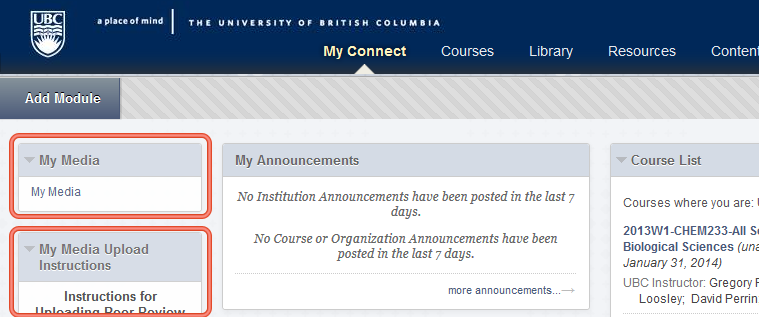
- From within Connect go to your ‘My Connect’ dashboard and select ‘My Media’ from the dashboard module you added previously (Figure 1).
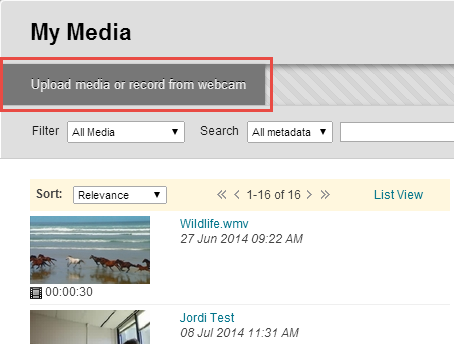
- Select the ‘Upload media or record from webcam’ button (Figure 2) from within ‘My Media’. You may not have any existing videos in your ‘My Media’.
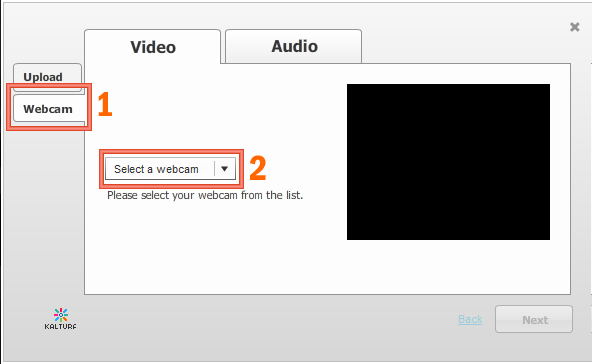
- Select the Webcam tab (1). If you have more than one webcam connected, select a webcam (2) from the drop-down menu (Figure 3).
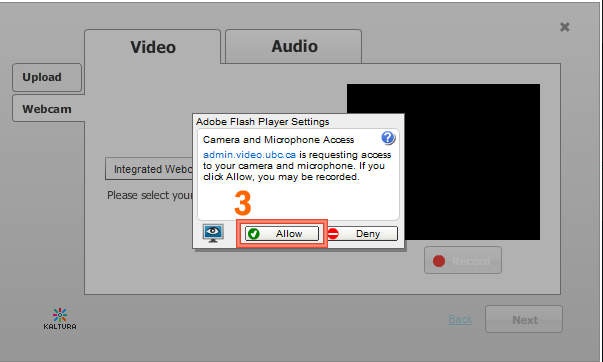
- You will be prompted to ‘Allow’ the Kaltura (UBC Video Share) website access to your Camera and Microphone (Figure 4). Note Some users experience difficulty selecting the ‘Allow’ button (3). This is an issue with Flash in certain browsers. Keep clicking the area and eventually it will register your click.
- When ready, select the ‘Record’ button (4). Recording will begin immediately after you select the ‘Ok’ button.
- Next you are prompted to read the Privacy and Copyright statements, confirm copyright authorizations (5) and optionally agree to provide Share and Download permissions to other users. Select ‘Ok’ (6) when you are ready to proceed.
- Note
- The user has the ability to allow other users to Share and/or download a video when the video is created or uploaded into the system:
- When presented with the copyright options there is a section called “Share and download permission”. This section has two options:
- Allow other users to share this media
- Allow others users to download the media
- Share Media
- If you check “Allow other users to share this media”, a share button will appear on the player of your video allowing the students and the instructors registered in your course to share the link of the video or embed it on any web page.
- Download Media
- If you check “Allow others users to download the media”, a download button will appear on the player of your video allowing the students and the instructors registered in your course to download the video.
- If you leave both options unchecked, no one will be able to share or download your video.
- Please note that your copyright and “Share and download permission” choices will be permanently applied to your video. You will not be able to modify them later. The only way to change them will be to delete your video and upload it again in order to be able to choose different options.
- Once you are finished recording select the ‘Stop’ button (7) followed by ‘Next’ (8).
- Prior to selecting ‘Next’ you can preview your recording by selecting ‘Play’ or choose to record again by selecting ‘Record’ (Figure 8).
- After selecting ‘Next’ (Figure 8) enter a title for the video, some tags and a description (9). See Guidelines for Metadata for further information. Select the ‘Next’ button (10) to begin upload.
- Once the file has been uploaded you will be returned to the ‘My Media’ page. At the top of the ‘My Media’ page you will see a green banner (Figure 10) informing you that the file has been uploaded and is now being converted. Depending on the size of the file it may take a few minutes before your webcam video will appear in your ‘My Media’ library (Figure 11).


