Documentation:Kaltura/UBC Video Share Create and upload videos/Create a Video Clip
Kaltura (UBC Video Share) provides tools that enable you to shorten a clip or highlight specific parts of videos you have uploaded. This allows you to quickly cut a long clip for class use, without the need for video-editing software or re-uploading the media again.
Video
EffectivePractices
- Due to limitations of the tool, there can only be one clip per video made at one time. Plan ahead accordingly.
- Use the tool to create relevant clips even if those clips are several years out of date (you can clip out a portion that contains the date, for example)
- Shorten a clip to create highlights and to reuse specific parts for other areas of the course.
- Since the Clipping tool is non-destructive, that is, it leaves the original clip intact, there is no need to create additional backups prior to clipping as Kaltura retains the original video as a backup.
Clipping your video from My Media
- Begin by starting in My Media.
- Note: While you can start in Course Gallery, for the purposes of this tool, we will continue the documentation in My Media. See the section Clipping in Course Gallery for more information.
- Select the video you would like to clip.
- Click the Create Clip button, below the video preview.

This is the Clip Editor window where you can clip a video in several ways as well as modify its description and title.
| Note
It is important to note that the quality of a clip is always one level below the original video. |
Clip using time stamps
Clipping allows you to determine the exact portion of the video that is relevant to your needs. You can clip using a start and end time. To do this you must use the following time format: hours:minutes:seconds:milliseconds.

- Set the beginning and end points of the videos by typing in a time with the format hours:minutes:seconds:milliseconds
- Make changes to the title and description according to your needs.
- Click ‘Save’ to create the clip.
The clip will now be saved to your ‘My Media’ repository.
| Note
After you click ‘Save’ it may appear that nothing has happened. Wait a few seconds before you are returned to ‘My Media’. The clip may take a few minutes before it is visible. |
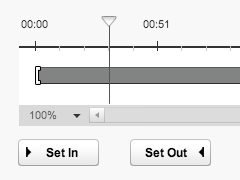
Clip using time bar
At the bottom of the clip preview, there is a bar marked with the length of the video. As you scrub the bars left and right to shorten or lengthen the clip, the preview window will show what is playing at that point in the video. This makes it incredibly easy to find the exact position of where you would like to clip the video.
Click and hold the left bracket ([) to set the start time. Similarly, set the end time by clicking and holding on the right bracket (]).

Clip using the Set In and Set Out Buttons
You can set the start and end points directly from the video itself. When you are watching the video and wish to select the point in the video to be your start or end point, pause the video and click either the Set In to set the beginning of the video or Set Out button to set the end.
When you are finished, click Save to create the clip.
Previewing the new clip
After you have made the necessary edits, you can preview your shortened clip by pressing the preview button (![]() ) on the bottom right corner. Pressing this button will start the video from the point where the grey bar begins and stops when the grey bar ends.
) on the bottom right corner. Pressing this button will start the video from the point where the grey bar begins and stops when the grey bar ends.
Clipping in Course Gallery
In the Course Gallery, you can clip videos owned by other course participants who have allowed clipping, which employs similar buttons and methods as described earlier under ‘Clipping your video from My Media’. A clip created from a video in the ‘Course Gallery’ will appear in ‘My Media’ and not in the ‘Course Gallery’. You may add the newly created clip to the ‘Course Gallery’ from ‘My Media’.
Clip Ownership
After contributing a video to a Course Gallery or Faculty Repository and allowing other users to make clips, users that choose to make a new clip from the contributed video will own that clip. That is, the newly clipped video will appear in their ‘My Media’ section of Connect as well. The original contributed video will not be deleted or altered after the clip, and should the original owner choose to delete the originally contributed video, the clipped video(s) that users have created will be retained in their ‘My Media’.
Allow others to create clips of your video
- In ‘My Media’ only, select the desired video.
- Check the box ‘Allow others to make clips of this video’ in the video information area. This enables other course participants to make non-destructive clips of your videos.
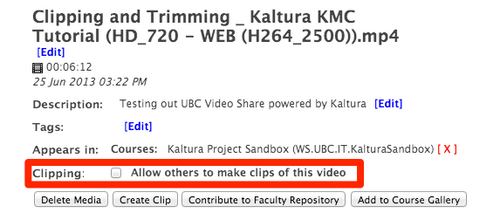
Enable Clipping
- The checkbox to enable others to make clips of your videos. This option is found in My Media only.
