Documentation:Kaltura/Activate Kaltura modules in Connect (How to)

|
This article may need to be updated. Please update this article to reflect recent events or newly available information, and remove this template when finished. Please see the discussion on the talk page. |
Note: check this page for more up-to-date information.
This documentation will show you how to:
- Activate Kaltura through tool availability option
- Add Kaltura to modules.
Activate Kaltura through tool availability option
- Open the Custiomization tab which is located under Course Management. Then select Tools Availability
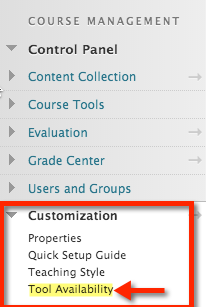
Tools Availability is located under Course Managmenet tab - Check all the boxes for Kaltura Media, Kaltura Mashup and Media Gallery

Check all the boxes for Kaltura, Mashup and Kaltura Media


Add Kaltura Modules
- Ensure that the edit mode is on.
- Hover the Add Menu Item icon
 . Then select Module Page
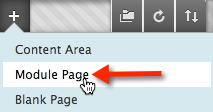
The plus sign icon is the Add Menu Item icon. - Name the module. (For example: Video). If you want the module to be available to students, check Available to Users.
- Go to the Module that you have just created. Select Add Course Modules. Find and add Course Media , My Media and Shared Media Repository .
- Press OK which is located on the bottom right hand corner.

Resources
On information on how to use Kaltura Modules, see the resources below: Kaltura Overview Quicksheet