Documentation:Geospatial Audio
Introduction
CEDaR, a lab department at UBC Vancouver, founded and co-directed by the principal investigators, has sent project proposals on various different scales to collaborate with the Emerging Media Lab. With the varying proposals, it has been established between the principal investigators and the team at EML that a proof of concept will be made especially tailored to the xʷməθkʷəy̓əm (Musqueam) Street Signs at UBC under the project proposal, “Geo-Located Spatial Audio” ("Geospatial Audio" for short). This is because the contents for Musqueam Street Signs at UBC are readily available at Musqueam Street Signs at UBC. Therefore, from here on, everything documented will be about the Musqueam Street Signs at UBC only.
In 2018, the Musqueam community and UBC collaborated on a project to install bilingual (English and hən̓q̓əmin̓əm̓) street signs on the major streets of the UBC Vancouver campus. For more information about the Musqueam Street Signs at UBC, please refer to the link. With this collaboration available, the principal investigators are interested in exploring how interactive these street signs can be to facilitate an immersive learning opportunity.

Background
With the grant that our principal investigators were given, they decided to offer a space for students/ learners for interactive learning on Indigenous subjects. Thus, serves the founding of CEDaR, Community Engaged Documentation and Research. “CEDaR is a collaborative new media space at UBC Vancouver designed to facilitate community-led innovation of relational technologies” (CEDaR, 2021). CEDaR’s ambition, in collaboration with the Emerging Media Lab, is to create multiple projects as installations targeting mainly Indigenous place-based learning, knowledge in food, medicine and tools, and explorations into the new ways of Indigenous storytelling. With curiosity, the principal investigators are determined to explore how technologies such as Augmented Reality (AR) and spatial audio can be applied to their various project proposals as an immersive learning environment for students and Indigenous studies learners.
Objectives
- Create a proof of concept that provides a solid foundation for all CEDaR project proposals
- Target mainly mobile accessibility
- Minimize the data usage of users on an experience
- Create a user-friendly interface that is easy to navigate for all users
- Establish a robust user flow from image, sound and location added to Drupal to said images used for image tracking, sound for positional audio and locations on a Leaflet map
Considerations
Both the team and the principal investigators are concerned with the data usage and the bandwidth that the application will take on end users. Currently, the concern of using data has been established with the understanding that UBC campus-wide wifi would be sufficient to resolve the problem. However, this understanding only applies to the Musqueam Street Signs at UBC only. Therefore, the same concern on data usage could not be resolved with the other proposed projects at the moment since there is a lack of information. Concerns on data usage may also vary depending on the scale and location radius of each project’s demand.
In terms of taking the bandwidth of users’ mobile devices, it would also vary from each project’s demand. Currently, for the Musqueam Street Signs at UBC, the development team has enabled notifications along each step of the user flow for users to accept or decline incoming downloads of content files. With that said, acknowledging that each project proposal has unique demands, the same resolution may not be able to fit the model from project to project.
In terms of battery usage for users’ mobile devices, the development team has ensured that the mobile screen does not need to be active most of the time while using the application, even if the user is walking to their next destination. Again, this is still merely a resolution that applies to the Musqueam Street Signs at UBC.
Format
Currently, the team has established that the end product will be a web application built with React-Three-Fiber. Our database will be run by Drupal, an open source content management system tool. This means that Drupal will be the application that the editing users will be using to compile various contents and information that the React application will need. Each React application will be tailored to each project. (ie. The contents for Musqueam Street Signs at UBC will be stored in our Drupal site and backend development will pull the data out from Drupal to send forward on its React application whenever it is requested).
Development

QR Code Generator - Entry to Application
Follow the steps below to generate your own QR code:
- Clone the git repository
- Find the cloned repo folder in your local computer
- Folder should be called "GeoSpatialAudio"
- Once the folder is found, follow this path: GeoSpatialAudio > bin > QRCodeGenerator > Double click on "qr.html"
This will take you a website and prompt you to enter a URL that you would like to generate a QR code for. Once "generate QR code" is clicked, generated QR code will automatically get downloaded to your computer.
Note:
- This generator can be used to generate any QR code from existing URLs on the internet
- This generator does not have labels on the QR code so please be mindful of which QR code is made for which URL in situations where multiple QR codes need to made for different URLs
Back End Development
What is Drupal?
Drupal is an open source web content management system. It provides back end framework that affords scales such as personal blogs, corporate, political and government sites. It is capable of handling web security, allows multiple content architecture, multilingual and such. The Drupal version that Geospatial Audio uses is Drupal 9.
Why Drupal?
As explained above, Drupal already provides the foundational tool for us in development. Since Drupal offers everything we need for back end development, the team will not have to worry about designing and building a system to handle the different types of contents we may have, or user passwords/logins (for editing users). Most importantly, it gives any similar future projects flexibility because none of the data need to be hardcoded. For this reason, we have chosen Drupal as the support/storage for our main back end database.
Basic Concepts Of Drupal
Here are some basic terminologies on Drupal:
- What we are familiar with as pages on a website is referred to as nodes on Drupal.
- A content type is a specific type of contents compiled in a node
- Ie. Tour is a content type and “UBC Musqueam Street Sign” is the content of a Tour that is made into a node
- Each content type can have fields that specifies a content type
- Ie. In the tour called "UBC Musqueam Street Sign", one could add a field called "Image" which allows for images to be added to this tour
- A view is a list of information displayed together
- It can be a list of nodes, users, comments, etc.
- Ie. An admin viewing all the published contents on a node is called a view
- Blocks are the individual sections of information that gets compiled into a view
- Blocks make up a view
- Ie. The “Geospatial Audio Testbed Site” title is a block
Now that we know the very basic foundation of Drupal, here is an overview on how to perform basic Drupal functionalities such as editing a content type, etc. Drupal comes with two default content types “Article” and “Basic Page.” These default content types are already equipped with their unique fields. To manage fields for these prospective content types, please refer to “Manage fields” below.

How to add a content type
Follow the path: “Structure” in the menu bar -> “Content types” -> “Add content type.” Once “Add content type” is clicked, users will be prompted to fill out the information needed in order to create a new content type. Users will then be prompted to add and manage fields to unique to the content type current in creation.
How to modify a content type
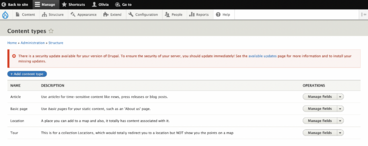
Follow the path: “Structure” in the menu bar -> “Content types” -> Select the content type needed to modify. This then prompts the user to manage several things about the content type. Users can: manage the fields of the content type, manage the form display of the content type, and manage the display of the content type
Manage fields
This allows users to add a new field to an existing content type. Users can also edit the field settings by clicking on “Edit” under the perspective field of interest. Drupal is built in with numerous default fields. For specific fields that do not appear as options, see Drupal Modules.
Manage form display
This allows the users to edit how each field gets displayed when a user edits that content type. Users can rearrange the order of each field by clicking and dragging the arrow beside each field title up and down. Users can also manage the way a field gets displayed in edit mode by editing the widget. For example, the coordinates field can be changed from displaying a map with points to displaying simply geo-coordinates by selecting the dropdown, again still within the edit mode. More advanced widget settings can be set by clicking on the gear to the right of the field.
Manage Display
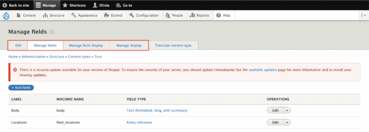
This is similar to “manage form display” except manage display has more relation to how the content type gets presented as a content in a node. This is what the users see when they view a content. Similar to “manage form display”, the arrows on the left can be dragged up and down to rearrange the order they appear on a node. The labels can be repositioned or hidden from the selection offered in the dropdown under “Label.” The order of the list is how information will be displayed on a node.
Drupal User Hierarchy
There are five roles allotted on Drupal, arranged from lowest to highest ability to manipulate the site:
- Anonymous User
- Authenticated User
- Content Editor
- User Manager
- Administrator
Anonymous User
Anonymous users are any users who are not logged in nor have an account on the site. This means that anonymous users are only allowed to view contents/nodes. They will not be allowed to modify any content they view. They also have the most limited permission on the site.
Authenticated User
Authenticated users are any users who are logged in. All users who create a new account on a Drupal site are automatically enrolled as an authenticated user. All users who are logged in have the ability to manage their own account. By default, once logged in, Drupal takes users to their own profile page. Authenticated users on the Geospatial Audio Drupal site has the ability to view, edit, and delete own content. They are also permitted to create any Tour contents. However, they are not allowed to edit nor delete contents made by other users. Which means, each authenticated users are only permitted to manage their own contents. For changing the permissions on each role, please see the user manager section.
Content Editor
Content editors are users who are one tier above authenticated users. This means that content editors have the ability to do everything outlined in the authenticated user section above. However, content editors are also allowed to view and manage all contents from other users. For changing the permissions on each role, please see the user manager section.
User Manager
User managers are users who have about the same capacities as content editors. Except, user managers are not permitted to view nor manage any content from other users. However, user manager, as the name implies, has the ability to moderate the permissions of each user and each user role. To access and manage the permissions for each role, select “People” in the menu bar -> “Permissions.” To access and manage each user’s role on the site, select “People” in the menu bar -> select the user you wish to edit -> edit the user’s role by checking the checkbox from the selection.
Administrator
Administrators are the users who have full control of the Drupal site. Everything outlined so far are just one of the few permissions that an administrator is enabled to do on Drupal. They have full access to the tools needed to manipulate the site as much as desired.
Note:
- For any moderations/ troubleshoot on Administrator level on the Geospatial Audio Drupal site [hyperlink], please contact the Emerging Media Lab at UBC
Drupal Modules
Drupal modules are packages that are made and maintained by Drupal moderators. There are many modules available. Their purpose is to extend the default functionalities that Drupal comes with. Each module serves different functionalities. Below are the modules that are downloaded in order for the Drupal site to best serve Geospatial Audio.
How to install modules
Once the suitable module has been found, copy the tar.gz link address. Paste the link at the end point of the following path: “Extend” in the menu bar -> “Install new module.” Once the module has been installed, enable the module by selecting “Extend” again, and look up the module name by filter. Once the module is found, select the module, then click “Install” to complete the installation process.
Note: Some modules are not easily found from the menu bar because some of them may merely present itself as an option for a field, etc. Users are required to have a good understanding of what the particular module does before they install the module.
How to uninstall modules
The following path is to prompt an uninstallation of a module: “Extend” in the menu bar -> “Uninstall module” -> Select the module to uninstall by clicking the checkbox -> Complete uninstallation by clicking “Uninstall.”
Note: Some modules may come with more than one dependencies. These dependencies will also appear as a module. Users must uninstall the dependencies too in order to completely uninstall a module.
Geofield Module
This module provides coordinates as one of the fields in which a content type could have. The coordinates can be displayed as points on a map, or simply as geo-coordinates. It can be found under “Structure” in the menu bar -> Select the content type you want the field to live in -> “Add field.” This field can be edited also once the field is added to a content type.
File Module –Audio
This module provides the ability to attach an audio file in a content type. The pathway to find is the same as the Geofield Module from above.
Cookies Module
This module enables cookies settings. It can be found in the following path: “Configuration” in the menu bar -> “System” -> “COOKies.”
Asset Injectors Module
This module provides CSS and Javascript injectors that override site-wide on Drupal. These injectors can be found in the following path: “Configuration” in the menu bar -> “Development” -> “Asset Injector.” You must flush CSS and Javascript in order for your codes in the injector to work properly.
Inline Entity Form Module
This module provides a content type the ability to have children of another content type. For example: The Tour type content has Location type content as children so we can display all the locations listed in a Tour. This module is more complicated to find. It is not like the ones above where you can just find it in a path. It more so provides an option to how you want to the display of contents. Nevertheless, it can be found in the current site as an option under “Structure” in the menu bar -> “Content type” -> “Tour” -> “Manage form display” -> An option in the dropdown under “Locations.”
Switch User Module
This module provides users above the user manager role to switch user roles once they are logged in. This does not mean they have the full ability to take over another user’s account. This just means that they can view what that specific user and their role can see/do. This module can be found in the following path: “People” in the menu bar -> “Switch User” -> Select the user you would like to switch to view.
Note: This is still only permitted for Administrator level users to access
Views Bootstrap Module
This module provides different forms of how each view or block can be displayed on the interface. Bootstrap is the theme that the current Drupal site uses. To change the display of a view or a block, follow the path: “Structure” in the menu bar -> “Views” -> Select a view or a block to which you would like to change the display -> Select “Edit” under that view -> Select the option under “Format” to switch to the display desired. You can also manage its setting by selecting “Setting.”
Anonymous User Login Module
This module provides the ability for admin users to block out specific nodes/pages to which anonymous users are not allowed to see. It can be found in the following path: “Configuration” in the menu bar -> “User Interface” -> “Anonymous login.”
Login with Email Module
This module provides the ability for all users to log into the site with either their username or the email address they used to signed up. There is no pathway to find this specific module as it presents itself as an option to the users.
Composite Reference Module
This module provides the ability to delete all referenced contents within a made content. For example, if one deletes a Tour, all the location associated with that Tour will automatically be deleted. There is no pathway to find this specific module as it presents itself as an option to the users, but it could be found as an option when creating a Tour content under "Manage fields."
Note: This module will only be useful when a content type is referencing another content type/ is a child or a parent to another content

Note:
- A quick tip for users who do not remember these paths is to input the key words using “Go To” above the menu bar.
- Only Administrator users are permitted to install or uninstall modules
- In some cases, certain functionalities are not easily obtained by installing modules. They may require a patch that involves a more complex process
- For any moderations on Administrator level, please contact the Emerging Media Lab at UBC
Front End Development
Github Branches
In order to understand what each branch in the Github repository consists of, please clone this repository. For any inquiries about this repository, please contact the Emerging Media Lab.
This section is last updated on April 30 2022.
Active Branches
Please refer to the table below for a description of all the branches in the repository.
| Branch Name | Description | Worked on by |
|---|---|---|
| devSettingsPageStyling | A branch that handles the styling of the interface as well as some other development work such as the geolocation fetching function, directions fetch requests and other minor map functions. | Olivia Chen |
| devNFTMarkers | A branch that handles framework of image recognition logic in the codebase as well as audio components. | Dante Cerron |
| devRestructuring | A branch that handles the restructuring of the framework in the codebase for a more logical flow in the codebase itself. | Dante Cerron |
| main | The default branch that one would automatically land on upon cloning the repo. DO NOT stay on this branch. It is suggested to either create a new branch or, switch an existing branch of interest. Note: This is NOT an active branch. It is simply a default branch. | N/A |
Note: The most up to date branch in the repository is devSettingsPageStyling. All the active branches are merged into devSettingsPageStyling. Developers should pull from devSettingsPageStyling if they wish to see most of the codebase. If developers wish to update all the changes into main, it is best practice to be on main branch and pull from the most relevant branch to avoid any major merge conflicts.
Stale Branches
The stale branches in the repository includes:
- develop
- devStyle
- spatialAudio
- qrcode
- gh-pages
- audioLoader
Note: Most of these branches are either merged with the active branches above or no longer used in the repository.
Image Tracking and Marker Training
The image tracking portion of the project uses React-Three-Fiber (a React framework that supports Three.js) to create a scene that allows users to use their camera. The image trained targets are created using this trainer.Additionally, the process of putting together the trained image markers into a scene in React-Three-Fiber uses this documentation. Note that this documentation uses Ar.js. For a more detailed tutorial on these, please refer to this documentation.
Note: You will need access to EML Teams in order to access this documentation. Please contact Emerging Media Lab for any inquiries.
Spatial Audio
Three.js not only allow users to develop elaborate scenes, it also has the capacity to incorporate audio into these scenes. Since React-Three-Fiber is simply Three.js packaged in a React environment, the web application uses the positional audio that Three.js offers. For more information on how React-Three-Fiber works, please refer to the React-Three-Fiber documentation. For more information on how positional audio in Three.js works, please refer to the Three.js positional audio documentation.
React Leaflet
The map used in the web application is a Leaflet map. Since the web application is using React, any information or documentation can be found in the React Leaflet documentation
Geolocation API
The geolocation of users are requested in the web application uses the resources from this Geolocation API
Open Route Services Directions API
The service used to calculate directions pathway in the web application uses the resources from Open Route Services' Directions API
JSON URL for Headless Drupal
To get the JSON URL for headless Drupal follow these steps:
- Enable JSON API on the Drupal site
- Follow this path: "Configuration" on the menu bar > "Web Services" > "JSON: API"
- Choose an option
Once an option is chosen, one is now ready to make fetch requests to the Drupal site on the front end development side
For more information and resources on how JSON API works on Drupal visit this Resources page
Build and Deployment
The build process for this app is specific to the tour that the web application will be hosting. For example the Musqueam Street Signs at UBC, was created on Drupal. The fetch request to obtain the JSON data for all the information on the tour of Musqueam Street Signs at UBC all have specific ID attached to the elements of the tour, including the tour itself. Therefore, one simply needs to run the command "REACT_APP_TOUR_ID = <YOUR TOUR ID> npm run build" during the build process for the app. Then a build folder would be built and ready for deployment onto the server you wish to host it on. For more information on tutorials about the build process, please refer to this documentation.
Note: For access into this documentation, please contact Emerging Media Lab for access inquiries.
This application is hosted on AWS cloudfront. For access into the S3 bucket of this project, please contact EML for permissions and credentials. The S3 bucket was last updated on April 25 2022.
User Manual Introduction
Before beginning to read the user manual, users must understand what kind of user they are in order to look for the manual they need. There are two users for Geospatial Audio: Editing users and End users. Editing users are users who will be interacting with Drupal to upload and manage contents. Whereas End users are interacting with the web application that is built. If you are using Drupal, please refer to "User Manual - Editing Users." If you are using the web application, please refer to "User Manual - End Users."
User Manual - Editing Users
Getting Started
Before an editing user begins uploading/managing contents, users must log in or sign up if they don't already have an account. Once logged in, users may begin to perform the tasks below. All logged in users are authenticated users. One does not need any higher user roles to perform the tasks below. For more information about different user roles, please refer to Drupal User Hierarchy.
Note: Users who sign up on Drupal for the first time must be granted permission as an authenticated user in order to perform the tasks below. Contact a user manager or an administrator on your Drupal site for permissions to be granted.
How to Add a Tour
Assuming the user is already logged in, follow these steps:
- Select "Create a New Tour" under "Contents" in the menu bar
- User should be prompted to fill in the information required to create a tour
- Each tour should have at least one location in order for the tour to be made
- If no location is added, the tour itself would still exist, but there would be no data in this tour
- To add a location, select "Add a Location" in the creation/edit mode of the tour user would like to add the location to
- To correctly add a location, users must give the map in the location field a marker/geo-coordinate
- It is suggested to only add one marker/geo-coordinate to each map to keep the user organized
- Select "Save Location" once the necessary information are all uploaded/selected inside the location field
- Click "Save" at the very bottom of the page
A Tour should be added. To check, select "View my content" under "Contents" in the menu bar
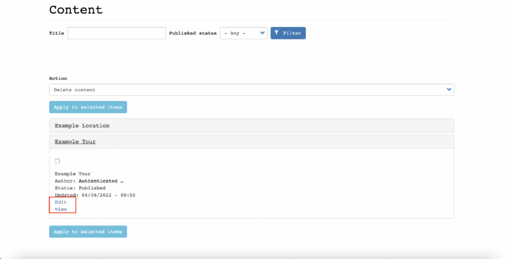
How to Edit a Tour / Location
Assuming the user is already logged in, follow these steps:
- Select "View my contents" under "Contents" in the menu bar
- Select the specific tour or location user would like to edit
- Location and tour are organized separately in "View my contents" page
- The accordion of the selected tour/location will expand on click
- Select "Edit" inside the accordion of the selected tour/location
- Make the changes
- Select "Save"
- Users must also select "Save Location" if the change in interest is the location content
- Tour/location should be edited. To check, select "View my content" under "Contents" in the menu bar
Note: Users must click "Save" in order to have any changes updated
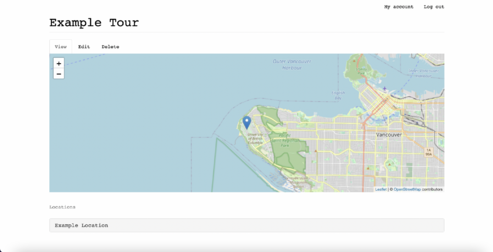
How to View Contents
Assuming the user is already logged in, follow these steps:
- Select "View my contents" under "Contents" in the menu bar
- Select the specific tour or location user would like to view
- Location and tour are organized separately in "View my contents" page
- The accordion of the selected tour/location will expand on click
- Select "View" inside the accordion of the selected tour/location
- The selected content should now be able to view for user
Note: To edit the content in viewing, select the "Edit" tab underneath the content title
How to Delete Contents
Assuming the user is already logged in, follow these steps:
- Select "View my contents" under "Contents" in the menu bar
- Select the specific tour or location user would like to delete
- Location and tour are organized separately in "View my contents" page
- The accordion of the selected tour/location will expand on click
- Select "View" inside the accordion of the selected tour/location
- Select the "Delete" tab underneath the content title
- Confirm delete by selecting "Delete" again
The selected content should be deleted. To check, select "View my content" under "Contents" in the menu bar

Alternatively users could also follow these steps to delete contents:
- Select "View my contents" under "Contents" in the menu bar
- Select the specific tour or location user would like to delete
- Location and tour are organized separately in "View my contents" page
- The accordion of the selected tour/location will expand on click
- Select the checkbox inside the accordion of the selected tour/location
- Select "Apply to selected items"
- Make sure the "Action" input on top is selected as "Delete content"
- Confirm delete by selecting "Delete"
The selected content should be deleted. To check, select "View my content" under "Contents" in the menu bar
For more clarified instructions on the user manual, please inquire CEDaR Lab at UBC for tutorial videos.
User Manual - End Users
This section is written with the assumption that users are currently located at UBC Vancouver-Point Grey campus. In order to use this application for the real experience, users must be at UBC.
How to Begin an Experience
Follow the steps below:
- Users should already have access to the web application either by URL or have a QR code to scan at a nearby bilingual street sign
- Read the instructions on the landing page of the application
- Click "Begin Experience"
Note: Permissions to access user's geolocation and camera must be allowed before the application could begin to function. If the app does not request for your location, you must go into the location preferences of your mobile device or the browser, to grant location permission. For a better experience, headphones/earphones are strongly recommended. Users must turn their phones OFF silence in order to hear the audio.
What to do During an Experience
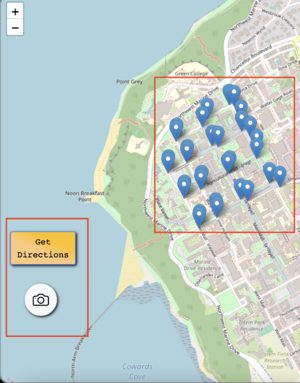
Follow these steps below:
- Once "Begin Experience" clicked, users will be prompted for allow camera and location permissions
- Please accept the requests in order to continue
- Once the camera on the device is turned on, users will be prompted to scan a street sign
- Upon a successful scan of the street sign, a play button will appear
- Users must press the button to hear audio
- Note: once the play button appears, users do not need to keep the current street sign in frame of the camera
- After the audio finishes playing once, a mini-map with all the points available for scanning and a replay button will appear
- Clicking the replay button will allow users to listen to the previously scanned audio again
- Clicking on the mini-map will allow the users to access the map in fullscreen
- At this point, users can tap on an available marker then press "Get Directions" to route to the point of interest
- Users can also navigate on their own should they be comfortable and familiar with the UBC Vancouver campus
- To return to the camera, press the camera button on the bottom left of the screen
Note: There is not a standard correct way to interact with this application. The objective of this user manual is for clarification on how users can interact with the interface elements in this application.
How to End an Experience
Simply exit the application on the web browser to exit the experience.
Features
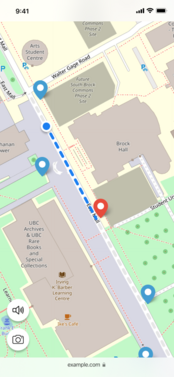
Background Soundscape
This feature was created to enhance users' experience while traveling to suit the foot-walking nature of the application. Being mindful of the fact that users may need to walk a distance from location to location while remaining on the application, the team considered this feature to not only keep the users entertained, but also letting the users understand that the application is still running on their phones. Of course, this feature is functional regardless if users equipped with headphones/earphones or not. Although, the team's recommendation is still to utilize headphones/earphones for a better experience of spatial audio.
Please refer to Future Plans for more information on background soundscape
Directions from Point to Point
This feature was mainly created with the understanding that not every user is familiar with the navigation around the large campus of UBC Vancouver. Therefore, users are given a choice to request for directions to their point of interest from the map provided in the application.
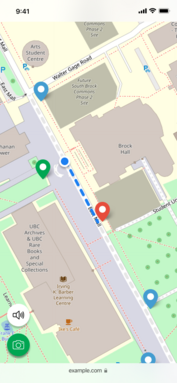
GPS Trigger
This feature was created to notify the users of any available street signs to prompt them to listen to more audios and understand how each street signs are named. Every time the user approaches street signs included in the tour, the marker icon on the map would change to a different color to prompt the users to click on the camera button to return to their camera and scan nearby street signs.
Challenges
Drupal Customization
The team had to learn how to use Drupal from the beginning of this project. The challenging part of learning Drupal is the new vocabulary as well as the way information is structured on the site. In order to learn how to create a custom Drupal interface for editing users, the team needed to go through all the problems/pain points that Drupal may give to beginner level users. Therefore, for the most part of this project, the team had to experience problems before solutions were provided.
Image Tracking and Marker Training
The team had to switch directions and restructure the way markers are trained and tracked. This is because the team was not always accessible to the actual street signs to test, therefore, most of the time when it works for tracking an image of the street sign on the computer, it wasn't always true for when the camera is working in front of real life street signs. To solve this problem, the team has replaced a regular marker trained with AR.js marker trainer, with turning the image files into NFT markers. This is to provide more precision and detail for the camera to read and recognize the target. Unfortunately, the team is still currently running into problems of cameras not being able to recognize the real life street signs because of distance (height away from the street signs) and all of the background scenery that nature has to offer around the street signs. These have unfortunately been the cause of this on-going problems, although the team will continue to resolve this issue in the future.
Future Plans
This section is last updated on April 30 2022. For a more descriptive scope of where the team left off in development and design, as well as more future plans, please contact EML for access to this Trello Board.This Trello Board should give access to all the ideation and brainstorming process during the development of this project.
GPS Trigger
Due to the shortage of time, the GPS trigger feature is pushed back into the future plan for any future developments of the project. As a proof of concept, the team acknowledges that this is a nice-to-have feature but does not obstruct the foundational functionality of the application that is built.
Spatiality of Audio
The spatiality of the audio is faint in the current implementation of the application. The priority of audio spatiality was placed behind image tracking because users must be able to scan an image in order to hear any audio as a result. With the implementation of NFT markers, the development team encountered complex problems for integration. Therefore, perfecting the spatiality of the audio was placed behind in priority and the team did not have time to tackle the task.
Implementation of Background Soundscape
Similar to the explanation of including the GPS trigger in the future plans, background soundscape is not fully implemented in the current version of the application. Although an element of it is already present and ready to be hooked on with an audio source in the code. It will be up to the needs of future development work to determine what kind of soundscape is suitable for the project.
Modify the Interface / Integrate User Feedback
The current interface for the React application is at low fidelity due to the fact the current version of the project being a mere proof of concept. Should future plans of the project be to create a high fidelity product, the design of the interface should be improved visually to reflect the inspiration of the project. In addition, the user feedback from the user tests conducted during the semester were not fully integrated. Therefore, it is also part of the future plan to integrate those feedback into the current web application to maintain the usability. Please refer to the Trello Board dedicated to the project roadmap of Geospatial Audio for details of these user feedback to incorporate.
Installation of QR Codes at the Street Signs
Since this project is a proof of concept with the intent to evolve into high fidelity product. Should the decision be to elevate the application into a fully functional product, it would be recommended to install QR codes as the means of entrance to the application for public access.
Team Members
Principle Investigators
David Gaertner, Ph.D.
Co-Director, Community Engaged Documentation and Research (CEDaR)
Assistant Professor, Institute for Critical Indigenous Studies
President-Elect, Indigenous Literary Studies Association (ILSA)
Associate Editor and New Media Curator, BC Studies
The University of British Columbia | Unceded Musqueam Territory
Daisy Rosenblum
Co-Director, Community Engaged Documentation and Research Space (CEDaR)
Co-Lead, Relational Technologies Research Cluster
First Nations and Endangered Languages Program
Assistant Professor | Institute for Critical Indigenous Studies and Anthropology
The University of British Columbia | Unceded Musqueam Territory
Project Lead
Olivia Chen
Work Learn at the Emerging Media Lab at UBC
Undergraduate in Bachelor of Fine Arts in Theatre Design and Production
The University of British Columbia | Unceded Musqueam Territory
UX/UI Designer
Vita Chan
Work Learn at the Emerging Media Lab at UBC
Undergraduate in Bachelor of Science in Computer Science
The University of British Columbia | Unceded Musqueam Territory
Software Developers
Dante Cerron
Community Engaged Documentation and Research Space (CEDaR) Lab Supervisor
The University of British Columbia | Unceded Musqueam Territory
Michelle Huynh
Work Learn at the Emerging Media Lab at UBC
Undergraduate in Bachelor of Science in Computer Science
The University of British Columbia | Unceded Musqueam Territory
Nemo Wax
Previous Work Learn at the Emerging Media Lab at UBC
Undergraduate in Bachelor of
The University of British Columbia | Unceded Musqueam Territory
Advisors/Mentors
Arynn King
Project Manager, CEDaR | Arts
The University of British Columbia | Institute for Critical Indigenous Studies | Unceded Musqueam Territory
Hannah McElgunn
SSHRC postdoctoral fellow and CEDaR research associate
Department of Anthropology
The University of British Columbia | Unceded Musqueam Territory
Vanessa Campbell
Language and Culture Department
Musqueam Indian Band
Catherine Winters
Emerging Media Lab Supervisor
The University of British Columbia | Unceded Musqueam Territory
Daniel Lindenberger
Emerging Media Lab Mentor
The University of British Columbia | Unceded Musqueam Territory
Acknowledgement
We would like to acknowledge that the land on which we gather is the traditional, ancestral, and unceded territory of the hən̓q̓əmin̓əm̓-speaking, xwməθkwəy̓əm (Musqueam) People.
See additional acknowledgement at Musqueam Street Signs at UBC.
