Documentation:Digital Tattoo Student Orientation/ Blogging
Blog posts
One of the great things at the Digital Tattoo project is writing blog posts. You get to find out about something happening in the world that’s connected to our themes and write a post about it. There’s a couple of steps to writing a blog post.
Identifying a topic
- What’s changed recently in the world of technology and privacy? Has a new product been released that people are using without considering its implications? Has a law recently been passed that changes the way we use the internet?
- Social media is a great place to find out about relevant things that are happening. By checking out some posts from the accounts that the Digital Tattoo twitter account follows, you’re sure to find a few good ideas.
- What’s happening around you? Your blog ideas don’t have to be inspired by anything larger than a topic, trend, or issue that you’ve noticed. Sometimes the small and personal things resonate the most with people.
Pitching
- Before you dive too deep into researching and writing, come up with a couple of points about why your topic is relevant and applicable to our audience. Think of a few key things: Why does this matter? Why now? Who does it impact? How? What can be done?
- Here are questions you should be able to answer with your topic proposal:
- How might a student relate to this? Where does it show up in their lives?
- Is this timely and relevant?
- Is it in the news
- IS it getting traction of social media?
- Are you interested - motivated to learn more?
- Does this provoke engagement from valued perspectives?
- Once you’ve focused your topic after asking these questions, come up with a pitch that won’t take longer than about a minute to explain. At the next Digital Tattoo meeting, you’ll be ready to share your blog idea and get some feedback.
Researching
- Have a look at what’s already been said. You’re joining in on an ongoing dialogue and your blog post should reflect that by providing links to other pages and by summarizing where the conversation has been.
- Read, read, read! You’re becoming a mini-expert in this subject and the biggest service you can do your reader is save them time. You try to become an authority and trusted voice on the topic.
- If the information that you’re looking for isn’t available, don’t be afraid to pick up the phone or write an email and ask somebody. Incorporating the voices of experts in the area will add to your credibility.
- Check out the following for news sources
- Reddit - https://www.reddit.com/
- Ars Technica - https://arstechnica.com/gadgets/
- Slashdot - https://slashdot.org/
- Wired - https://www.wired.com/ (Soft paywall, try not to use)
- The Next Web - https://thenextweb.com/
- Digital Trends - https://www.digitaltrends.com/social-media/
- Engadget - https://www.engadget.com/tomorrow/
- Vice - https://www.vice.com/
- Motherboard (tech subsection of Vice) - https://motherboard.vice.com/
Writing
- The tone you choose to use is very important. Try to find that balance between being informative and entertaining. Mix up the length of your sentences. If something can be said more simply, say it that way. Be concise.
- Sprinkle in lots of hyperlinks. If someone has already explained an issue in detail, just summarize what they’ve said and provide a hyperlink to that article. There’s no point extensively repeating what’s already been said.
- Encourage more thought on the topic. Your blog posts should be informative, but they don’t have to solve the world’s problems. Ask lots of questions and try to generate a discussion.
- See Writing Tips
Technical
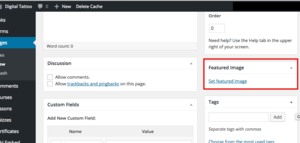
Compose blogs on the Wordpress page using the "Posts" tab. After you write your new post select the boxes "Blog" and "Slider" in the Categories box on the right hand side of the page. As you want your post to be added to the slider it is important to add a Featured Image. These images are uploaded using another box on the right hand side of the page. The featured image will be displayed on the slider on the home page and it doesn't have to match any images within the blog post itself .
Formatting
- Read over the Digital Tattoo Style Guide
- Make sure to choose a good feature image for your post. If you can’t take a picture yourself, find an image with a creative commons license. You can use Google or Flickr to search for them.
- Break up your paragraphs. Nobody likes reading a long wall of text. Short, punchy paragraphs with three to four sentences are best. And they shouldn’t contain more than one thought.
- Where possible, use subheadings. When reading articles, people tend to scan for what’s most useful to them. Subheadings will stop the eye and alert the reader to the section’s content. Otherwise, they might scan right off the page.
Add a Featured Image
- Under Featured Image, click on set featured image.

- Click on the Upload Files tab, and press "Select Files"
- Choose the image that you would to set it as a featured Image.The recommended featured image size is 1920 X 800 px.
Adding Related Blog Posts
In the new Digital Tattoo site, It gives you an ability to add related blog posts to tutorial/theme landing pages. For example, you can add "A Model for Your Data Double" to "Data" blog posts.
- Go to a blog post that you want to add to related blog posts and press edit.
- Under Categories, tick the category that has the same name as the title of the tutorial/theme landing pages. For example, if you want to add the blog post to "data", click on "Data" category.
- Press Save. your blog post is now on related page!