Documentation:Digital Tattoo Student Orientation/Creating Video/Production
The production process is where you shoot the actual video and find/create other kinds of media that will appear in your video (PNGs, GIFs, other video files, etc...).
Filming
Below are a few key things I kept an eye out for when filming. Following these steps will make your editing process easier and a lot less time-consuming.
- When shooting the video, it was helpful to leave at least 3 seconds of video before and after the clip. This gave the video editor enough clip-time to work with when trimming and joining clips together.
- It was helpful to have the teammate being filmed pause for 3-5 seconds after stopping his/her line. This made it easier for the video editor to trim and join clips together, preventing accidental overlap of lines which could cause the whole clip to look awkward. This especially applies when you make a mistake, and want to start over again without stopping the video camera.
- Don't be afraid to re-shoot scenes when you or your colleagues make a mistake! It is always easier to re-do a clip than it is to find workarounds for the flawed clip during the editing process.
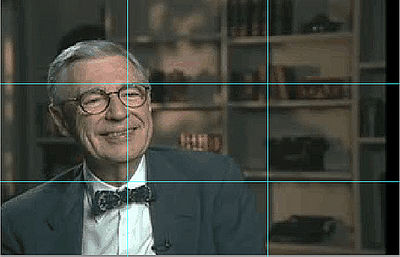
- When interviewing people on camera, follow the rule of thirds. Take a look at the picture below:
Notice how the photo is separated into thirds in BOTH horizontal and vertical directions. The subject being shot should be roughly centered around either the left or right line separating the video into thirds. As you can see, the interviewee's face roughly sits on the left vertical line of the photo, with ample space above the head (not too much above the top horizontal line). I found the the rule of thirds to be an extremely useful and effortless technique that added a professional look to our videos.
For more information on the rule of thirds, visit this blog by Oregon State
Finding Images/Other Media
I used images, videos, and sound effects downloaded from the internet support the videos I did. When deciding the kinds of media I wanted to include, I had to be wary of the copyright procedures that come with using images off the internet. To search for more information on proper image copyright, check out UBC Copyright's online guide to image citation. When searching for images specifically with copyright licenses, I used ccsearch.
It is recommended that you take down citations for every piece of media you decide to keep on hand as you go along. This makes gathering citations in the publishing step much easier with less room for error.
Creating images
Sometimes, instead of finding images online, you'll want to create your own image to suit your own purposes using something as simple as MS Paint/Paintbrush, or something more suited for professional design work like Adobe Illustrator. In any case, this is entirely up to you, but in my experience, sometimes creating my own image, however crude, was a lot easier than trawling the internet for the right image with the right citation. Creating the image myself also meant that I could better tailor the image to fit with the video's message.
