Documentation:DLSblog/Basics
Overview of Blogging
What's a blog
A weblog, or "blog", is really a webspace on the Web. Weblogs cover as many different topics, and express as many opinions, as there are people writing them. Some blogs are highly influential, some have enormous readership, some are university course websites, while others are mainly intended for a close circle of family and friends.
Generally speaking (although there are exceptions), blogs tend to have a few things in common:
- A main content area with articles listed chronologically, newest on top. Often, the articles are organized into categories.
- An archive of older articles.
- A way for people to leave comments about the articles.
- A list of links to other related sites, sometimes called a "blogroll".
Where Can I get a Blog or Webspace?
- UBC blogs http://blogs.ubc.ca
- Wordpress http://www.wordpress.com
- Blogger http://www.blogger.com/
- MySpace http://myspace.com
- LiveJournal http://www.livejournal.com/
Examples
- Worldwide Examples of Wordpress sites:
- UBC Examples:
- http://blogs.ubc.ca/dean/
- http://blogs.ubc.ca/etec522/
- http://blogs.ubc.ca/phar330/
- http://efolio.educ.ubc.ca/whyandhow/
WordPress.com Login Info
- Go to: http://www.wordpress.com
- Click on Sign Up Now to create an account
- Create an account using an email address you can check from the workshop
- The second screen will prompt you to set up a Blog Domain name (you can't change this), a blog title (which you can change) and choose your privacy settings.
- Click Sign Up
- You will receive an email to activate your account/blog. Once you activiate your account, click login to get into your dashboard.
WordPress Dashboard
1. The Dashboard (image Figure 1 at right) provides you with an at-a-glance snapshot of your activity on your webspace, such as: pages, posts, categories, and the QuickPress tool. From the Dashboard, you can also access a variety of tools on the left hand menu bar.
2. My Blogs will display all the blogs you are presently working on.
3. The New Post drop down menu allows you to create either a post or a page on the fly, compose a draft, view comments, and upload media
4. Screen Options allows you to customize the look of your Dashboard by selecting certain elements to be displayed.
5. The Visit Site button will present an authentic view of your webspace - this is what the public will see!
The Difference Between Pages and Posts
WordPress employs two fundamental content types: pages and posts. These content types behave quite differently and therefore it is important to understand when to create a page or a post.
Pages are static. They are a good way to publish information that doesn’t change much, like an "About" or "Contact Us" page. Pages are usually linked from the main navigation bar on the Homepage.
Posts are dynamic. Posts are always associated with a date and are really meant to update your audience.
Some key differences:
- Posts are:
- dynamic (you may create a couple of Posts a day!)
- displayed in reverse chronological order (placing the most recent content at the top of the page)
- assigned tags and categories (helps with search engines!)
- meant for updating your audience
- are syndicated via RSS
- Pages:
- display static content that will not change - or very, rarely anyways (Examples are 'About Me', 'Contact Me', 'Services', etc.)
- cannot be categorized or tagged
- do not appear in RSS feeds
- may have sub-pages (this gives the appearance of a more traditional website)
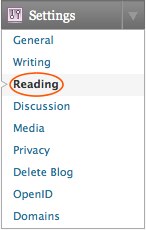
It's now up to you to chose whether you would like static content or dynamic posts to appear on the Homepage. To adjust the settings on your site, go to Settings >> Reading.
How to Write and Edit a Post
Add New Post
- From the Dashboard, click Posts on the left-hand menu bar
- Trash the default post entitled “Hello World”.
- Click Add New (see Figure 2 image at right).
- The Add New Post screen appears. Enter a short title and enter text in the large empty box below the title.
- In the Categories area on the far right, click the Add New Category button and enter a category name. Click the Add button.
- In the Post Tags area on the far right, type a new tag (eg. learning, students, education, etc) and click Add button.
- Scroll down to the Discussions settings section and either allow or disallow comments on your posting.
- On the far right, in the Publish settings, click Preview to see your new post, and then click Publish. Note: the yellow confirmation at the top of the page
Formatting Your Post using the Kitchen Sink
The Kitchen Sink (see Figure 3 image at right) drop-down toolbar provides you with a menu from which you can choose how to format your text.
- From the Dashboard, click Posts on the left-hand menu bar.
- Select a Post to edit by clicking on the underlined title. When the Post opens, click the Kitchen Sink icon. (see Figure 3 image at right)
- The Kitchen Sink toolbar enables you to bold fonts, increase font size, change the colour, make bulleted lists, inserts images, and hyperlinks, etc. When you have finished formatting your post click Publish and visit your site.
Hands-on Activity - Creating & Formatting a Post
- From the Dashboard, create a new Post and title it “Thoughts on the Symposium” and enter some text
- Format your post using the Kitchen Sink
- Add a category and add a tag
- Publish your Post
- Click Visit Site and see what your webspace looks like now!
How to Write and Edit a Page
Add New Page
- From the Dashboard, click Pages on the left-hand menu bar. (see Figure 4 image at right)
- All blogs come with a built-in About page. Click on the About page to edit the content. Add some information about yourself and the course.
- Then click on the Update blue button of the far right-hand side of the page.
- Now, let's add a New Page.
- On the left-hand menu bar, under Pages, click Add New.
- The Add New Page screen appears. For this example, we are creating a course site, so type "Syllabus". Enter some text about the course in the large empty box below the title.
- Click the Kitchen Sink icon to expand the toolbar and format the text.
- Now, let's create one last New Page.
- Call the new page "Updates". (this is eventually where all your Posts will be displayed).
You should now see three pages: "About", "Syllabus", and "Updates". When you have finished formatting your page click Publish and visit your site.
Adding Images and Media to Your Page
- From the Dashboard, click Pages on the left-hand menu bar.
- Select a Page to edit.
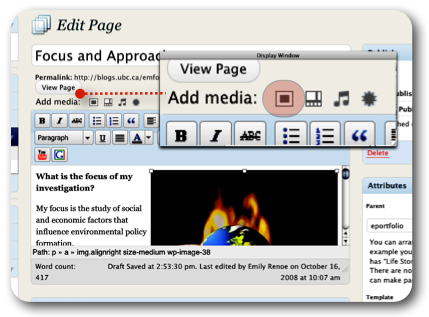
- On the Upload/Insert toolbar click the first icon in the row. (see Figure 5 image at right)
- Add media files from your computer window appears.
- In the Choose files to upload box, click Select Files. From your computer, select an image and click Select (OK on a PC).
- Enter a caption, a description of the image, and select an image size to be displayed on your page. (Note: the default in Full Size). Click Insert into Page.
- When you have finished formatting your page, click Update Page on the far right-hand side and visit your site.
Hands-on Activity - Creating a Page and Adding Media
- Format your About page using the Kitchen Sink
- Add media into your Page.
- Be adventurous and add a YouTube video!
- Click Visit Site and see what your webspace looks like now!
Changing the Look of Your WebSpace
Reading Settings
The Reading Settings control how a blog is displayed to visitors. Front page displays allows you to choose what appears on the blog’s front: the latest posts or a static page that you have created in the Pages section of your blog. (see Figure 6 image at right)
- From the Dashboard, under theSettings area, click Reading
- Select the radio button next to "Front page displays" a static page
- Choose the About page from the drop-down menu for the Front Page
- Set the Updates page as the Posts page
- Click Save Changes
Wordpress Themes
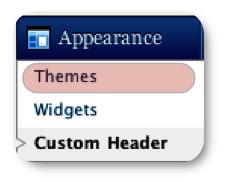
WordPress Themes can provide control over the look and presentation of the material on your webspace.(see Figure 7 image at right)
- From the Dashboard, under Appearance on the left-hand menu, click Themes.
- Manage Themes screen appears, displaying your current theme. Browse through the many different themes and select one by clicking on the thumbnail image.
- Wordpress displays a Preview of the selected theme. Click Activate at the top right of the screen. Visit your site to see the changes!
Customizing Headers
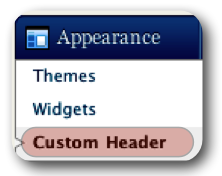
- From the Dashboard, under the Appearance drop-down menu, click Header. (see Figure 8 image at right)
- Click on Choose File, select an image (jpg, gif, png) from your computer and click Upload.
- Adjust the header image with the slide ruler and click Crop Header.
- Click Visit Site and see what your webspace looks like now!
Hands-on Activity: Themes and Custom Headers
- From the Dashboard, under the Settings drop-down menu, click Appearance
- Select a new theme
- Upload a new image header
- Click Visit Site and see what your webspace looks like.
Privacy Settings
The Privacy Settings control your webspace visibility to search engines like Google. You can decide if you would like your blog to be visible to everyone, including search engines or not. If you don't want your blog available to the search engines you can block search engines, but allow normal visitors to see your site. (see Figure 9 image at right)
- From the Dashboard, under the Settings drop-down menu, click Privacy.
- Browse through the Blog Visibility settings and select the most appropriate settings for your webspace.
- Click Save Changes. (Note: If you have selected “I would like my blog to be private, visible only to users I choose,” go to the Users section and add the e-mail address of another WordPress.com user to add them to your blog.)
Online Documentation
- This document is online: http://wiki.ubc.ca/Documentation:DLSblog/Basics
- More resources from Wordpress are here: http://en.support.wordpress.com/

