Documentation:Camtasia Toolkit/Tips/Tips on Recording
When you record a video in Camtasia, noting these tips ahead of time will help you produce a better product:
1. Recording dimensions
- Record the screen in a larger size possible. By doing this, the quality of the your video will be retained when you upload to video server such as Kaltura, Cousera and YouTube.
- On tutorial on how to edit the video dimension of your recording, read or watch the tutorial by Techsmith for Mac and Windows.
2. Recording speed
- Talk slowly when you record the screencast. So that during the post-production, it will be easier for you to edit your voice.
- You do not have to re-take if you make a mistake during the recording. You can just pause for 10 seconds, correct your mistake and continue with the recordings. You will be able to edit out your mistakes in the post production process.
3. Recording "manageable chunks"

Instead of trying to record your entire powerpoint presentation in one attempt using Camtasia (which is virtually impossible as we all know and will take many attempts!), try recording one slide at a time. Each slide becomes an 'entity' all on its' own. You can then 'stitch' them together in Camtasia.
Lastly, you can insert a wrapper chunk(s) anywhere in your timeline. Wrappers can include:
- Guiding questions for students to consider when watching your video
- a self-assessment to take follow the conclusion of the video
- resources to extend learning further
- an opportunity to discuss or work with the content in some way (this may be your in-class activity)
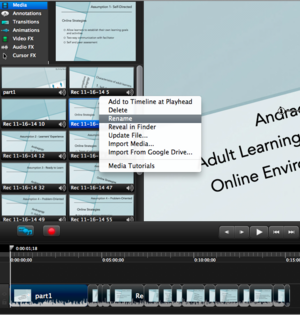
Note: After you record your 'chunks' (i.e. slides), make sure you rename them accordingly (see image at right). This renaming will help you position the correct 'chunks' together on the timeline.
4. Record audio first, then drag other media onto timeline
Again, instead of trying to record your audio/video (i.e. tour of a webpage) together in one attempt using Camtasia, record your audio FIRST and save it. This way, the audio will have its' own timeline, separate from the video (and other media). Next, you can drag different media onto the timeline to align with your audio.
'
Note: Remember to adjust the setting to 'screen off", then hit the red record button to record just the audio.