Documentation:Blackboard Collaborate/Voice Authoring/Create a Voice Board (How to)
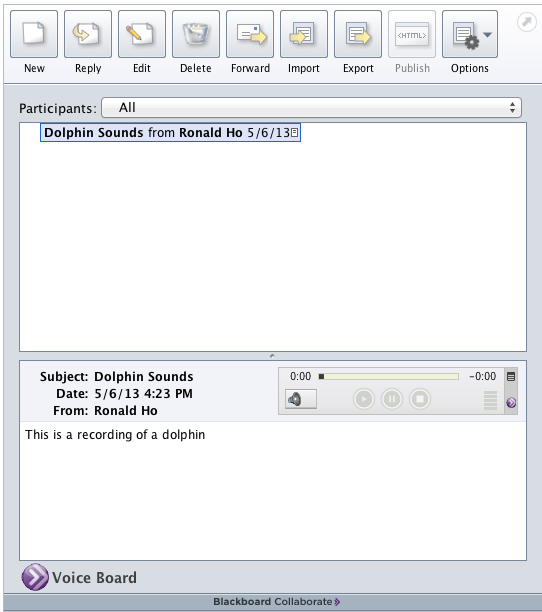
The Voice Board is similar to a discussion board but will use audio files rather than text as a means of communication. It can be used to facilitate discussion that could not be conveyed through text, to facilitate discussion around a lecture clip or recording, or to put a personal touch outside of the classroom.
This document will show you how to:
- Add voice files through a recording or pre-recorded file
- Delete a voice post on the Voice Board
- Amend any posts you have on the Voice Board
- Reply to posts
- Forward a post
- Export your content
Video
This video demonstrates how to create a new post on the Voice Board.
This video demonstrates the other functionality found on the Voice Board.
Effective Practices
- Add a description to your podcast episodes to help students quickly locate the content they need.
- Select the quality that the audio will be recorded in. This is useful for students with lower speed internet connections.
- Let students record their responses to a discussion topic that you started. At the same time, you can provide a recorded response either as feedback or assessment.
- Provide students learning another language opportunities to practice speaking new words and phrases through recorded asynchronous conversations.
Add content
| You will need to create a Tool Link in a Content Area prior to recording. Please refer to Creating a Tool Link (How to). |
Recording live content
- Go into Voice Board via the content item. Give permission to Java and Quicktime should your browser prompt you.
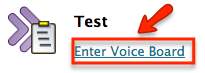
Enter via the Voice Board content item.
- Select new
 to create a new post, a compose window will appear.
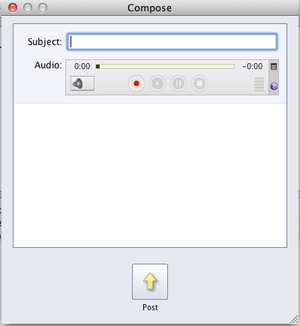
The compose window that appears.
- Fill in the subject field with the appropriate subject for the post.
- Fill out the the description box, which is the space below the audio controls, with a description of the recording.
- To record a post, use these buttons to record (
 ) , pause (
 ), play (
 ), and stop (
 ). To re-record press the record button again.
- For Audio Options, click small box with stripes.

For audio options click on the audio options symbol.
- Click Post to publish the content.


Uploading pre-recorded content
- Select the Import button
 at the top toolbar. A file chooser will appear.
 - Choose the desired file in the file chooser, and click ok to begin uploading.
- After the upload is complete, Voice Podcaster automatically creates a title for the content, based on the file name.
- If you would like to modify the name and the description, follow the steps in 'Amend file descriptions and names section below.

Keep in mind when importing, a large file can take a very long time to process and upload. |
Amend file descriptions and names
- Enter the Voice Board application from the link on the Content Area page.
- In the file listing, below the row of buttons at the top, select the appropriate file you wish to amend.
- Click the edit button
 at the top of the screen.
 - Change the appropriate fields, or add to your recording if you wish.
- Click Post to finish.

Delete content
- Enter the Voice Board application from the link on the Content Area page.
- In the file listing, below the row of buttons at the top, select the appropriate file you wish to delete.
- Click the delete button at the top of the screen.
- Confirm your action by selecting yes. Otherwise, select no to cancel and return to the Voice Podcaster application.

Other Functionality
Reply to posts

Since the Voice Board is a discussion board, replies can be made to previous posts. This functionality facilitates the discussion around the audio file.
Forward posts

Forwarding a voice post allows you to send a post to anyone with an email address. This lets you forward content to those who are not enrolled in the course. Please note that this utilizes your email that you use with Connect. To use this tool:
- Click the Forward button in the top toolbar. A popup will appear allowing you to compose your message
- Type in an appropriate email address in the "To:" field.
- (Optional) Enter a different subject than the default one pre-populated by Voice Board.
- (Optional) Fill out an appropriate message you wish to send to the recipient.
Export
The Export functionality allows you to export your Voice Board files for archival or backup purposes. Voice Board allows you to choose what exactly you want to export, and into what formats you would like to export in.
- Click the Export button
 in the top toolbar. A popup will appear, allowing you to select options for exporting your content.
 - In the first drop-down menu (below Select what you want to export), select how much of the Voice Board you would like to export. You can choose between Entire Voice Board which will export the Voice Board in its entirety; Top Level Messages only which will export original posts only and not any replies; and Selected Messages only, which will only export the messages you select.
- In the second drop-down menu (below Select the export format), select which format you would like to export your messages in. If you export in Voice Board (.wvb) format, it will create a file that is compatible with Voice Board or Podcaster only. You may also choose to export it into Speex, MP3, or Wav. Those formats will be downloaded in an archive file, which you have to expand the contents prior to use.

The Export Window will enable you to choose which messages you want to export and the file format.
- Click Next. A file prompt will appear for you to select where to save the file to your computer.


Options

- Play on click: By selecting this option, the podcasts will not play until you select them.
- Continuous Play: By selecting this option, the podcasts will continuously play until you press Pause or Stop.
- Expand All: This will expand all threads in the Voice Board expanding the content showing any replies.
- Collapse All: This will collapse all threads in the Voice Board hiding the thread's replies.
- Refresh: This will refresh the board, checking for new content.