Documentation:Adding Class Roster to iGrader without using WebCT Vista in Windows
Do you want to add your class list to iGrader when your course is not on WebCT Vista in Windows?
Create a ".txt" file
- Note: The entries should be placed in this order: Last Name,First Name,Student ID
Using Excel
- a. Open Excel and enter (or copy and paste) your class list with their Last Name in Column A, First Name in Column B, and Student ID in Column C.
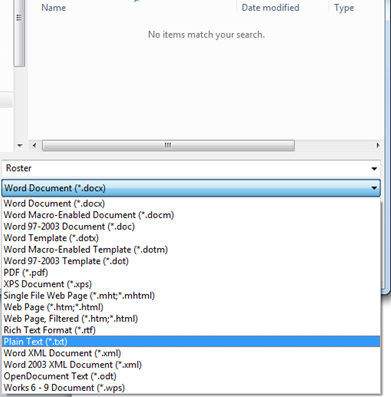
- b. Save the file as "Roster.csv" (Note the capital R and the ".csv" extension.
- c. Open any Windows Explorer (eg. My Documents) -> Tools -> Folder Options
- Note: If you cannot see the toolbar, press "Alt" on the keyboard.
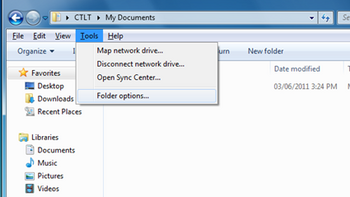
- d. View Tab -> uncheck "Hide extensions for known file"
- e. Right click the "Roster.csv" file and Rename -> delete the csv extension and replace it with txt.


Using Word/Notepad
- a. Open Word or Notepad and enter your class list in the following format: Last Name,First Name,Student ID.
- Note:Use the same format below for Word.

- b. Save the file as "Roster.txt".
- Note: Notepad's default extension is already txt


Replace "Roster.txt" file
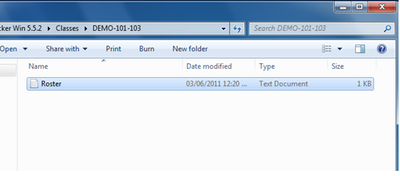
- Go to "iClicker Win - UBC" -> "Classes" -> <Class Name>. Replace the "Roster.txt" file with the "Roster.txt" file you just made.
- Note: You have to create a class in iClicker before you can see the file with "Roster.txt" in it.

Course Management System
- a. Open iClicker. Go to "Your Settings and Preferences".
- b. Go to the "Registration/Export" tab.
- c. Choose the Course Management Option to be "General".

Register clicker IDs to the students
- Pick one of the three options below:
- Note: Option C is usually used for a small number of students (eg. a new student joins your class after you have already finished registering the other students)
Manually in iGrader
- a. Open iGrader and you will see something like the image below.
- b. Click on a student's name. Enter their iClicker ID in the "Add New Clicker" field. Press the "Add New Clicker" button.
- c. The student's name will turn blue and the clicker ID you entered would disappear. Do step b for the rest of the students.


"Roll Call" in Class
Note: This method will reveal your students' student numbers to the rest of the class.
- a. Open iClicker. Display your screen through a projector so that students can see their names when their names scroll down later.
- b. Click on the upside down arrow and choose the option Loan/Register Clickers.
- c. Click on the "Roll Call" button.
- d. The pop-up shown below will appear. You can choose the speed of the names scrolling down at the top.
- e. When a student sees their name scroll down into the Step Two area (blue), he or she should click on the letter (shown beside their name) on his or her clicker. The icon will disappear when the signal is received.
- f. When the student's name scroll down into the Step Three area (green), he or she should click on the second letter. The icon will also disappear when the signal is received.
- g. To unregister the clicker, the student can click on "D" once to see their student number appear (blinking in blue and red) on the bottom and click on "D" again to unregister their clicker (will see Cleared <clicker ID>)


Manually in iClicker
- a. Open iClicker. Click on the upside down arrow and choose the option Loan/Register Clickers.
- b. Fill in the Remote ID, find the student's name, and pick the choice "For the Term (Permanent)" for the Register field. Click "Set and Close".
