Spectrophotometer
What is Spectrophotometry?

Spectrophotometry is a method of quantitative analysis of molecules which can estimate the concentration of a solution. A light beam's intensity as a function of its colour (wavelength), is passed through a coloured solution, and by measuring the amount of wavelength is absorbed, an estimate of the concentration can be obtained. Typically, a chemical reaction occurs with the compound of study, and the value is measured against a standard curve with known concentrations of the target compound.
Applications in Soil Science
Healthy plant growth depends on a fine balance of nutrients, and this is of particular importance to the agricultural sector. The determination of this fin nutrient balance can be done through quantitative analyses in a lab. Spectrophotometers are a valuable tool for monitoring nitrogen and phosphorus levels in fertilizers and soil samples. Through spectrophotometric technology, we can monitor fertilizer applications in addition alongside other soil management practices.
Thermofisher Spectronic 200 Spectrophotometer


The Thermofisher Spectronic 200 spectrophotometer is a single cuvette spectrophotometer made with the intention of teaching and learning. It uses 1cm2 cuvette containers, utiilizes a tungsten halogen lamp, has a detection range between 340 to 1000nm, has a wavelength accuracy +/- 2nm, and wavelength repeatibility of +/- 1nm.
Instrument usage


Step-by-Step Guide
The following is a step by step guide offered for the
- Plug the Spectronic 200 in and turn on the power (switch is at the back of the device).
Visual aid for operating spectrophotometer - The Spectronic 200 will prompt the user to remove any cuvettes in the instrument and close the sample compartment. Press the to continue once you have ensured it is empty and closed.
- The device will automatically run through a series of self-diagnostic steps. If there are any error messages, discontinue use and contact the technician.
- After initialization is complete, the main menu appears. Select "SPEC 200E Modern Interface" by using the arrow keys and enter button.
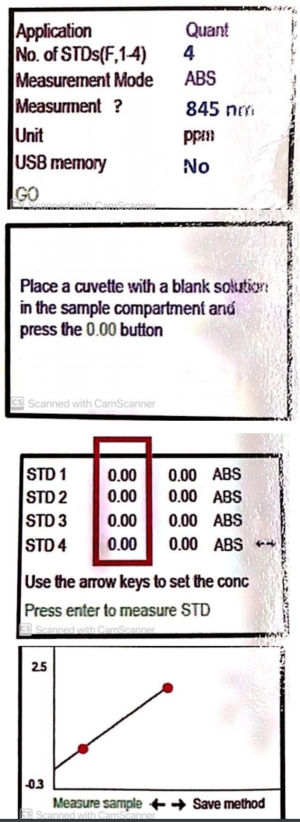
- There are several modes to choose from. For APBI 200, we will be using the Quantitative Analysis. With the "Application" item selected, use the left/right arrows to choose "Quant".
- Use the arrows to set the number of standards to 4.
- Ensure measurement mode is in absorption ABS.
- Use the arrows to set the wavelength to 845 nm
- Units are in PPM.
- We do not use the USB memory or save function.
- Use the arrows to navigate to the GO button and press to continue.
- The instrument will prompt you to place a blank solution (Mehlich 3 extraction solution) into the sample compartment and press to continue. This step is important! You are beginning to set the standard curve which is used for the readings.
- The instrument will confirm that it is recording the zero absorbance. Wait for the next prompt.
- Once the zero measurement is completed, the standard solution-editing screen will appear. Because we have chosen foud standards, tehre will be four standard that show on the screen.
- Set the first concentration (STD 1) to 2 ppm using . This is the area outlined in the red box on the right.
- Press to take the ABS measurement.
- Repeat for the 4 ppm, 6 ppm, and 8 ppm standards.
- Once all four standards have been completed, press the center button again to display the calibration graph. (Note: image at right has only two calibration points but yours will have four based on the instructions above).
- Use the to select "measure sample". You can now measure the samples.
- Do not turn off the instrument between labs as we will lose the calibration curve. If it is turned off, you must run the full instructions to recalibrate the instrument.

Using the Cuvette Holders

Square cuvettes - simply slide the square cuvette into the square cuvette holder.
- If the cuvette has frosted sides these should face the front and rear of the instrument. The beam passes through the sample compartment from right to left so the clear faces of the curvette must be on the right and left sides.
Test tube cuvettes - The screw clamp only needs to be adjusted once for a particular size of test tube.
- Loosen the thumb-screw and place the test tube cuvette in the holder.
- Slide the moving part up against the test tube so that it is held securely and tighten the thumb-screw (do not over-tighten).
- Remove the test tube and re-insert it without adjusting the thumb screw.
The slide is locked down on only one side so it serves as a spring. If the tube is held securely and slides in and out with ease the tension is correct. If significant force is required to insert or remove the tube, or if the tube wobbles while in place, adjust the position of the slide component to decrease or increase the grip tension as required.
References
- Spectrophotometry. (2020, August 03). Retrieved August 28, 2020, from https://en.wikipedia.org/wiki/Spectrophotometry
- Thermo Scientific™ SPECTRONIC™ 200 Spectrophotometer. (2020). Retrieved August 28, 2020, from https://www.spectrumchemical.com/OA_HTML/lab-supplies-products_Thermo-Scientificsup-8482sup-SPECTRONICsup-8482sup-200-Spectrophotometer_312861.jsp?section=23190