Software
Arduino
Download link for the Arduino Software (IDE) can be found below:
MATLAB
If you are installing MATLAB on a UBC-owned computer, open Software Center on the computer and follow the installation prompts.
SOLIDWORKS
Installation instruction for the latest SOLIDWORKS can be found here: Installation Link
- Navigate to the Installation Section and follow the steps to obtain the SEK-ID and Serial Number.
- Note: SOLIDWORKS is only available for Applied Science students.
- Note: SOLIDWORKS is not backwards compatible, meaning you cannot open version 2019 files with SOLIDWORKS 2018. If you open older files with newer software versions and save the files, they will be permanently and irreversibly converted to the newer version. Double check which version you need for the context of your work.
LS-DYNA (Windows Personal Computer Installation)
Installation Guide
You can find the installation executable here. Start at Section 1.Complete Installation and click on the hyperlink "lsdyna_R10.0_winx64-install-eng.exe" for 64-bit windows installation.
- You will need a password and username to download the executable.
- User Name: User
- Password: computer
License Acquisition
New Site License instructions: https://it.apsc.ubc.ca/ANSYS/#getANSYS
Older instructions:Once you finish the installation, you will need to set-up your network based license. The license is currently based on Dr. Lyndia Wu's computer. Before proceeding to following steps, you need to check with Lyndia that your computer's IP address is included in her license file.
To acquire your computer's IP address, open the start menu, type "cmd" and press "Enter" to Command Prompt. Type "ipconfig" and press "Enter". Your IP address should be the IPv4 address; see LS-DYNA Figure 1.

Once your IP address is added to the license file, follow these steps and see LS-DYNA Figure 2.
- Open the start menu, search for "program manager" and launch it with administrator mode.
- Navigate to "Env Variables" in the navigation bar and click on "Set LS-DYNA ENV. Variables".
- Select "network" as License Type and enter "137.82.114.174" for Network License Manager. Leave every other setting as default.
- Click "Apply" when finished with changes.

LS-DYNA Figure 2: Use these to setup LS-DYNA license at SIMPL

You should now be able to execute an example k-file. See LS-DYNA Figure 3.
- Navigate to "Solver" in the navigation bar and click on "Start LS-DYNA Analysis".
- Click on "Browse" for the Input File option and select any one of the included example k.file.
- Click on "RUN".
- A command window should pop-up with outputs of the status of the simulation.
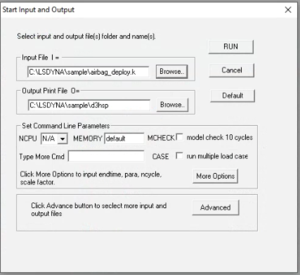
LS-DYNA Figure 3: Testing LS-DYNA after initializing license

Resources for Getting Started
LS-DYNA Manuals: These files contain all definitions of parameters and keywords in LS-DYNA. Refer to these when you encounter unknown keywords.
LS-DYNA Units Guide: LS-DYNA does not explicitly assign units to inputs. This means you need to keep track of consistent units. This link outlines the different scaling systems that you can use in LS-DYNA.
YouTube Tutorial: For those who are new to LS-DYNA, this 3-parts video series provides a good overview of LS-DYNA's interface and general workflow. The series walks you through on the steps of making a simulation of a ball hitting a jello block.
LS-DYNA (UBC ARC Sockeye Installation in Allocated Personal Space)
****GUIDE IS ONLY APPLICABLE TO WINDOWS****
Account & VPN Setup
Before moving to the following steps for installation of software, you first need to obtain access to the lab's UBC Sockeye allocation. Check with Lyndia to see if your project can benefit from using Sockeye.
If you wish to access Sockeye from your personal computer, you will need to setup VPN to access UBC Confluence and Sockeye. VPN setup instructions can be found here: link.
Access Terminal
There are several options of access terminals you can use for Sockeye. The author of this Wiki section recommends MobaXterm. It supports SFTP with a intuitive file explorer and user-friendly interface. The alternative is Windows Subsystem for Linux. It is recommended to use Ubuntu 18.04 LTS instead of the newest 20.04 LTS version since less support/forum content exists for the newer version.
Note: The rest of the content is based on MobaXterm.
Network License Setup
SSH Session Setup
- Once MobaXterm is installed, open the terminal and select Session on the top left hand corner of the menu ribbon. See LS-DYNA FIgure 4.
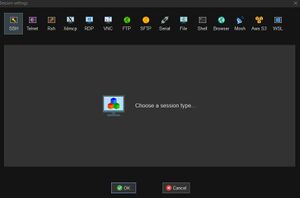
LS-DYNA Figure 4: Session Menu - Select SSH. Then enter <sockeye.arc.ubc.ca> along with your CWL username. Leave the port at 22. Feel free to also create a desktop shortcut for launching this session. See LS-DYNA Figure 5.
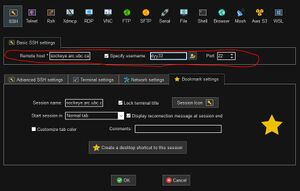
LS-DYNA Figure 5: SSH Menu - Click OK. You should now see the console requesting your CWL password. Once you enter the password, Sockeye will prompt you to enter a two-factor authentication password that will be sent to your phone. It will send you ten codes with the first digit being 0 to 9. See LS-DYNA Figure 6.
- If you do not have any passcodes left or never requested them, press 1 to request a new set of passcodes.
- If you do have a set of valid passcodes, Enter the one with the first digit requested by Sockeye.

LS-DYNA Figure 6: Passcode
- You should now be greeted to the Sockeye boot screen.


SFTP Session Setup
- Do not close the SSH Session. You will need this for running a test keyword.
- Select Session again from the top menu ribbon. Select SSH. Then enter <sockeye.arc.ubc.ca> along with your CWL username. Leave the port at 22. Feel free to also create a desktop shortcut for launching this session. See LS-DYNA Figure 7.
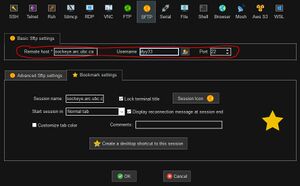
LS-DYNA Figure 7: SFTP Menu - The SMP and MPP versions of LS-DYNA can be found here. Depending on your application, you may choose to install either option. For smaller simulations with lower CPU units (less than 10), SMP version will perform better than MPP. I have installed SMP LS-DYNA R10 1.0 single precision (OS RedHat). See LS-DYNA Figure 8.
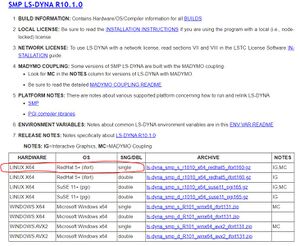
LS-DYNA Figure 8: SMP Versions - Download the archive (.gz). Extract the file to a convenient location for file transfer. Navigate to the file location and re-name the file to "lsdyna". See LS-DYNA Figure 9.
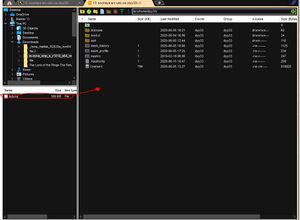
LS-DYNA Figure 9: Installation file transfer - Follow this link's Step 1 instruction (Username: user Password: computer) for installing LS-DYNA. This will be done in the SSH session that you should still be opened in another tab.
- For Step 1, you do not need to modify the first 4 lines of the lstc.log. This is just for the setup of license file which we already have.
- Do not follow the rest of the instructions, only step 1.
- Create a folder inside your space, /arc/home/<CWL>/, with the name <.licenses>. Inside the folder, create a new text file called <ls-dyna.lic>. Copy the following two lines of text into the file and save the file. See LS-DYNA Figure 10.
- #LICENSE_TYPE: network #LICENSE_SERVER: 31010@137.82.114.174

LS-DYNA Figure 10: Creating <ls-dyna.lic> file
- #LICENSE_TYPE: network #LICENSE_SERVER: 31010@137.82.114.174
- Navigate back to your space, /arc/home/<CWL>/. Open the file <.bash_profile>. Add the following line of text to the file and save the file. See LS-DYNA Figure 11.
- export LSTC_FILE=~/.licenses/ls-dyna.lic
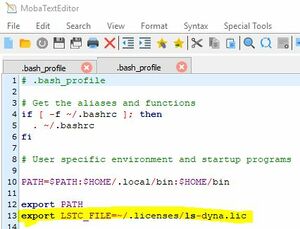
LS-DYNA Figure 11: Editing <.bash_profile> file
- export LSTC_FILE=~/.licenses/ls-dyna.lic


Running a keyword
The license should now be setup for your LS-DYNA. To test this, copy a .k file of your own choice to your project workspace using the SFTP session. Then, navigate back to the SSH session.
- Enter: ./lsdyna to launch LS-DYNA.
- Enter: i=<keyword name>.k to run the simulation. Case sensitive!
- You can view the results and transfer them back to your local computer after the simulation ends.
CORA (CORelation and Anaylsis) [UNDER CONSTRUCTION]
Background
"The software CORA (CORrelation and Analysis) provides an objective evaluation of time-history signals, e.g. derived from test and simulation. The software combines two independent sub-methods, a corridor rating and a cross-correlation rating. The corridor rating evaluates the fitting of a response curve into user-defined or automatically calculated corridors. The cross-correlation method evaluates phase shift, shape and area below curves. " - pdb, Parnership for Dummy Technology and Biomechanics
Installation Instructions
- Go to pdb's website and install CORA 3.6.1
- Extra the zip file at the download location.
- Navigate to ...\cora\software and open install_cora.txt file. Follow the installation step 1 to 7 with the follow modifications:
- If you do not have administrative previleges to modify and save .bat files, instead of creating the new directory at C:\progam files\cora, simply create a new folder named "cora" in your D: drive.
- To edit cora.bat file, right click and select "Edit". Replace "<path of cora software>\cora_361.exe" with: "D:\cora\software\windows\cora_361.exe"
- For step 6, set both path for WINDOWS to your browser's executable file. This is mine:
- # --Windows-- BROWSER C:\Program Files (x86)\Google\Chrome\Application\chrome.exe #BROWSER C:\Program Files (x86)\Google\Chrome\Application\chrome.exe
Using CORA
Before running any CORA files, you should take a look at the manual (located here: D:\cora1\manual) and the two papers (D:\cora1\publications) that contains the theory CORA applies.
- Section 13 describes the work flow of CORA. It is recommended to follow along this and read specific sections it reference to understand the format and settings of CORA.
Control File (.CPS File)
- Currently recommending using the default global parameters/settings. [UNDER INVESTIGATION]
- The pair of data you wish to compare needs to be in a format specific to CORA. See page 40 of the CORA manual.
- Input the location of the data files in the DATAFILES section. See example in CORA Figure 1.
Miscellaneous Software
You can find Microsoft Office Professional Plus, Google Chrome, Acrobat Reader DC, Skype and other productivity software on the Software Center on your UBC-owned computer.