Library:How to Search OvidSP Health Databases
(Redirected from Library:How to Search OvidSP Databases)
The major health databases on the Ovid interface are:
| 1974 – present, daily update | Covers international and European biomedical, pharmaceutical and other life sciences journals. Some full-text. | |
|
EBM (Evidence-Based Medicine) Reviews |
Varies – current | Covers all seven evidence-based medicine databases (ACP Journal Club, Cochrane Central Register of Controlled Trials, Cochrane Database of Systematic Reviews, Cochrane Methodology Register, Database of Abstracts of Reviews of Effectiveness, Health Technology Assessments, and NHS Economic Evaluation Database). Allows you to search all at once. Some full-text. |
|
HaPI - Health & Psychosocial Instruments |
1985 – current | Evaluation and measurement tools designed to facilitate health and psychosocial studies. No full-text. |
| 1948 – current | Covers major international biomedicine, dentistry, nursing, health administration journals. Some full-text. |
How to access Ovid databases (Note: Ovid was formerly known as OvidSP)
- Go to the UBC Library Home Page (http://www.library.ubc.ca/).
- In the main search box click on the Indexes & Databases tab
- Search for the Ovid database you require. (e.g. MEDLINE )
- Click on the name of the database to connect to it.
Searching – Ovid Search
- This is OvidSP's main search page!
- Enter a keyword or phrase in the search box, e.g. heart attack.
- Keep the check mark beside Map Term to Subject Heading.
- Click on the Search button.

| For newer terms, try a keyword search by deselecting the Map Term box if OvidSP does not map to a good subject heading. |
|
|
What does "mapping" your term do? In MEDLINE, OvidSP maps heart attack to a list of terms called MeSH (medical subject headings). When you search with MeSH, you improve your search retrieval/relevance. EMBASE uses similar subject headings (called EMTREE). EBM Reviews, HaPI and IPA use keywords rather than subject headings. |
Mapping Display – Selecting the best subject heading
- OvidSP's Mapping Display lists a number of possible Subject Headings for heart attack.
- Select the best – i.e. Myocardial Infarction.
- Click on the heading itself to see terms that are broader or narrower.
- Select the Explode checkbox to expand the search to include all narrower terms.
- Select Focus to restrict your search to Myocardial Infarction as a major topic.
- Click on the i icon to read about the heading.
- Click on Continue.

Subheading Display: Focusing the subject heading
- The Subheading Display lists many possible subheadings for Myocardial Infarction.
- Use these subheadings to restrict your search to specific aspects (e.g. Mortality) of your search,
- OR click on Include All Subheadings to retrieve all articles on a topic.
- Click on Continue.

Ovid Basic Search
- To access Ovid's Basic Search option, click on the Basic Search button.
- Enter a search term or phrase (e.g., heart attack).
- You can Include Related Terms in your search by checking the box below the search box.
- Click on Search.
|
|
What is a "Basic Search"? OvidSP's Basic Search option allows you to search using natural language, i.e. keywords or phrases, in plain English. This search option does not map to subject headings or display subheadings. |
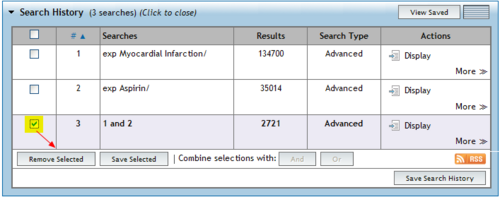
Combining terms – AND or OR
- Select the sets that you want to combine.
- Click on the AND button to combine the sets with the Boolean search AND to retrieve articles that contain all of the terms. e.g. Myocardial Infarction AND Aspirin
- Click on the OR button to retrieve articles that have any of the terms. e.g. cardiac arrest OR heart attack

| You can type set numbers in the search box, rather than use the Combine button, e.g. 1 and 2 |
|
|
Search Technique Tip Search each topic/term separately and then use the search history box to combine your topics/terms. |
Limiting – To refine your results
- On the main search page, below the search box, click Limits to expand the Limits menu.
- Click Additional Limits to see all available Limits.
- Select a search to limit (or Ovid will default to the last search).
- Check individual boxes or choose from the drop-down menus (e.g. language, publication year, publication type).
- Click Limit a Search to apply the limits selected. OvidSP will bring you back to the main search page.

| Do NOT overuse limits as they reduce your retrieval of relevant articles. |
Displaying & marking search results
From the main search page, scroll down to see your search results.
- From each citation, you can click on:
- Ovid Full Text – to go directly to the full article online (when available)
- Abstract Reference – for a summary of the article
- Complete Reference – for more details, including subject headings
- Find Similar – to find related articles based on terms found in the title
- Find Citing Articles – to find articles that cite the original article
- UBC eLink – to locate the article
- Mark citations by clicking the box(es) on the results display or on the abstract/complete reference display.
- To customize the display of results list (i.e., change the displayed fields or the citation style), click on the Customize Display link in the Search Information box and select your preferences.

Output options: Print
- Select individual citations using the checkboxes, OR Select All at the top of the results list.
- Click on the Print output option.
- In the pop-up dialogue box, select your preferred Fields display. Most searchers prefer Citation + Abstract fields.
- Check Search History to include your search strategy.
- Click on the Print Preview button to display your search in a new browser window. From your browser print the results.

Output options: Email
- Select individual citations using the checkboxes, OR Select All at the top of the results list.
- Click on the Email output option.
- Enter your Email address.
- In the pop-up dialogue box, select your preferred Fields display. Most searchers prefer Citation + Abstract fields.
- Select your citation style.
- Check Search History to include your search strategy.
- Click on the Send Email button to send the email.

Output options: Export
- Select individual citations using the checkboxes, OR Select All at the top of the results list.
- Click on the Export output option.
- In the pop-up dialogue box, select your export format (e.g., Txt, MS Word, PDF, Endnote,Refworks}.
- Select your preferred Fields display. For citation management tools, select Complete Reference.
- Click on the Export citations button to export your search.

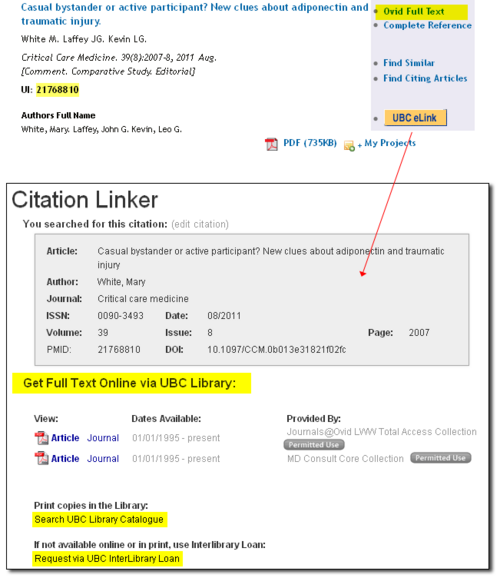
Getting the article
- If your citation offers Ovid Full Text, use that full-text link first.
- If Ovid Full Text is not offered, click on the UBC eLink button. This opens a new window called Citation Linker.
- To access full text from this new window (if available), click on the article link under Get Full Text Online via UBC Library.
- If full text is not available online, click on Search UBC Library Catalogue to see if we have a print subscription. If we have the journal and volume you need, remember to write down it's location and call number.
- If not available online or in print, Request via UBC Interlibrary Loan.

Saving your search history in Ovid
- To save searches and set up alerts in Ovid you must first set up a free Personal Account. The My Account button is located on the top right of the main search page.
- To save searches and set up alerts, click on the Save All icon on the bottom right corner of the Search History box.
- You have four options for saving: Temporary (72 hours), Permanent, AutoAlert (SDI) and My Projects. The AutoAlert option allows results for your saved search to be emailed to you regularly.

|
|
You can set up an RSS feed by clicking on the RSS icon below your search history. |
Deleting search sets from your search history
- On the main search page, select the checkbox beside the individual searches you wish to delete.
- Click on Remove Selected.

|
|
A quick way to delete searches is to type the following command in the search box: ..pg followed by the set(s) you wish to delete: e.g. ..pg 2,5,8-10 |