LFS:FASprint
Introduction
To send print jobs or make copies on the LFS copiers after August 12, 2019, you will need to have an account registered with LFS Finance where they can send the charges. Existing copy codes on the copiers have been transferred to the new system.
Obtaining (if you are new to LFS) or updating your printing access on the copiers can be done by filling out this request form, https://my.landfood.ubc.ca/human-resources/hr-forms/fasprint-account-set-up/.
Photocopiers
| Printer Name | Type | Location | Windows Connection | Mac Connection |
|---|---|---|---|---|
| lfs-mcm249 | Ricoh IM C6000 | MCM 249 | \\fasp-z04.ead.ubc.ca\lfs-mcm249 | smb://fasp-z04.ead.ubc.ca/lfs-mcm249 |
| lfs-mcm262 | Ricoh IM C6000 | MCM 262 | \\fasp-z04.ead.ubc.ca\lfs-mcm262 | smb://fasp-z04.ead.ubc.ca/lfs-mcm262 |
| lfs-fnh200 | Ricoh IM C6000 | FNH 200 | \\fasp-z04.ead.ubc.ca\lfs-fnh200 | smb://fasp-z04.ead.ubc.ca/lfs-fnh200 |
Staff Users
The copiers will auto attach to your office computer. Please contact the Learning Centre if you do not see the copiers.
| Printer Name | Type | Location | Windows Connection | Mac Connection |
|---|---|---|---|---|
| lfs-mcm248 | HP BW Multifunction | MCM 248 - Dean's Office | \\fasp-z04.ead.ubc.ca\lfs-mcm248 | smb://fasp-z04.ead.ubc.ca/lfs-mcm248 |
| lfs-mcm254 | HP BW Multifunction | MCM 254 - Finance Office | \\fasp-z04.ead.ubc.ca\lfs-mcm254 | smb://fasp-z04.ead.ubc.ca/lfs-mcm254 |
| lfs-mcm264 | HP BW | MCM 264 - Learning Centre | \\fasp-z04.ead.ubc.ca\lfs-mcm264 | smb://fasp-z04.ead.ubc.ca/lfs-mcm264 |
| lfs-mcm278 | Lexmark | MCM 278 - Comms & DAE | \\fasp-z04.ead.ubc.ca\lfs-mcm278 | smb://fasp-z04.ead.ubc.ca/lfs-mcm278 |
| lfs-mcm291 | HP BW Multifunction | MCM 291 - Grad Office | \\fasp-z04.ead.ubc.ca\lfs-mcm291 | smb://fasp-z04.ead.ubc.ca/lfs-mcm291 |
| lfs-mcm344 | HP Colour Multifunction | MCM 344 - Student Services | \\fasp-z04.ead.ubc.ca\lfs-mcm344 | smb://fasp-z04.ead.ubc.ca/lfs-mcm344 |
Windows - Printers
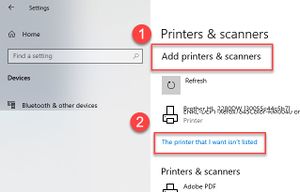
Use Windows search to bring up Add Printers & Scanners. Click on Add Printers & Scanners in the dialog window. Wait for the "Printer isn't listed" link to appear, then click on that.
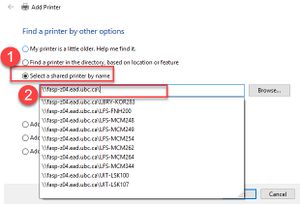
In the following dialog, click on Select a shared printer by name. Then type in the Windows share name of the copier listed above.
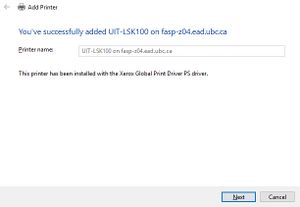
Once connected, Windows will automatically install the required printer drivers for the selected copier.

You can check the Set as Default printer option if this will be your default print device.
Mac - Printers
Drivers for the Ricoh copiers can be obtained from the vendor's websites. Links are provided below.
| Ricoh C6000 Driver Link | Installing the Ricoh driver |
For users connecting to the printers in the staff offices, you can use the built-in Generic Postscript driver.
Set Up Details
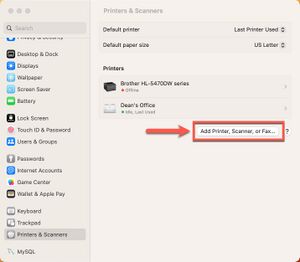
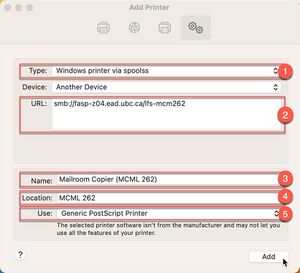
Under System Settings, select Printers & Scanners, then click on the Add Printer, Scanner or Fax... button to add a printer.
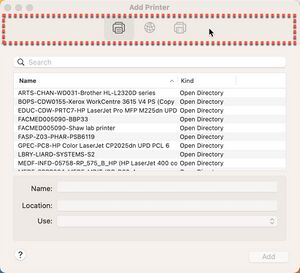
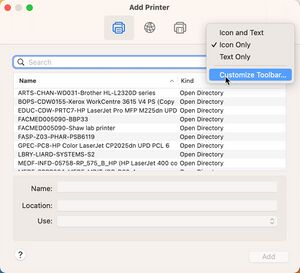
If the Advanced item is not on the toolbar in the dialog that appears, you can add it by holding down the control key and clicking on the toolbar area. In the dropdown menu that appears, select Customize Toolbar, then drag the icon on to the toolbar.
Click on Advanced and wait for the window to load.
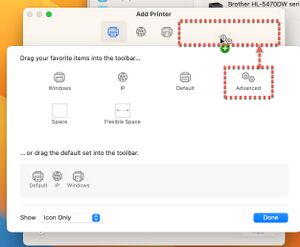
Select Windows printer via spoolss for the Type, and fill in the URL with name of the copier from the first tab of this page.
Fill in the Name, and Location accordingly. You can Use the Generic PostScript printer.
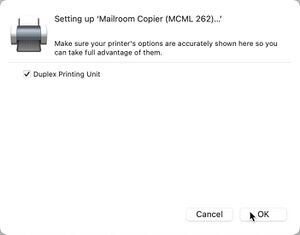
Check the Duplex Printing Unit option.
The copier is now installed and ready for use. You will be prompted to enter credentials when you print to the copier, use your EAD (CWL) username and password.
Setting the copier options
Ricoh
In the Printer Options dialog,
- set the Finisher Option to Booklet Finisher SR3290.
The copier is now installed and ready for use. You will be prompted to enter credentials when you print to the copier, use your EAD (CWL) username and password.
Windows - PaperCut
Using these instructions, connect to this share drive location.
\\fasp-z04.ead.ubc.ca\Client\win-latest
Now run the client-local-install.exe as an admin user. Agree to the license agreement.

Accept the default installation location.
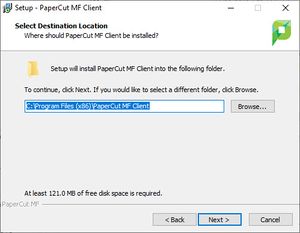
Install for all users on your computer.

Install.

Finish the installation and leave the Launch client and verify my identity checked.

In the following pop up dialog, enter in your CWL ID and password. If you are a student worker, enter in your CWL_ID.stu.

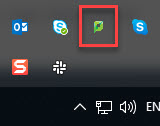
There will now be a new icon in your taskbar, click on the upward pointing chevron near the clock, you will see the PaperCut client.
Mac - PaperCut
Install the PaperCut client to your computer. You need to use an administrator account on your Mac.
In Finder, press Cmd + K, type this into the address field.
smb://fasp-z04.ead.ubc.ca/Client/mac-latest
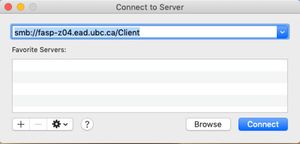
Run the client-local-install app to install PCClient into Applications.
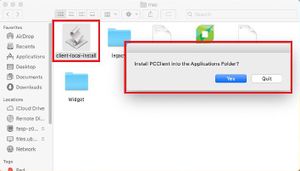
PCClient can now be found in the Applications on your Mac.

Set up PCClient to auto launch when you login to your Mac.
- Login with the account that you normally use on your Mac
- Under System Preferences, select Users & Groups, select your user account.
- Click on the Login Items tab and click on the + to add an item.

Browse to PCClient in the Applications folder and click Add.
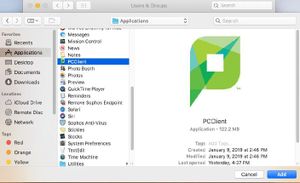
PCClient will now stay automatically when you login.

The PCClient will now appear in your icon bar when it is running.

Launch Agent
An alternative method of starting pc-client automatically using launchd can be found here. This is useful if you do not log out of/shutdown your computer on a regular basis. The Launch Agent will ensure that the PC-Client application is running.
Accounting
PaperCut records the page count after the job has been printed.
Web Print
This feature allows you to upload a print ready document (PDF or image files) to fasprint.ubc.ca for release to one of the 3 copiers. This feature is unable to provide a cost estimate for your job. It will be calculated and accounted for after it has been printed.
After you have uploaded the file to be printed and have selected the options (paper type, colour, single/doublesided, etc.), and successfully completed, the print job will be available at any of the copiers.
At the Copier
At the copier, there will be a card reader where you will swipe your UBCcard to access the print and copy features. If you forget your UBCcard, you can login using your CWL ID and password on the copier’s console.

After you have swiped your card or entered your CWL ID and password, you will see all the accounts that are available to you.

An alternative set up for automatically starting pc-client using launchd can be found here LFS:FASprint-launchd here
There are no changes to how the copiers otherwise operate.
Print Accounting Dialog on your Computer
When printing from your computer, you will see a pop-up dialog box when you click print. It will prompt you to select the speed chart. If you have more than one speed chart, you can select where you would like the printing to be charged to.

Select the speed chart that you would like to use, if you have more than one.
