Help:Wiki to WordPress
Did you know that you can publish your wiki pages through WordPress? You get the collaborative aspects of the wiki with the styling and publishing options of WordPress. Since it's pulling the content directly from the wiki, it will also automatically update! This is not restricted to UBC Wiki either. You can pull any page from any wiki using MediaWiki (such as wikipedia).
Installing Wiki Embed
- Download the Wiki Embed plugin from the WordPress plugin page.
- Upload the wiki-embed folder into your /wp-content/plugins/ directory.
- Activate the plugin through your plugins menu.
- Note: Some styling in the wiki may not transfer well to WordPress because WordPress does not accept older HTML styling in which case you need to either use the newer HTML tags in the wiki page or work around it through WordPress' custom CSS. For example, <b> is not recognized and needs to be set to do the same thing as <strong>, same with <i> relative to <em>. You will probably also want to style the table classes (wikitable and possibly sortable).
Wiki Embed Settings
There are also a number of options (see the documentation page for more information) that you can change. Here are some suggestions:
- Change the 'Update content from the wiki' to a minimum of 'Every 30 minutes' especially if you have a high traffic site. Obviously, it's a balance between server load and "up to date-ness".
- Change 'Internal wiki links' to 'WordPress Page' if a consistent look is important to you. You can leave it on the Default if you think your users will benefit from exploring the wiki.
See below for more information on using the Target URL option when Internal wiki links open as a WordPress page.
Wiki Page Tips
When creating or modifying a wiki page, it is best to keep a few things in mind when you expect to use it in WordPress through wiki embed.
- Images: should be no wider than 560px (pixels). If images are wider, wiki embed will automatically resize the width only, and resulting pictures will looked squished.
- Tables: should be 1-3 columns. Obviously, depends on how and what you are using a table for. Just remember that in the typical 2 or 3 columns themes in WordPress, your table will be automatically resized to something smaller. You should use the built-in "Insert Table" function in the wiki toolbar (which can then be styled in WordPress).
- Tabs: If you intend to use the 'Top section converted into tabs' option (which translates to any Heading Level 2 becoming a tab), then you need to make sure there are either only a couple of level 2 headings or that they are short.
- As an example, take a look at the UBC Library's Community Users & Visitors' page, which corresponds to the wiki page Library:Help_for_Community_and_Visitors. Notice that there are 5 tabs, but they are relatively short to fit on one line. Also, any text before the first level 2 heading shows above the tabs and thus always shows on the page.
- Links: As there are different options on how to deal with wiki links, always use an internal wiki link when available/appropriate.
- For example, if you're on the wiki and you decide to link to the Community Users & Visitors page mentioned above, you should link to the wiki page using an internal wiki link, because each WordPress site may have its own relative links to it (though unlikely, it's possible).
Also keep in mind that changes on the wiki will appear immediately on the wiki, but depending on the wiki embed settings in WordPress, it may take anywhere from 5 minutes to never for changes to appear.
- Please note that these may change as wiki embed is updated. This section was last updated March 2011.
Wiki in WordPress
Inserting Wiki Pages in WordPress
In order to insert wiki pages, you will need to have access to the WordPress pages section. This usually means you need to have editor or admin access (though it depends on the site settings).
- Add New Page (or use existing one).
- Click on the Wiki Embed icon. (The [[ ]] icon just above where it says Wiki Embed.)

- Copy and paste the full wiki page link (including the http part) into the box. (See the CLF Documentation for an example.)
- Choose your options. First one is tabs on/off, second is to not show the table of contents, and third is for links to edit the wiki page.

Remember that the wiki embed function is like an "insert" function, which means that you can have things in the WordPress page before and after if you wish.
Inserting Wiki Pages in WordPress using Gutenberg editor
Wiki pages can also be inserted under Guternberg view via the 'UBC Wiki Embed Block' plug-in.
- In the UBC Blogs site Dashboard, switch to the Gutenberg view by navigating to 'Writing' in Settings and selecting all the checkboxes next to 'Enable Gutenberg.'
- Click 'Plugins' on the left-hand side panel.
- Search for 'UBC Wiki Embed Block' and click 'Activate'.
- Add a New Page (or use existing one).
- In the page editor, click on add block (plus icon).
- Search for 'UBC Wiki Embed' and paste the URL to the UBC Wiki page.
Setting Target URLs
If you have the 'Internal Wiki Links' opens as WordPress page option, then you will want to set target URLs for any internal wiki links on your pages, meaning that if someone clicks on a wiki link, it will open a page that you specify instead.
- Go to Dashboard>Wiki Embed>Settings
- Under Global Settings, choose WordPress Page — links open a WordPress page with the content of the wiki for the internal links option.
- Embed a wiki page as discussed above.
- View the WordPress page where you have embedded wiki content.
- Click on the internal wiki link(s), which will open the wiki page in a sort of temporary WordPress page. Do this for all internal wiki links.
- Scroll down to the bottom of each temporary Wordpress page. If you do not want this temporary page to be part of your WordPress site, click on "in Wiki Embed List" and skip ahead to step 8; otherwise, click on "Create a New Page." In Edit mode, change the title of the page, update the wiki embed source if necessary, and set page attributes such as parent and order to make sure the page is located where it should be in the site architecture.
- Click on Wiki Embed then Wiki Embed List in your WordPress menu. You should see a list of internal wiki links on your WordPress site. Such as,
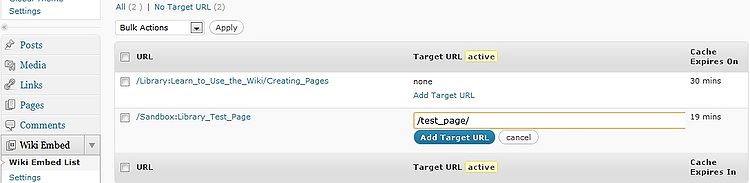
- Add a Target URL for each internal wiki link. The target URL is a sort of redirect, so you set "when someone clicks on this wiki link, go to this specified page". The link can be either a relative link (within the WordPress site, see above image) or an external URL, for example, a URL that points back to the original wiki page.

The wiki embed list will have a full list of wiki pages including all the pages you are embedding. You do not need to set a Target URL for pages you have embedded, only the internal wiki links.
In case you missed any, there is an option to enter an e-mail for notification when a new temporary WordPress page is created so that a target URL can be added. (As of March 2011, however, it is still under development and the person may be notified of links other than internal wiki links.)
Wiki Cache
When wiki content is embedded in WordPress, wiki embed caches or stores a copy. Depending on the Wiki Embed settings, how long this copy is stored until a new version is loaded from the wiki will differ, which you can find out from the Wiki Embed list's 'Cache Expires in' and at the bottom of a page using wiki embed.

Clear Cache
There are two ways to clear this stored copy so that the newest copy of the wiki page is loaded.
- Click on "Refresh Wiki Content" at the bottom of a WordPress page using wiki embed (as in the above screenshot).
- Select the relevant pages in the Wiki Embed List and under 'Bulk Action', select 'Clear Cache' and hit 'Apply'.