Documentation:WordPress Basics/Extending Functionality
BuddyPress (5 min)
BuddyPress creates a social networking layer on any WordPress installation. UBC Blogs has recently added BuddyPress allowing you to:
- Create public or private groups for classes, clubs, sports teams
- Follow and communicate with fellow UBC Blogs users
- Participate in forums and discussions about any issue or topic concerning the UBC community
- Share your profile, including your academic, personal interest and status updates
The video below will give you a better idea on the different things you can do with BuddyPress on UBC Blogs:
Hands-on Activity - BuddyPress

- Go to http://blogs.ubc.ca and under My Account drop-down menu, click Profile
- Review and edit your profile settings including your Avatar, Privacy Settings and UBC Info
- Click on the Members tab, search for the person sitting beside you and add them as a friend
- Click on the Groups tab, search for the Learning Technology Institute (LTI) group and join.
- Under the Forums section, create a New Topic or reply to any of the discussions.
- Invite your friends and colleagues to join the group in the Send Invites section.
Categories & Tags (10 min)

In WordPress Basics 1, we briefly discussed categories & tags. Both have similar functions where they help blog authors organize their posts in certain ways.
Imagine categories as a more formal way to structure your blog posts. They should be broad enough to capture different kinds of activities. If needed, you can also create sub-categories for a more refined approach.
Tags, on the other hand, has a more flat structure with multiple tags having equal importance. They are more commonly used to describe the topics a post is discussing.
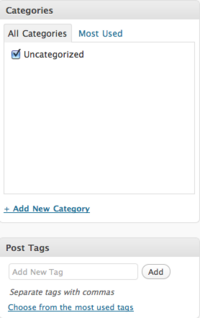
You can easily add categories and tags to a post by going to the right hand corner of the Add New Post page.
As mentioned in the Custom Menus, you can easily use Categories as navigational tab on your custom menus. Once included, visitors who click on that tab will be presented all of the content within the that category. It helps visitors easily find the posts that are relevant to them.
Categories/Tags Sidebar Widget
Another way you can help blog visitors find content easily is through the Categories Widget and the Tag Cloud Widget.
The Categories Widget, once added, will create a list of all of your categories on the sidebar. Clicking on a category will give all the content categorized under it.
Similarly, the Tag Cloud widget will show you a cluster of all of the tags you have created. A tag used multiple times will appear larger compared to those used once. Clicking on a tag will bring you to a list of all the posts associated with that term.
Categories/Tags RSS
Categories and tags also produce RSS feeds that visitors of your blog can subscribe to if they're only interested in a specific topic.
You can find these RSS by adding "/rss" or "/feed" at the end of your category/tag's specific URL. These URLS usually take the following form:
Categories
- http://blogs.ubc.ca/yourblog/category/your-category/
Tags
- http://blogs.ubc.ca/yourblog/tag/yourtag/
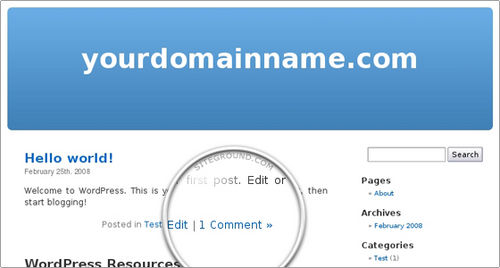
Links to your blog's categories and tags can also be found at the bottom of each post.
Hands-on Activity - Categories & Tags

- From the Dashboard, under the Appearance, click Widgets
- Add the Categories Widget or add the Tag Cloud Widget
- Visit your site and look at your sidebar
- From the Dashboard, open Appearance, click Menus
- Create a custom menu and add the blog categories as tabs
- Under the Theme Locations box, choose the custom menu you made as the Header Menu
- Visit your site and look at the navigational tabs
- Go to your blog and search for your categories or tags.
- Click on a category/tag and add "/feed" or "/rss" at the end of the URL
- Grab the RSS feed and add it into either an RSS reader or the RSS widget.
- If you added the RSS widget, visit your blog and look at your sidebar. If you used an RSS reader, browse through the feed items.

One of the most social aspects of your blog is the opportunity for visitors to leave comments on your posts and pages. They can ask you questions about the topic you wrote and you can respond accordingly. Pose a question to your students have them start a discussion on possible solutions. This feature creates a dynamic interchange between you and your readers, and between readers themselves.
When used properly, Trackbacks and Pingbacks are an excellent way to build links and traffic to your blog, as well as building relationships with other bloggers.
Pingbacks are your entries on a bibliography. If you have linked to another resource, such as a colleague's blog, in a post, she will be notified once the post is published. The same thing will happen if somebody links to a page or post you have written. It is a simple way of giving credit and attribution.
Trackbacks are a way to notify a website when you publish an entry that references it. When you send it a trackback, a link with a short excerpt of your entry will appear on the referenced website. Comments, pingbacks and trackbacks can be found at the bottom of each page and post.
Discussion Settings

You can also moderate comments and pingbacks via the Discussion Settings in the dashboard. The image on the left shows the default settings on UBC Blogs. Many of the settings are self-explanatory but here are a few you should take note of:
- Default article settings
- Leave these checked if you want to notify blogs that you have linked to, receive notifications from blogs that linked to you, and allow people to comment on your posts/pages.
- Users must be registered and logged in to comment
- Check this box if you only want only those with CWLs to comment.
- Enable threaded (nested) comments...
- Allow comments to look like forum posts. Leaving it unchecked will present comments as a linear conversation.
- An administrator must always approve the comment
- Check if you always want to look at comments before they are published.
- Comment author must have a previously approved comment
- Check if you want to immediately publish comments from those you have previously approved.
Managing Comments

If you choose to approve comments before they are published, they can be found by clicking on the Comments section of the left-hand sidebar in the Dashboard. New comments will be indicated by a number beside Comments on the sidebar.
Moderating comments beforehand can help you fight spam and deal with disrespectful comments. As the blog owner, it is your responsibility to set what kind of environment you will be fostering through your discussions.
You can do the following to any comment that needs to be moderated:
- Approve: Publish it immediately
- Reply: Respond to a comment
- Quick Edit & Edit: Edit the comment before being published
- Spam: Mark comments as spam
- Trash: Delete comments
Fighting Spam
A great benefit of moderating comments is to prevent spam from being published on your blog. Many spammers use bots to automate certain tasks such as fill out forms or make randomized linked comments.
As mentioned before, you will be able to mark a comment as spam by going into Comments and hovering over the comment you are suspicious of. When a series of actions appear under the comment, just click spam and it will be transferred to your spam folder. WordPress will automatically take note of the email and IP addresses that those spammers leave. Future messages will then be blocked.
Other uses for comments
There are other ways you can take advantage of comments & pingbacks:
- Add the Comments Widget to your blog's sidebar. It will help visitors see what is currently being discussed on your blog.
- Enable the Subscribe to Comments Plugin. This will place a check box at the bottom of your posts or pages enabling visitors to receive notifications when others have left a comment. It can help foster discussion between readers.
- Grab the RSS Feed of a page or post. Add "/feed" to the end of the post/page URL. This will produce an RSS feed that you can take into an RSS reader or the RSS widget. It can help you and your students keep track of a discussion that is happening in post.
Subscribe To Comments

The Subscribe to Comments plugin allows blog visitors to receive email notifications when they leave a comment on a post.
It helps students keep track of discussions on a course blog, especially if commenting is a required component of the class.
Google Analytics (5 min)

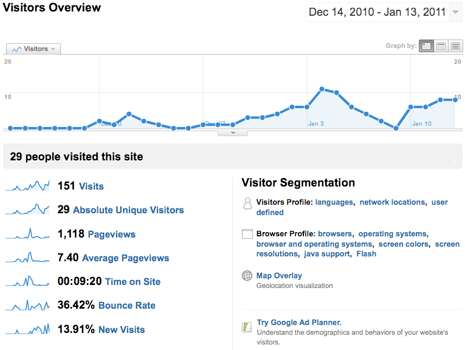
Google Analytics is the free stats tracking system supplied by Google and produces very attractive (and comprehensive) stats. It is very easy to use and provides valuable detailed information on traffic to your site. To get going, just sign up for Analytics, set up a new account and copy the tracking code you receive (it will start with 'UA-') and paste it into the Tracking Code box in WordPress. It can take several hours before you see any stats, but once it is you've got access to one heck of a lot of data!
Hands-on Activity - Setting Up Google Analytics

- Visit www.google.com/analytics
- Sign in with your google account or create a new account
- Add a Website Profile (paste in the URL or web address of your site)
- A Tracking Code will be generated (copy this code - CTRL+C on yr keyboard)
- Back in the WordPress Dashboard, under Settings, click on Google Analytics
- Paste in the Tracking Code that was generated in Google Analytics
- Visit the Google Analytics site every now and them and watch monitor the stats for your site


