Documentation:WordPress Basics/CommScie300training
Overview of Blogging
What’s a blog?
A weblog, or "blog", is really a webspace on the Web. Weblogs cover as many different topics, and express as many opinions, as there are people writing them. Some blogs are highly influential, some have enormous readership, some are university course websites, while others are mainly intended for a close circle of family and friends.
A WordPress webspace is made up of basic elements: pages, posts, categories, and tags. Understanding the difference between a page and a post is core to understanding WordPress. A page and a post are both a collection of paragraphs and look almost identical. Pages form the basic information about a site, such as “About the Author” or “Contact Information.”
A page is on a topic and there is one page on that topic. A user views pages one at a time. A post is like a collection of pages. A post belongs to a category. A site has multiple posts about each category. In my site, I have a category called “Articles.” As I post an article, I categorize it under Articles. This enables a viewer to see my articles by clicking on the category “Articles.” A user can view a single or multiple posts at a time. A post is time sensitive, reflecting when it was written with the most recent shown first. The more website-like a blog is, the more posts it will have. Pages are website-like, posts are blog-like.
Examples
- Worldwide Examples of Wordpress sites:
- UBC Examples:
- http://blogs.ubc.ca/dean/
- http://blogs.ubc.ca/etec522/
- http://blogs.ubc.ca/phar330/
- http://blogs.ubc.ca/etec521sept10/
Discussion
Browse the examples of course blogs and consider the following questions: 1. What is the difference between a tag and a category? How have these two indexing systems being used in the example sites? How might these two indexing systems be used in the SCIE 300 course site? 2. What is the different between a page and a post? How have these two methods of displaying content been used in the example course blogs?
Getting Started with WordPress
Login Info PART I
- Go to https://blogs.ubc.ca/ (bookmark this for the future!) >> click on the LOGIN button and enter your CWL information.
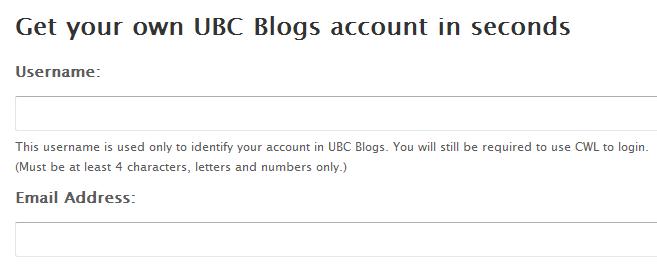
- The “Get your own UBC Blogs account” screen appears
- Enter a Username (only the lowercase letters a-z and numbers allowed)(This cannot be changed), Email address, and Display Name
- Agree to to the terms: "I have read and agree to the terms of service"
- Select "Gimme a Site" and click the NEXT button
Login Info PART II
- Choose a Site Name and Site Title
- The Site Name will become part of your URL and cannot be changed
- Select the Privacy option "I would like my blog to be visible to everyone, including search engines (like Google, Sphere, Technorati) and archivers and in public listings around this site"
- Click the SIGNUP button at the bottom of the page
Your WordPress Profile Page

1. The Dashboard (image Figure 1 at right) provides you with the ability to quickly create a new blog, add and manage content.
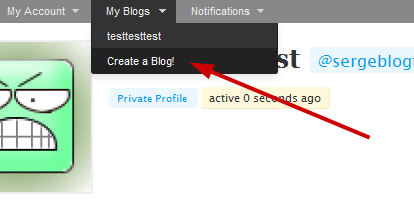
2. Under My Blogs you will see:
- All your blogs
- Create a Blog
- Access to the Dashboard (the "nerve" central of your blog space).
3. Go to your WordPress dashboard by clicking on the name of your site from the drop-down menu
A Tour of the WordPress Dashboard
The Dashboard is the "nerve" centre of your blog spaces (image Figure 1A at right)
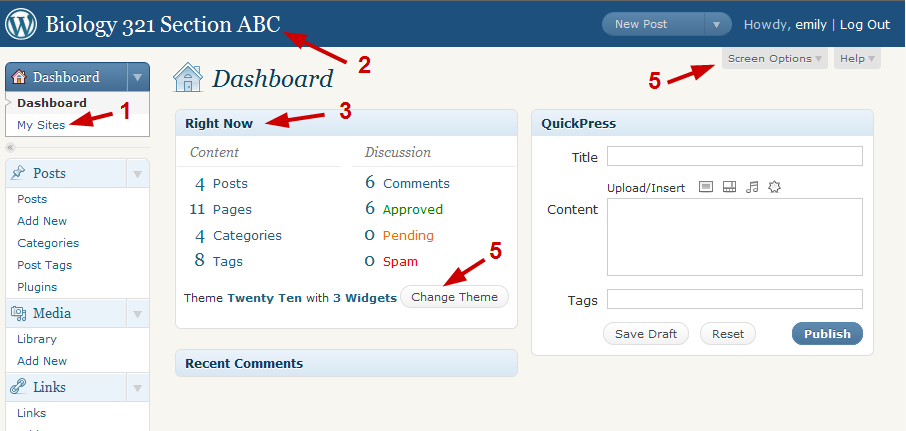
Some important areas are:
1. My Sites - lists the blogs you have access and Create a New Site feature
2.Visit your webspace by clicking on the underlined title
3.Right Now column gives a quick snapshot of how many pages, posts, categories and tags exist
4.The Screen Options button allow you to rearrange your Dashboard page
The Difference Between Pages and Posts
WordPress employs two fundamental content types: pages and posts. These content types behave quite differently and therefore it is important to understand when to create a page or a post.
Pages are static. They are a good way to publish information that doesn’t change much, like an "About" or "Contact Us" page. Pages are usually linked from the main navigation bar on the Homepage.
Posts are dynamic. Posts are always associated with a date and are really meant to update your audience.
Some key differences:
- Posts are:
- dynamic (you may create a couple of Posts a day!)
- displayed in reverse chronological order (placing the most recent content at the top of the page)
- can be assigned tags and categories (helps with search engines!)
- meant for updating your audience
- are syndicated via RSS
- Pages are:
- static content that will not change - or very, rarely anyways (Examples are 'About Me', 'Contact Me', 'Services', etc.)
- not related to categories or tags
- do not appear in RSS feeds
- may have sub-pages (this gives the appearance of a more traditional website)
How to Write and Edit a Post
Add New Post

- From the Dashboard, click Posts on the left-hand menu bar.
- Click the Add New button (see Figure 2 image at right).
- Enter a new short title in the New Post such as “Public Engagement with Science” and enter text in the large empty box below the title.
- In the Categories area on the far right, enter a category name and click Add New Category button.
- In the Post Tags area on the far right, type a new tag (eg. learning, students, education, etc) and click Add button.
- Browse the Discussions settings below and either allow or disallow comments on your posting.
- On the far right, in the Publish settings, click Preview to see your new post, and then click Publish. Note: the yellow confirmation at the top of the page.
- Create a second post following the above directions.
- At the top of your Post, click View Post
Both your new posts will now appear on the front page of your webspace.
Formatting Your Post using the Kitchen Sink

The Kitchen Sink (see Figure 3 image at right) drop-down toolbar provides you with a menu from which you can choose how to format your text.
- From the Dashboard, click Posts on the left-hand menu bar.
- Select a Post to edit by clicking on the underlined title. When the Post opens, click the Kitchen Sink icon. (see Figure 3 image at right)
- The Kitchen Sink toolbar enables you to bold fonts, increase font size, change the colour, make bulleted lists, inserts images, and hyperlinks, etc. When you have finished formatting your post click Publish and visit your site.
Hands-on Activity - Creating & Formatting a Post

- From the Dashboard, create a new Post and title it “A Science Problem” and enter some text
- Format your post using the Kitchen Sink
- Add or select a category and add a tag
- Publish your Page
- Click Visit Site and see what your webspace looks like now!
- Bonus: add a subcategory to the post
How to Write and Edit a Page
Edit a Page

- From the Dashboard, click Pages on the left-hand menu bar. (see Figure 4 image at right)
- All Themes comes with a built-in About page. Click on the About page to edit the content and add some information about yourself and/or the site.
- Then click on the Update Page blue bottom of the far right-hand side of the page.
Add New Page
Now, let's add two new pages.
- On the left-hand menu bar, under Pages, click Add New.
- The Add New Page screen appears. For this example, create a page called Resources. Enter some text about the course in the large empty box below the title, and add a PDF or Doc using the Add Media icon (see Adding Images and Media to Your Page and Adding PDFs to Your Page section below). Put a password on this page as well.
- Click the Kitchen Sink icon to expand the toolbar and format the text.
- Click Update
- Click New Page.
- Call the new page "Daily Updates". (this is eventually where all your Posts will be displayed).
- Do not write anything in the Empty box below the title.
- When you have finished formating your page click Publish and visit your site.
You should now see three pages.
Add Images and Media to Your Page or Post
- From the Dashboard, click Pages on the left-hand menu bar.
- Select one of the pages to edit.
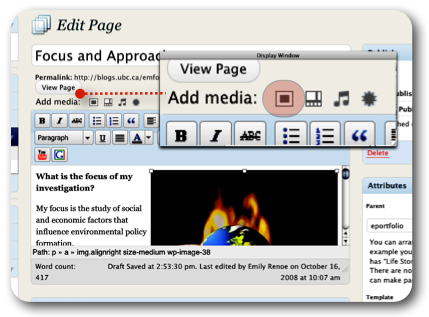
- On the Add Media toolbar click the first icon in the row. (see Figure 5 image at right)
- Add media files from your computer window appears.
- In the Choose files to upload box, click Select Files. From your computer, select an image and click Select (OK on a PC).
- Enter a caption, a description of the image, and select an image size to be displayed on your page. (Note: the default in Full Size). Click Insert into Page.
- When you have finished formating your page, click Update on the far right-hand side and visit your site.
Hands-on Activity - Creating a Page and Adding Media

- From the Dashboard, create a new Page or Post and give it a title and enter some text.
- Title the page and enter some text.
- Format your page using the Kitchen Sink
- Add media into your Page.
- Add a YouTube video
- Add or select a category and add a tag (for posts)
- Publish your Page/Post
- Click Visit Site and see what your webspace looks like now!
Changing the Look of Your WebSpace
Changing Your Front Page
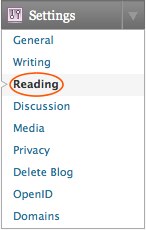
The Reading Settings control how a webspace is displayed to visitors. Front page displays allows you to choose what appears on the blog’s front: the latest posts or a static page that you have created in the Pages section of your blog. (see Figure 6 image at right)
Wordpress Themes
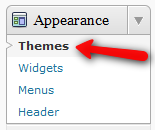
WordPress Themes can provide control over the look and presentation of the material on your webspace. Changing your WordPress Theme does not impact the content of your site only the header image and widgets.
- From the Dashboard, under the Appearance drop-down menu, click Themes (see Figure 7 image at right).
- Manage Themes screen appears, displaying your current theme. Browse through the many different themes and select one by clicking on the thumbnail image.
For this example, select the '''TWENTY TEN''' theme (this popular theme offers a nice variety of headers to choose from!)
- Wordpress displays a quick view of the selected theme.
- Click Activate at the top right of the screen. Visit your site to see the changes!
Customizing Headers
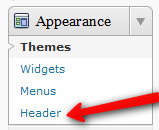
- From the Dashboard, under the Appearance drop-down menu, click Header. (see Figure 8 image at right)
- Click on Choose File, select an image (jpg, gif, png) from your computer and click Upload.
- Adjust the header image with the slide ruler and click Crop Header.
- Click Visit Site and see what your webspace looks like now!
Hands-on Activity: Themes and Headers

- From the Dashboard, under the Settings drop-down menu, click Appearance
- Select a new theme
- Upload a new image header
- Click Visit Site and see what your webspace looks like.
Privacy Settings
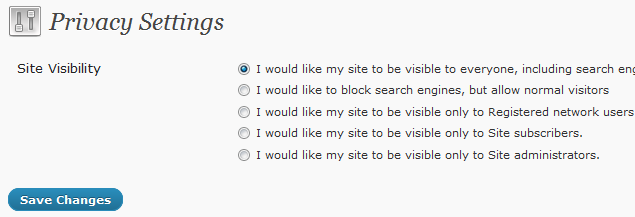
The Privacy Settings control your webspace visibility to search engines like Google. You can decide if you would like your blog to be visible to everyone, including search engines or not. If you don't want your blog available to the search engines you can block search engines, but allow normal visitors to see your site. (see Figure 9 image at right)
- From the Dashboard, under the Settings drop-down menu, click Privacy.
- Browse through the Site Visibility settings and select the most appropriate settings for your webspace.
- Click Save Changes. (Note: If you have selected “I would like my blog to be visible only to registered members of the blog”, refer to Adding Specific Users section below)
Blog Visibility has 5 options - the top three of importance are:
- I would like my blog to be visible to everyone, including search engines (like Google, Bing, Technorati (Technorati is an Internet search engine for searching blogs) and archivers – This is the setting used by most blogs. It lets everyone read your blog and allows your blog to be included in search engines and other content sites.
- I would like to block search engines, but allow normal visitors – If you want all human visitors to be able to read your blog, but want to block web crawlers for search engines, this is the setting for you.
- I would like my site to be visible only to Registered network users – You would use this setting to create a private blog. If selected, another area will appear where you can control which WordPress.com users will be able to log into your blog to read it (those users will only be able to read your blog, they will not get access to your dashboard to edit your blog, please see this section if you want to give people edit access):
Adding Specific Users

The WordPress Users feature is designed to give the blog owner the ability to control and assign what users can and cannot do in the blog. A blog owner must manage and allow access to such functions as writing and editing Posts, creating Pages, defining Links, creating Categories, moderating Comments, managing Plugins, managing Themes, and managing other users. You can add as many administrators, subscribers, editors, authors, and contributors to your blog as your like.
- From the Dashboard, click the drop-down menu on Users and select Add User.(see Figure 10 image at right)
- Enter a Username and Email, select a Role from the drop-down menu, and click Add User.
- The user you have added will appear in the invitation box below.
Widgets
A Sidebar “Widget” is just a silly word that WordPress has chosen to describe the sidebars on your webspace. Widgets are things you can add to your webspace to make it more interesting, such as a calendar, links to your favorite websites, a search feature, a tag cloud, and so much more!
Adding Widgets
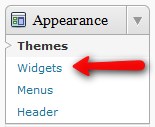
- From the Dashboard, under Appearance, click Widgets. (see Figure 11A image at right)
- Select the desired widget(s) and click on it.
- Drag the widget to the sidebar and drop it where you would like it to appear.
- Enter a Title, select a Position, and click Save Widget.
- Open each widget and edit the title and content and click Save.
- Click the Visit Site button at the top of your screen to see the new sidebar on your webspace.
Editing the Links Widget
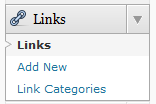
- From the Dashboard, under Links, click Add New (see Figure 11B image at right)
- Enter a Name and the Web Address - example is Google and http://www.google.ca/
- In the Categories area, click Add New Category and call it “My Favorite Sites” and click Add.
- In the Target area, select where the link should open (i.e. new window or tab). At the top right, click Add Link. (Note: If you select _blank as the Target- a new window or tab will open)
Hands-on Activity: Adding and Editing Widgets

- From the Dashboard, under the Appearance drop- down menu, click Widgets.
- Browse through the many different widgets and select a few including the Links widget. Remember to drag and drop them onto the Sidebar on the right hand side!
- Add a few of your favorite websites in the Links tool
- Click Visit Site and see what your webspace looks like.
Last but not Least - Creating Another Blog
You have the option of creating a second (even third!) webspace for yourself/department/faculty.
- From the My Blogs drop down menu at the top of the screen, click Create a Blog.
- The "Get another UBC Blogs site in seconds"" appears. Complete the required fields and click the Create Site button at the bottom of the page.
Resources
http://wordpress.tv/category/how-to/
http://wiki.ubc.ca/UBC_Blogs_FAQ
Download the http://wiki.ubc.ca/File:WordPressTrainingGuide.pdf
License
|
|

