Documentation:WordPress Basics/Add Media to a Page or Post (How to)
You can upload your own files (e.g. documents, images, audio recordings) into WordPress that you can embed in pages or posts.
Take note, individual files can be a maximum of 9MB in size and each blog has a limit of 300MB.
This page will show you how to:
- Upload New Media
- Add Media to a Page/Post
- Edit Images already inserted to pages/posts
Questions about Copyright?
All files uploaded into UBC Blogs need to be compliant with Canadian copyright laws. You will need to confirm their copyright status before uploading them or update them through the Media Library.
For any copyright questions, please contact UBC's Copyright Advisory Group at copyright.services@ubc.ca for in-depth guidance and support.
The Copyright at UBC site contains copyright resources, requirements, and guidelines, including frequently asked questions about copyright in the digital classroom. The Copyright Advisory Group also hosts a regular series of workshops drop-in copyright clinics, where faculty, staff, and students can meet and get individual support from members of the Copyright Advisory Group. More information and a schedule of the upcoming copyright workshops and clinics can be found at http://copyright.ubc.ca/workshops/.
Upload New Media
- Create a new page or post.
- Click the Add media icon beside Upload/Insert, above the formatting menu.

Add files to your post/page via the Upload/Insert Media above your Formatting Menu.
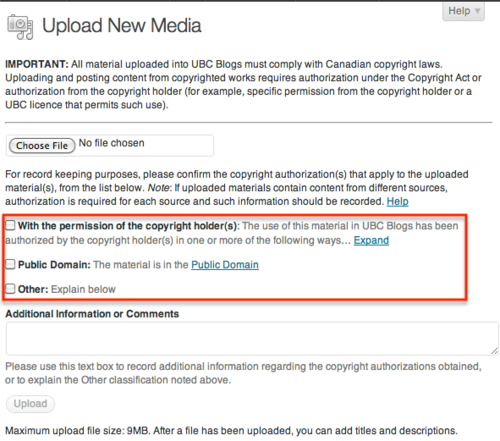
- From the Add Media window, click Choose File to select a file from your computer.
- Confirm the copyright status of the file by choosing from the following options:
- With the permission of the copyright holder(s): The use of this material in UBC Blogs has been authorized by the copyright holder(s) in one or more of the following ways:
- The individual (for example, the teaching staff member, course participant or other member of the UBC Blogs site) wishing to distribute the material in the UBC Blogs site holds copyright (solely or jointly) and has duly authorized its upload
- Specific written permission was obtained from the copyright holder(s)
- A UBC License, a Creative Commons license or other license permits such use UBC holds copyright in the material.
- Public Domain: The material is in the Public Domain.
- Other: Please explain in the provided text box.
- With the permission of the copyright holder(s): The use of this material in UBC Blogs has been authorized by the copyright holder(s) in one or more of the following ways:
You need to confirm the copyright status of any file you upload into UBC Blogs.
- In the Additional Information or Comments, add more copyright details such as the source and author(s).
- Click Upload at the bottom of the window.


Add Media to Pages or Posts
- Give the file a Title or name that you can easily remember.
- (Optional) For image files, provide some Alternate Text to the file which provides a text-based alternative that screen readers will be able to read to people with visual disabilities.
- (Optional) For image files, write a Caption to provide context to readers such as the creator of the image.
- (Optional) Give the file a Description to help you remember what the file is about when searching your Media Library.
- (Optional) Choose from the following where people will go to when they click on the link or the image:
- None: Images will only be displayed and not linked to anything.
- File URL: Links will go directly the file's URL.
- Attachment Post URL: Links will go to a post on your blog where you can download the file.
- You can also paste any URL. For files/images used under a Creative Commons license, it is recommended that they are linked back to the original source.
- (Optional) Change/Update the copyright status.
- For image files, choose how they will align in the page/post.
- For image files, choose the size it will appear in the page/post.
- Click Insert into Post.
You have now added new media to your page/post.
Edit an Image
You can edit also edit the size, alignment, and other information an image after you have added it to your page/post.
- Go to Visual view on the upper-right corner of the text box.
- Click on the image.
- Click on the Edit Image
 icon on the upper-left corner of the image.
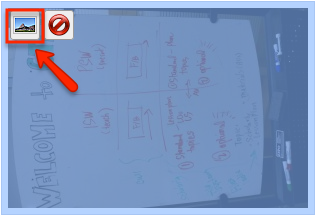
The Edit Image icon only appears after clicking the image.
- In the Edit Image window, you can change the image's size, alignment, title, alternative text, caption, and link URL.
- Click Update at the bottom of the screen.
