Documentation:VSE Collaborate Ultra
What is Collaborate Ultra?
Blackboard Collaborate Ultra is a lightweight, browser-based, web-conferencing tool, which is particularly suited to online lectures, office hours, or other collaborative learning environments. It allows an instructor to create a live web-broadcast session, in which they can share content, video, and audio with up to 250 students at a time. It also allows for students and instructors to interact via video, audio, text chat, and iClicker-like polling options. Collaborate also supports small group "break-out" discussions, chat and audio moderation, and teleconferencing - all without installing any software! If you are familiar with Skype, you will likely feel right at home with Collaborate.
What do I need to use Collaborate Ultra?

Since Collaborate runs through a web browser, you can give an effective lecture with only a microphone and a reliable internet connection. This is can be accomplished with just a regular laptop, if it has a decent quality webcam - for example, a Microsoft Surface, or MacBook work well.
- Note: Collaborate works best in Google Chrome. If you are having browser issues (particularly using Safari on Mac), try switching browsers.
However, to most closely match the experience of lecturing in person (and get the most out of Collaborate) I recommend having a set-up that includes (see Figure 0):
- A reliable internet connection (Item 2, in Figure 0: a wired connection is more reliable than WiFi)
- A microphone and headphones (Items 3 and 5: a set of headphones (Item 5), to minimize audio feedback, and a microphone built-into a webcam (Item 3))
- A good quality webcam (Item 3: a webcam with both audio and video).
- A computer set up with two monitors (Items 1 and 4, in Figure 0: Item 1 is a Microsoft Surface, which allows for pen annotation using a stylus. Item 4 is a regular monitor, for the webcast controls.)
This is especially useful if your set-up includes a tablet-like display, such as an iPad, Microsoft Surface, document camera, or Wacom tablet which allows you to make free-hand annotations. This will allow you to use the primary monitor to control the webcast, and the secondary monitor to display and annotate content.
As an alternative to annotating slides, you can also point your webcam at a whiteboard or use it like a document camera.
How do I set up Collaborate Ultra?
Collaborate is integrated directly into Canvas (but can also be set-up as a stand-alone, if you need it for something other than a Canvas course; contact UBC IT to set this up), so the process to set it up is relatively simple:
- Enable Collaborate Ultra in your Canvas Course
- Create a session in Collaborate
- Configure your session settings
- Broadcast
I will discuss each of these below; you may also find UBC IT's guide and Arts ISIT's guides helpful.
Enable Collaborate Ultra in your Canvas Course

To to this, you need to add Collaborate to your course navigation menu (See Figure 1):
- In your Canvas course, click on "Settings" in the sidebar
- Select the "Navigation" tab at the top of the page
- Scroll to the bottom and find the item "Collaborate Ultra" in the list
- Drag and drop the "Collaborate Ultra" into the top part of the list to enable it
- Scroll to the very bottom of the page and hit "Save".
You should now see "Collaborate Ultra" in the Canvas course sidebar, and you're ready to go.
Create a session in Collaborate
Web-broadcasts in Collaborate are referred to as "Sessions." These can be scheduled in advanced, or created as needed, and joined before the broadcast begins. When you click on the Collaborate Ultra link in the course sidebar, you will come to a page with a list of sessions (See Figure 2a). From this page you can create new sessions using the "Create Session" button, and edit existing sessions using the three dots on the left-hand side of the screen.
- Note: every Canvas courses has a default, pre-created session called "Course Room" which cannot be deleted. I recommend locking this session (Figure 2b), since it can confuse students who are not used to Collaborate and might join this session accidentally. You can lock a session by click on the three dots, then selecting "Lock Session". Alternatively, you may want to leave it open as a "drop-in" session.
You can create a new session by hitting "Create Session" which will bring up a sidebar with the session options. You can now configure the session, as I will outline below.
-
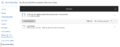 Figure 2a: Collaborate Session list
 -
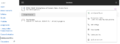 Figure 2b: Locking a Collaborate session
Configuring your session settings
When you create a new session, or click on a previously created session in Collaborate, it will bring up the session configuration. This allows you to change the rules which apply to your session. There are three sections: Session Information, Event Details, and Session Settings
- Session Information (Figure 3a) allows you to change the name of the session, join the session (i.e. start the broadcast), and gives details for teleconferencing
- Teleconferencing allows someone to join the session as audio-only, via telephone. This can be disabled in the Session Settings. The only other way to the join the session is via Canvas, using their Canvas course identification.
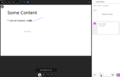
- Event Details (Figure 3b) allows you to set the times for the session, provide a description (e.g. provide an overview of the session or link to key files), and set an early entry cut-off where students can join before the session starts.
- Most sources recommend allowing early entry, so students can settle in and fix technical issues before you start.
- Session Settings (Figure 3c) allows you to configure the session, and is the most important. Through this, you can
- Set the attendee role, which defines what students who join the session can do
- Allow anonymous chat and recordings (but see below)
- Define what participants can do in the session (e.g. draw on whiteboard, share audio)
- Enable or disable teleconferencing
- Enable or disable private chats between students
For most lecture sessions, I use the following settings (Figure 3d):
- I set default role to participant
- I do not allow recordings or anonymous chat
- I show profile pictures only for moderators
- I disable participant drawing on whiteboard and files
- I disable session telephony and anonymous chat
Note that I do allow video and audio chat - you can silence and mute participants during the session, but if your class is very large, you may not want to enable these. You can also promote students to "presenter" if they want to share a file or make annotations.
You are now ready to begin a Collaborate broadcast - click "Join Session" to get started.
-
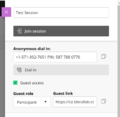 Figure 3a: Session Information
 -
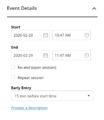 Figure 3b: Event Details
 -
 Figure 3c: Session Settings
 -
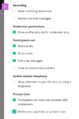 Figure 3d: My preferred options


How do I broadcast and record using Collaborate?
Once you have joined the session, the main Collaborate window will open in your browser (Figure 4). This has a variety of tools and tabs - you can watch a video tour here. This will initially be empty (mostly black), and has three sets of tools:
- A set of personal controls at the bottom, which are similar to Skype or Facetime:
- Your status (person symbol), which allows you to indicate you are away (mostly useful for students) or your "status" which can be used for quick feedback of what students think (this shows up in the Attendees tab, outlined below).
- Microphone, which mutes/unmutes audio - which is muted initially
- Camera, which enables/disables your webcam
- The "Raise hand" button, which is only really useful for students; when clicked, it notifies the presenter(s) that you have "raised your hand".

The other two buttons are the the black session menu on the top left, and the purple content button on the bottom right, which controls content and interaction.
- The session menu allows you to leave the session, and record. The department has given guidance that recording on Collaborate is not problematic, so recording lectures can be done through this menu, although you should still not allow students to download them.
- After recording, you can access the recordings from the main session page; see the FAQ below. Note that recordings can take time to process before they show up on this menu; roughly twice as long as the recording took plus about a half hour.
The purple content button is the most important tool for controlling your sessions, and has four different parts, indicated by the tabs at the bottom (Figure 5a, at the bottom).
- When you click on it, it automatically brings up the "Chat" window (Figure 5a), where you (and students) can text chat with one another.
- The second tab (crowd) is the "Attendees" tab (Figure 4b), which allows you to see all of the attendees, their roles, their connection strength, and their audio/video settings. You can mute them, kick them, and change their role using the three dots on the side.
- It also shows the statuses of the students, and who has raised their hand. This can let you keep tabs on how the class is going, and address questions or problems.
- The third tab (box with arrow) is the "Content tab" which we will discuss below; this is how you share content with attendees
- The final tab (gear) is the "Settings" tab, which allows you to change the session settings (as discussed above), as well as when notifications about student events appear; these are relatively straightforward - a small message will appear at the top of your window or an audio cue will play when these events occur.
- The most important part of this tab are the audio-visual settings, which allow you to select a microphone and camera, and test your set up. I strongly recommend doing this before every session, even if you've tested your set-up before.
-
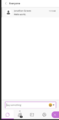 Figure 5a: Chat window
 -
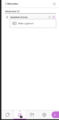 Figure 5b: Attendee window, with options shown


All content sharing is done via the "Share Content" tab. There are three different types of content: primary content (what you share), secondary content (student interaction), and group content (students chatting in groups).
Primary Content
-
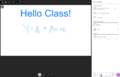 Figure 6a: The Whiteboard
 -
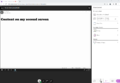 Figure 6b: A second monitor in use
 -
 Figure 6c: Sharing files
 -
 Slides 6d: Sharing files - in use
 -
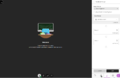 Figure 6e: Groups


Primary content allows you to share different types of content with students:
- The first option is a blank "whiteboard" which is just a white page which you can edit and annotate like a PDF or PowerPoint slide using the tools at the top.
- The second option to share an application or screen. For example, if you have your slides open in PowerPoint, you can share the PowerPoint window.
- The third option is to share files, which you can then display or students can download. If you upload a PowerPoint, PDF, or Image, blackboard will convert them into a whiteboard format, which you can annotate (but again, annotations are not saved!).
- This can take a little while to upload, so do this ahead of time, if you choose this option.
You can stop sharing content by click the "stop" square in the primary content menu. I will discuss each of these in turn.
Option 1: Whiteboard Sharing
When you select "Share Blank Whiteboard" this brings up a white page (See Figure 6a), upon which you can add (i) text annotations, (ii) freehand (pencil) annotations, and (iii) shapes. You can also erase, move/resize objects, and change colours. All of this is done via the buttons at the top of the whiteboard screen .
- These function very similarly to markup in Powerpoint, Canvas Speedgrader, or PDF readers.
- Unfortunately, you cannot save this whiteboard and if your erase, there's no way to undo. It's really just like a whiteboard in class!
One good alternative, if you want to save your annotations or simply have a more powerful "whiteboard-like" experience, is to use an application like OneNote and share the application instead (see below).
Option 2: Application and Screen Sharing
If you would like to share other content, you can instead choose to share either an application currently open on your PC (e.g. PDF Reader, Powerpoint, OneNote, STATA), or your monitor. You can select which option you want using the different tabs, which display a preview of what each content currently looks like. For example, in Figure 6b, you can see an example of content from a second monitor being displayed.
- You should always test what you want to share before you try it "live", to make sure it appears properly.
- You may also experience instability (e.g. browser crashing) with certain applications; try to work around this issue if it occurs.
Tip: This is my most preferred option if you have a secondary monitor, particularly one that you can annotate easily. I simply place all my content on the second screen when broadcasting. This is more flexible than the other options, and allows me to save annotations easily. You can use blank slides in PowerPoint, or Microsoft OneNote for free-form content like the whiteboard. It's a good idea to practice a few times to get the hang of how you prefer to present - but I find this option is the most similar to an ordinary classroom lecture, requires the least set-up, and is the most reliable
Collaborate also allows you to upload and share files (of specific formats: images (JPG, TIFF, etc), PDFs, and PowerPoint presentations).
- To begin, upload your files by clicking on "Add Files" then selecting the files you want. (See Figure 6c)
- Once they have uploaded and been coverted, you can now click on the file, and hit "Share Now" at the bottom.
- If you want to remove or rename a file, click on the three dots "..."
- This will bring up the "Navigate slides" panel for your presentation; selecting a slide will display it (See Figure 6d)
- You can stop sharing slides by clicking the "<" by Navigate slides, then hitting the stop button (or hitting the stop button at the top of the screen).
Slides and images basically serve as static backgrounds - you can mark them up just like the whiteboard (above). However, the same caveats apply: if you change slides, your annotations will disappear.
Secondary Content and Polling
Secondary content allows you to do iClicker-like things:
- You can set a timer, for example for a timed discussion or a break
- You can also create a multiple choice poll, which can allow you to ask a question and get responses from students. As of July 2020, you can now get reports on who participated in the poll; you can find a guide here. Note, however, that there's (currently) no way to set up a poll ahead of time - so you might need to get creative with how you use it in the classroom.
- Tip: remember also the status options at the bottom; this can get quick "Yes/No" questions as you go, without stopping for a poll.
Advanced: Group Content
The most complicated type of content is "Breakout Groups" (See Figure 6e). This creates several different "Rooms" which you can assign students to (either manually, or automatically). Rooms function like mini-versions of the main Session, but where students can share content and chat. You can then visit the different group session, and monitor them using the sidebar.
- You should test this carefully, since it can be complicated to use, and students may not be familiar with it.
- This can be useful for exercises like Think-Share-Pair, having small-group office hours in a larger class, or simply working in groups.
You can end the group sessions and return to the main session using the sidebar (click the stop button).
Overall
Collaborate is a powerful webconferencing tool, which strikes a good balance between ease-of-use, flexibility, and teaching tools. It does not require any extra software or set-up, and closely mimics a traditional classroom lecture. Feel free to contact me if you have any questions or would like some help.
- You can email questions to jonathan.graves@ubc.ca or we can arrange an online or in-person tutorial. Let me know!
Frequently Asked Questions
Can my TAs use Collaborate for office hours, labs, or tutorials?
Yes, anyone who is set up as a TA in your Canvas course can create and administer sessions, just like the instructor can. They automatically have the "Moderator" permission status, which is same as you do.
I've made some recordings; where are they saved?
Recordings in Collaborate are saved online initially, and can be found from the same page where you administer and create sessions. Click the three bars (menu) symbol in the black bar at the top, then select recordings. From here you can view and manage past recordings; if you'd like to download them, click on the three dots beside the recording you want to download. These download in MP4 format.
When I try to set up a camera (or microphone), it doesn't work
For example, if you get a grey screen with a crossed out camera (or microphone) symbol. This indicates that Collaborate can't detect or manage the device properly. First, try to restart your computer. If you have another camera (or microphone) you can use, try that instead. Finally, try uninstalling the device drivers, then reinstalling them. You might want to contact Arts ISIT for help with this!
Can I use Collaborate on an iPad?
Yes; it works best running via Chrome, but iPad is supported. Make sure you have enabled microphone and camera for your browser on your iPad, or it won't be able to connect.
How can I test my set-up?
If you run a Collaborate sessions as normal, then open a new browser window and then Canvas, select "Student View". Then, join the currently open Collaborate session as the test student. You'll now be able to see it from the student's perspective, and you can see what a session with students look like from the presenter's point of view.