Documentation:Screen capture basics/Training
Screen Capture Basics with Jing
Jing Project (http://www.techsmith.com/) is a free, easy-to-use application (available to BOTH MAC and PC users) that let's you create "on-the-fly" and/or simple screen casts and screenshots.
Workshop Goals
- Create effective "on-the-fly" screencasts and screenshots using Jing Project.
- Learn and apply best practices for screencasts and screenshots.
- Make Jing content available to students in a variety of ways
Workshop Learning Outcomes
- Create accounts for Jing and Screencast
- Create a screencast and screen snapshot and copy them to your computer and screencast.com
- Enhance a screen snapshot with text, arrows, boxes and highlighting
- Embed Jing content into a webct Vista course
- Manage files in your screencast.com account
What is a Jing?
Jing is a free tool you can download to capture computer screen output - either a screen capture or screen shot (records the visible items displayed on the monitor).
Uses and Benefits
- Collaborate on a design project
- Share a snapshot of a document
- Narrate your vacation photos
- Capture that pesky bug in action
- Show Dad how to use iTunes
- Comment verbally on students' homework
- Post tidbits from your life on Twitter or Facebook
UBC Examples
TBD TBD TBD TBD
Step 1: Get Started with Jing and Screen cast.com
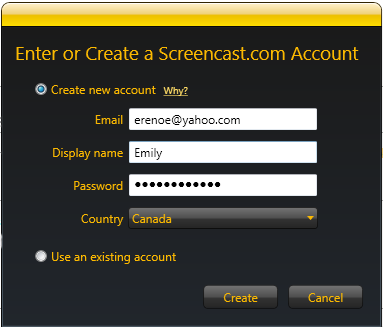
What is Screencast.com?
Screencast.com is a hosting service from TechSmith. This is where you can upload your Jing videos and images to share out to a specific audience or the entire world! You get 2 GB of storageand 2 GB of bandwidth per month for free. You can also choose to host your captures elsewhere, such as Flickr or your own FTP server.To sign up for screencast follow the Handson Activity below.
Is it private?
Yes. You own and control all your content. Only people you choose can see it, and it’s only deleted when you delete it.
Handson Activity 1

- Download and install Jing from http://www.jingproject.com/
- Double click the installer and proceed as directed.
- Near the end of the short process you are prompted to sign up for Screencast.com (see Figure 1: Screencast Signup)
Step 2: Find and Launch Jing
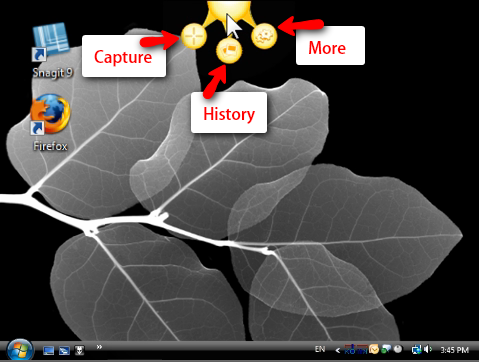
After the installation and sign up is complete, you might not notice anything has changed on your computer. Look carefully around the top edges of your screen. On Windows, the Jing Sun Launcher location is at the top center of the screen. On Macintosh, it’s in the upper right corner. To start using Jing, follow the Handson Activity below
Handson Activity 2

Now that ypou have installed Jing, look for The Sun: at the top of your screen - As you move over the “sun” three options will emerge - from left to right:
- Capture
- History
- More (see Figure 2: Find and Launch Jing]
Step 3: Take a Capture OR Record a Video
Capture what you see. Need to emphasize or explain? Jing's minimal feature set keeps the focus on instant sharing. We think it's the perfect companion to the casual, fast-paced online conversations we all have every day.
Handson Activity 3

Take a Capture
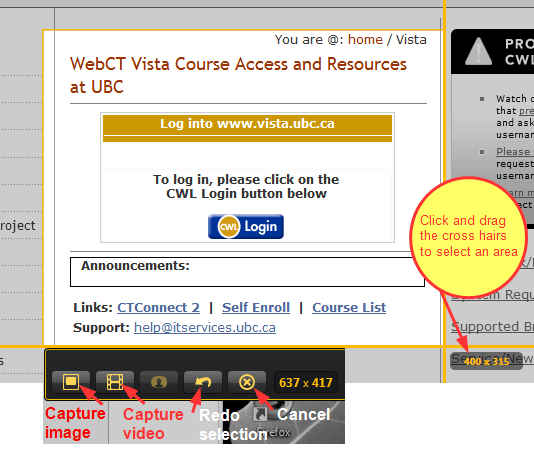
- Click Capture Image and select what part of the screen or image you want (see Figure 3: Crosshairs and toolbar at right)
- Time to share and save your capture. Choose one of the available output buttons to share your capture.
- In the name space, enter a Name for the new image
- Use the image tools to annotate your capture
Capture a Video
- Click Capture Video and select what part of the screen or image you want (see Figure 3: Crosshairs and toolbar at right)
- Time to share and save your capture. Choose one of the available output buttons to share your capture.
- In the name space, enter a Name for the new video
Once you’ve captured an image or made a video, you have to decide what you want to do with it. (see Figure 4: Share to Screencast.com, Save, or Copy)
Handson Activity 4

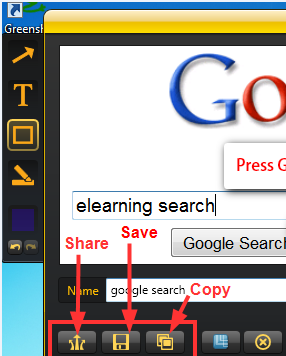
- Share at Screencast.com: If you click Screencast.com, your image or video is uploaded to your Jing folder on Screencast.com. Remember it’s private. No one is going to get to your content unless you give them the link to it. Once the video or image is uploaded to Screencast.com, you get a link to it. Next, paste the link into your email, document or online conversation. The link will look something like this: http://screencast.com/t/yKWyv8hI5. When people click it, they’ll see exactly what you captured!
- Save: Your traditional save process you’ve done dozens or thousands of times. Save it. Pick a file name. Pick a location.
- Copy: This only applies to images. You can click the Copy button and then paste the image into a document, email, etc.
Step 5: Sharing Your Images and Videos
You can share your images and videos in a variety of ways to students, colleagues, etc.

Handson Activity 5
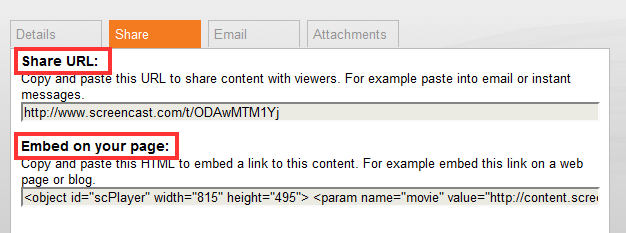
- Login to your screencast.com account, and open a video. Below the video you will see 4 tabs: Details, Share, Email and Attachments. (see Figure 5: Sharing Content with Embed Code and URL)
- Click on Share
- Copy the simple embed code and paste it into your WebCT Vista course or a blog. Your content (at Screencast.com) then displays right in your WebCT Vista course or on a blog page environment. Embed code looks like this: (Don't be freaked out - screencast.com generates this for you!)
<object id="scPlayer" width="815" height="495"> <param name="movie" value="http://content.screencast.com/users/emrem/folders/WebCT%20Vista/media/49ba6e42-bddd-4407-a6fd-e16ca5b4d046/bootstrap.swf"></param> <param name="quality" value="high"></param> <param name="bgcolor" value="#FFFFFF"></param> <param name="flashVars" value="thumb=http://content.screencas... ....
- Copy the simple URL web address and paste it into your WebCT Vista course or a blog. Your content (at Screencast.com) then displays right in your WebCT Vista course or on a blog page environment. (You can also paste this URL into email or instant messages). A website URL looks like this: http://www.screencast.com/t/ODAwMTM1Yj
Additional Resources
- Jing http://www.techsmith.com/
- http://www.screencast-o-matic.com/
- Snagit http://www.techsmith.com/
- IrfanView http://www.snapfiles.com/downloads/irfan/dlirfan.html
- Snapz Pro X (Mac OS X, commercial)
- Captus http://www.freedownloadscenter.com/Multimedia_and_Graphics/Screen_Capture_Tools/Captus_Screenshot.html
- Greenshot http://sourceforge.net/projects/greenshot/files/)
Best Practices for Screencast and Snapshots
- NEVER capture the entire screen
- Resize windows and/or capture areas before starting your capture
- Make your text readable (i.e.large)
- Do include narration when you create a screencast
- Don't talk too fast or too slow, and make sure your microphone is turned up loud enough
- Write out a script before you start your screencast