Documentation:Podcasting Basics/Basics Training
Equipment

Photo on left originally by Ian Kath
Before you start recording, you will need two simple tools that you can easily, and cheaply acquire. You need something that will record (i.e. microphones, voice recorders or a laptop) and something that will help you hear your recordings (headphones).
The type of recordings you plan on doing will affect what type of equipment you will need.
USB Headsets with built-in microphones that you can easily plug into your computer will suit any self-recording. External microphones are better suited for conducting interviews while digital recorders are preferred for a more mobile recording experience.
If you are working in area by yourself then speakers will be okay when checking and reviewing your recordings. In more public settings however, headsets or headphones are recommended.
Download Audacity

Audacity is a free open-source audio recording and editing software. Available to use on either Windows or Mac, you can download it at: http://audacity.sourceforge.net/.
In order to save your recordings as an MP3 file, you will need to download the separate LAME MP3 Encoding Library at: http://lame.buanzo.com.ar/. Choose the appropriate version for your operating system and download the installer.
Please read the LAME FAQ for installation instructions.
Setup

- Plug your microphone and headphones into the computer. Make sure your devices are connected properly by going into the CONTROL PANEL and clicking SOUND.
- Open AUDACITY and press CTRL + P or go into the EDIT menu and choose PREFERENCES.
- In the new window, click on the DEVICES tab. Check if the device you will be using is chosen.
- Click OK when you are done.
Recording and Playback
Recording and Playback Toolbar

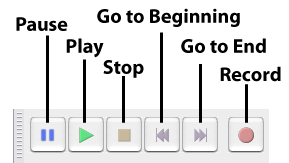
The record and playback toolbar is usually in the upper left-hand corner of your screen and it has 6 functions:
- PAUSE: Momentarily pause recording or the audio playback.
- PLAY: Play the file you recorded.
- STOP: Stop recording or playback.
- GO TO BEGINNING: Jump to the beginning of the audio track during playback.
- GO TO END: Jump to the end of the audio track during playback.
- RECORD: Start recording.
Audio Tracks and Waveforms
Once you have familiarized yourself with the basic controls, you can start recording.
- Press the RECORD button to start recording. A new AUDIO TRACK will appear, showing you the waveform of any sound it captures.
- The waveform visualizes the volume of the recording at that particular time. If you see the wave moving up and down as you record, this means that the microphone is working.
- The PAUSE button allows you to stop and resume recording on the same track.
- Once you are finished, press the STOP button. Clicking the record button again will create an entirely new audio track.
- You can listen your recording by pressing the PLAY button. Click on any part of the audio track to start listening at specific of your recording.
- Click the X on the left if you want to delete the whole audio track.
Hands-On Exercise 1


- Click the RECORD button and do a 20 sec. self-introduction.
- Click the STOP button when you are finished.
- Click the PLAY Button to hear what you have recorded.
- Try recording another track to see what happens.
Editing
Editing Toolbar
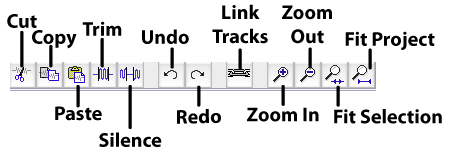
When you have finished recording, you can edit the audio file in Audacity. The Editing Toolbar is usually found in the upper right-hand side of the menu and has many tools available.
- CUT: Cut/remove a selection from the audio track.
- COPY: Create a copy from a selection of the audio track.
- PASTE: Paste the selection you previously cut or copy into another location.
- TRIM: Delete everything except the highlighted selection on your audio track.
- SILENCE: Mute the sound of the highlighted area in your audio track.
- UNDO: Remove the effects of your previous action.
- REDO: Removes the effects of what you have previously undone.
- LINK TRACKS: Link two or more tracks together. Any changes will affect the whole group.
- ZOOM IN: View the audio track with larger waveforms for more precise editing.
- ZOOM OUT: Zoom out for a larger view of your work.
- FIT SELECTION: Zoom into the highlighted selection of the audio track.
- FIT PROJECT: View your whole project within your window.
Highlighting
You can edit parts of an audio track by highlighting them on the wave form. Just click on any part of the track and drag your cursor to where you want the selection to end. Any highlighted section is indicated by a dark grey background on the audio track.
Hands-On Exercise 2

- Listen to your recording again and take note of long pauses, errors, ambient noise and the use of silence fillers such as the expressions "like" and "um".
- Extract any unwanted selection either by clicking the CUT button or pressing DELETE on your keyboard. Remember to ZOOM IN for more control.
- Remove ambient noise by using the SILENCE button.
- Try to ZOOM IN or to ZOOM OUT for more precise editing.
Advanced Tools
Advanced Tools (Audacity Tools Toolbar)

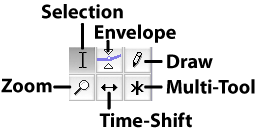
Audacity has tools at your disposal for more advanced editing functions. Also called Audacity Tools Toolbar, this set of tools are usually found on the upper left-hand of your screen.
- SELECTION: Highlight specific sections on the audio track.
- ZOOM: Zoom in to magnify the audio track. Press and hold the Shift key and you will be able to zoom out.
- ENVELOPE: Isolate specific areas on your audio track and change their loudness/amplitude.
- TIME SHIFT: Move the whole audio track along the timeline. Works best with multiple audio tracks.
- DRAW: Even more fine-grained sound amplification. Only works on specific sound points visible at very high magnification.
- MULTI-TOOL: Combination of the aforementioned tools designed for very advanced users.
Hands-On Exercise 3

- Start a new project by clicking File on the menu bar and then New.
- Create a new 20 second recording talking about what you did yesterday. Try to make errors, certain parts loud, and other parts soft.
- Create another 15 second recording where you discuss what you plan to do tomorrow.
- Click the TIME SHIFT and move around the recordings in your preferred order.
- Use the SELECTION and ZOOM tools to select and remove unwanted errors.
- Use the ENVELOPE tool to change the volume on specific parts of your recording.
Saving and Exporting
Saving
You can save your work at anytime by clicking CTRL + S or going to the FILE menu and choosing SAVE PROJECT. You can work on the project at a later date but do not delete any files associated with it.
Export
Once you are satisfied, you can export your work as an audio file for people to listen to.
- Go to the FILE menu and choose EXPORT.
- A new window will appear asking you to include any relevant information about the file. They will become the file's metadata that will help listeners learn more about your work. Click 'OK when you are done.
- Name your file. You can choose to export your file in different formats, the most common is mp3.


