Documentation:OpenUBC/POSE/Website Documentation
The way module is structured

The module is structured by pages. Each page has hieratical structure. Using the Creative Commons module page, below is an example:
- Open Education
- Creative Commons (Subpage of Open Education)
- Introduction (Subpage of Creative Commons)
- What is a Creative Commons License (subpage of Creative Commons)....
- ..etc.
- Creative Commons (Subpage of Open Education)
This structure/hierarchy will show up on the left side of the menu. If the menu on the left doesn't show up, click on "page Layout" and select the 4th option.

So let's say, if you want to create a page on Author Rights, you will have set the Open Access as a parent page. If you are creating page that is part of Author Rights, and you want to split into separate pages, then for those separate pages, set Author rights as a parent page.
How to set up a parent page/set up hierarchy of page
To set up a parent page/hierarchy of page, you can click Page Attribute> and select the page you want to make it into a parent page

Styling the module/Adding Gutenberg block
Take a look at an example on how the module is styled on the Author Rights page
There are are list of Gutenberg blocks that you can add
Adding a Big Ideas/Blue Box block
This box is used to style the "Big Ideas" or simply to emphasize certain text/bullet points. To do so:
- Edit the Page
- Click on the "+"(add block) button
- Select the reusable tab
- Click Big Ideas/box for emphasizing text to insert the block
- IMPORTANT: After you add the block, click on "3 dot circle"(More options) and select convert to regular block.
- Edit the block
Adding a Scenario block
This Gutenberg block is used to add a "Scenario" to the module
- Edit the Page
- Click on the "+"(add block) button
- Select the reusable tab
- Click Scenario to insert the block for Scenario.
- IMPORTANT: After you add the block, click on "3 dot circle"(More options) and select convert to regular block.
- Edit the block
Adding a Scenario Quiz block
This Gutenberg block is used to add a " quiz" to the module
- First, follow the instruction for Adding self-assessment quiz to create a quiz
- Edit the Page that you want to add the quiz
- Click on the "+"(add block) button
- Select the reusable tab
- Click Scenario Quiz to insert the block for Scenario quiz.
- IMPORTANT: After you add the block, click on "3 dot circle"(More options) and select convert to regular block.
- Edit the block. Insert HTML block and paste the Embed Code from Step 3 Under Adding self-assessment quiz.
Adding a link to Activity bank using block
This Gutenberg block is used to add a link to "Activity Bank"
- Add a Activity bank first. See Add activity to activity bank to learn how to add Activity Bank.
- Edit the Page
- Click on the "+"(add block) button
- Select the reusable tab
- Click Link to Activity Bank to insert the block for Activity .
- IMPORTANT: After you add the block, click on "3 dot circle"(More options) and select convert to regular block.
- Edit the block and link to the activity bank you have created.
Adding a "Continue" and "Back" button
Adding only a "Continue" OR "Back" button
This will be relevant if the page is the first page of module (introduction) or last page of module
- Edit the page that you want to add "continue" or "back" button
- Click on the "+"(add block) button
- Select Layout Elements
- Click button
- On the button, type Continue or Back.
- On the right side of the screen, under the block setting, and under Link Setting, type the URL of the page that you want to link to
Adding both "Continue" and "Back" button
This will be relevant for most of the pages,
- Edit the Page
- Click on the "+"(add block) button
- Select the reusable tab
- Click Back and Continue Button to insert the block for back and continue button.
- IMPORTANT: After you add the block, click on "3 dot circle"(More options) and select convert to regular block.
- Select the "Back" button. On the right side of the screen, under the block setting, and under Link Setting, type the URL of the page that you want to link to
- Do the same for the "Continue" button.
Adding self-assessment quiz
You can add self assessment quiz to add interactivity to your module. When you click on the radio button on the multiple quiz, it gives you feedback for each answer. The answer will not be logged or graded.
Step1: Create a multiple choice using H5P
- Go to POSE's pressbook site to create a new H5P quiz. Select Multiple Choice
- Add Form Title of the quiz you're creating. The title of the quiz will not appear in the quiz itself but for organization purpose, add a title that is in "PATHWAY- MODULE TITLE - NAME OF QUIZ" (For example: Open Education - Creative Commons - Remix Quiz)
Step 2: Add a multiple choice question and add feedback for each choice
- Under Question, type the question that you are trying to add for your quiz.
- Under Available options, type the choices of the multiple questions.
- Add a feedback for each multiple choice: click on the Tips and Feedback located under options field to add a feedback. If the quiz has correct answer, tick correct. You can add more multiple choice options by clicking on Add Options.
- After you're satisfied with the change, click Create.
Step 3: Embed the quiz to the module
- Click Embed that is located under the quiz questions.
- Copy the Embed code
- Follow#Adding_a_Scenario_Quiz_block to embed the quiz you have created to your module.
Add activity to Activity Bank
- Go to dashboard> Posts > Add New
- On Add Title, add the title of your activity.
- click on the + sign to add a new block. Click Reusable and select Activity Bank Template (convert to regular block before use )
- Important step: click on the 3 dots icon/More Options. Select Convert to regular block.
- Edit the text and multimedia accordingly.
- Add a featured image to the activity bank. This featured image will appear as a image on the activity bank page . To add a featured image, Under Document, click Featured Image and upload the image file.
- Add an excerpt to the activity bank. The excerpt will appear as a text on the activity bank page. To add an excerpt, Under Document, click excerpt and type the excerpt of the activity.
- Make the activity appear on the activity bank page by categorizing the post. Under Document, click on categories. Then, select activity category and category that fits with your activity. (For example, if the activity is for Creative Commons module, select Creative Commons. )
- Once you are ready, press Publish. Done - you have added an activity! You can link the activity to your module.
Other Useful Tips
Copying and pasting the entire content using Gutenberg
If you want to copy the entire content from other page the tip below will be useful:
- Go to the page that you want to copy the content (For example: Module Structure page from Author Rights module)
- Click on the 3 dotted icon (More tools and options )
- Click on Copy all content
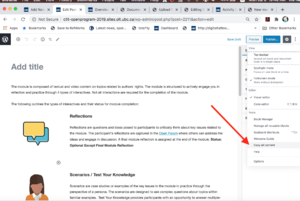
Click on the 3 dotted icon (More tools and options button)> Click on copy all content - Paste it (click right click and then paste) on the page that you want to copy over the content.

Adding accordions
Adding accordions is useful to chunk the information or to hide certain type of information.
- Go to the page that you want to add accordion
- Click on "+" button to add a new block
- Select Accordion item. By default, accordion will be created in H2 tag. Change the heading level accordingly
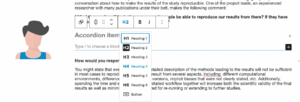
When selecting a heading level on the Gutenberg block, the best practice is to make sure the heading level is consistent with the heading before. (i.e. after heading level 2, it should be heading level 3 ). If there is no heading before, select "Button". - On "Accordion item title", type the title of the accordion.
- Under "Type/to choose a block", type a paragraph that will be hidden inside the accordion.

Removing specific type of Gutenberg Block
Sometimes removing specific type of Gutenberg Block can be very tricky. To remove certain type of blocks, you can:
- Select Block Navigation tool (see the screenshot below)
- Click on the block that you want to remove (such as columns)
- press the "3 dots icon (more option) " and select "Remove Block"
