Documentation:Online Collaborative Office Applications
Online Collaborative Office Applications
Learning Objectives
Upon completion of this workshop, participants will :
- Identify different web based office tools
- Navigate the Google Docs environment
- Create new and upload a variety of document types
- Share folders and documents for review and collaboration
- Create a form for collecting information online
- Publish and embed documents in a blog or a WebCT Vista course
Agenda
- Introductions - Us and You
- Overview of Online Collaboration Tools
- Google Docs
- Zoho Writer
- Microsoft Office Live
- Prezi
- Introduction to Google Docs
- Discussion: Google Documents in our practice
- Step-by-Step to using Google Documents
- Hands on activities
Overview of Online Collaboration Tools
Zoho Accounts
- http://docs.zoho.com/
- Collaborative office tool
- Free platform (Beta)
- Offline mode
- Zoho accounts includes a number of free a web-based office services including:
- Wiki
- Spreadsheets
- Publish to blog directly from Zoho
Office Live
- http://workspace.officelive.com/
- Collaborative office platform developed by Microsoft
- Web-based versions of Word, Excel,PowerPoint and One Note
- Access, edit and share documents from the Windows Live Dashboard
- Set a document to be read or edited by
- a) the Public
- b) Your MSN Live Friend List
- c) Select Users
- Add comments to each document
- Restore Document Revision
- Social interface (see what documents your friends are creating and editing)
Google Docs
Google Docs is a free, web-based, word processor, spreadsheet, presentation, form, and data storage service offered by Google. It allows users to create and edit documents online or out in the Cloud while collaborating in real-time with other users.[1]
Old Way: saving documents on your local desktop computer or laptop.
New Way: multiple authors, publish to the web, anytime, anywhere
Benefits
- Collaborate online
- Reduce emails
- Create forms/surveys
- Cloud storage
- Real-time collaboration
- Integrated with MS Office Suite
Features
- Create, upload and convert documents, spreadsheets and presentations
- Easily format your documents, spell-check them, etc.
- Invite others by email to edit or view your documents, spreadsheets and presentations.
- Edit documents online with multiple authorsCreate and share folders
- View your documents' revision history and roll back to any version.
- Publish documents online to the world
- Download documents to your desktop as Word, OpenOffice, RTF, PDF, HTML or zip.
- Email your documents out as attachments.
- Create and share forms including surveys and quizzes
Limitations
As great a tool as Google Docs is, it does have it's limitations and drawbacks. Google's servers are located in the United States and your content can be subjected to the Patriot Act.
Each account also is also limited to the following:
| Size Limits | Simultaneous Collaboration Limits | |
|---|---|---|
| Documents | 100 pages | 50 users |
| Spreadsheets | 400,000 cells | 50 users |
| Presentations | 200 slides | 10 users |
| Storage | 1024MB |
Google Docs in Teaching and Learning
- Have students post their projects and reports
- Summary of discussions could be posted to the course document
- Build on class notesGroup presentations
- Brainstorm ideas
- Compile an annotated bibliography
- Glossary creation
- Visualize data
Resources
Hands-On Activity
Creating a Google Account
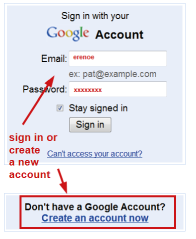
- Go to http://docs.google.com
- Sign in with an existing account or create a new one.
Activity 1: Creating a Google Account

- Go to docs.google.com and login into your Google account.
- If you don’t have a Google account, create one by clicking on the Create an account now link.
Creating a Document
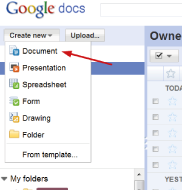
- Click the drop-down menu on Create New button, and select from a variety of different document types. For this example select a Document. (see Figure 2 below)
- Click in the Untitled Document box at the top, and enter a new name for the doc such as “Kelly’s Practice Doc”. Add and format some text in the new document (using the Standard Menu above the text area). Click the Save Now button at the top left of the screen.
- Close the document and return to the main documents area.
Document Features
- To set your line spacing for the document click on the Line Spacing Icon and set spacing for the document
- To search Google Images and add one to your document without leaving the Google Documents dashboard, click on the image icon and then select Google Image Search from the menu that appears. Search for images in the form that appears and select the image and click Select Image to add it to your document.
- The web clipboard in Google automatically saves any item you copy to your Google Account. To use the web clipboard, highlight the image or text you wish to copy, select the web clipboard item and click Copy Selection to Web Clipboard.
- To translate your document from the header menu select tools and click Translate Document. Select a title for the new document and the desired language and click OK.
Sharing Documents for Collaboration
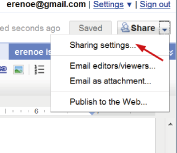
- From the main documents area, click on the document you just created.
- On the Share drop-down button (top right), select Sharing Settings. In the Add People box, enter the email address of a collaborator, and click the Share at the bottom of the page. (see Figure 3 below).
Activity 2: Collaborating on a document

- Pair up with the person next to you
- Each participant creates and shares a new Google document.
- The new doc should briefly describe this room layout and include one obvious incorrect fact (i.e. there is a grandfather clock in the room). Each participant must correct the error on the others document.
Viewing and Selecting Document Revisions
- From the document view select File and from the drop down menu select See Revision History.
- Select the different revisions from the sidebar. Select restore to restore your document to the previous revision. Exit from the revision history to view the document you updated most recently.
- Select a new version to edit or select Return To Editing to return to your original document.
Publishing Documents on the Web
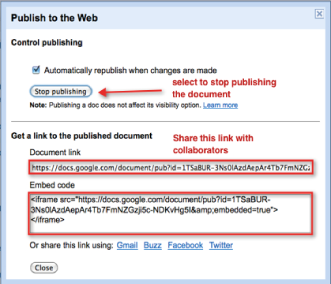
- From the document view from the Share drop down button select Publish As a Web Page. A pop up box will appear and click Start Publishing to publish your document as a web page. To stop the document from being published at any time click on Stop Publishing (see Figure 4).
- When the document has been publish an embed code will appear in the form at the bottom of the pop up box. Copy the code from the form (see figure 5), and paste this code into your blog or WebCT Vista course. The document that you embed will be live and automatically update any changes made by you or your collaborators.
Creating and Sharing Presentations

- Click the drop-down menu on Create New button, and select from a variety of different document types. For this example select a Presentation.
- Change the colour and design of your Presentation by selecting Change theme from the Format drop down button (see Figure 6). Click on the Change the background link to upload images for the slide background.
- Click on the Slide drop down button on the menu and insert slides, duplicate and delete slides.
- Insert images, Google videos, diagrams/drawings, text or shapes by clicking on the Insert drop down button. Import slides from PowerPoint by selecting Import Slides from the drop down menu.
- Click on the Share drop down button (top right side) and select Publish/Embed. On the next screen click on the Publish button and copy the embed code that appears.
- Copy and paste the embed code into one of your posts or pages. Under the Share drop down menu select Sharing Settings and either change your privacy settings or add people’s emails to give them access to the document.
Activity 3: Collaborating on a presentation

- Pair up with the person next to you
- One participant creates a new presentation and shares it with their colleague.
- Collaborate with your colleague (i.e share) and create a 5-slide Presentation about Climate Change. The presentation should include the following elements:
- Hyperlinks
- Image
- Textbox
- Formatting
- The Collaborative Office Applications folder on your desktop contains media and content for you to add to the presentation.
Creating, Sharing and Publishing Spreadsheets
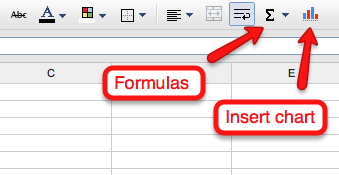
- Click on Create New and from the drop down menu select Spreadsheet.
- Click on Unsaved spreadsheet and give a title to the spreadsheet such as “Project Budget”.
- Fill in the cells with entries and appropriate amounts for each.
- Find the total (SUM) and AVERAGES for your entries as well as create a Pie Chart.
- Share the spreadsheet with a partner and ask them to provide comments/suggestions/tips to improve your work.
Activity 4: Collaborating on spreadsheets

- Working individually, create a spreadsheet of upcoming travel plans to Toronto, ON and fill-in the following information: Number of people going, how long you will be going, transportation costs (including airfare, car rentals/buses), accommodation costs, food and beverage costs, shopping costs.
- Create formulas to find out the following information: total costs for the trip, average cost per day, average cost per person, create a pie graph to see how big each cost component is.
- Share the document with the person sitting beside you.
- Give travel tips/suggestions to reduce costs on your partner's spreadsheet.
Creating and Sharing Forms

- Click on Create New and click from the drop down button and select Form.
- Write a title such as “John’s Practice Survey” in the Untitled Form box. You can also add a description of the form below the title.
- Enter a title in Question Title box (see Figure 7 below) and select the question type from the drop down box. Fill in the answer options (below) and check the correct one.
- Click done to complete the question and click on the pencil icon
 to add new questions
 - Select a theme for your form and from the header boxes choose to email the form, embed it within a Website or view the results
Activity 5: Creating and sharing forms

- Pair up with a person next to you and create a form. For example, a survey, or a poll.
- Each person fills in the completed form and view the results in the spreadsheet
Creating Folders
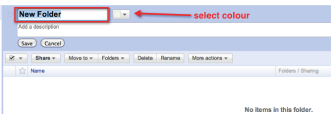
- From the Main Google Documents page select Create New from the drop down menu (top right). Select Folder.
- Write a title for the folder and add a description. From the small box (right of the folder title) select a colour for your folder and click Save.
- To place a document into a folder you will need to click on All Items in the left navigation menu to see all of your documents. Then choose the document you would like to move to a folder by checking the box next to it. Go to the Add to Folder button on the Menu bar and chose which folder to add it to or DROP AND DRAG.
Sharing Folders
- From the sidebar in the main document area select the folder you have just created.
- On the Share drop down button click on the link Share Folder. From the form enter the email of those you would like to share the folder with.
- If you would like to change the overall visibility of the folder, click on Privacy to select whether the folder is visible to the public or private
Activity 6: Creating folders and sub-folders

- Work individually
- Create four folders
- Add a sub-folder to each of those folders
- Select different colours for your folders
Uploading Documents into Google Docs
- From the main menu click on File and then upload. Set the Destination Folder, and select whether you our converting a PDF, Image or a document, presentation or spreadsheet.
- Click Select File to Upload select a file to upload. You can upload any of the file formats listed in the table (see below). Your file will then be converted into a Google document, spreadsheet or presentation and can be shared publicly or with users that have been registered.
| Type | File Extensions |
|---|---|
| Document | Microsoft Word (.doc, .docx)
OpenDocument text (.odt) StarOffice text (.sxw) Rich text (.rtf) Plain text (.txt) HTML (.htm, .html) |
| Spreadsheet | Microsoft Excel (.xls, .xlsx) files
OpenDocument spreadsheets (.ods) Comma-separated values (.csv) |
| Presentation | Microsoft PowerPoint (.ppt, .pps) |
| PDF, Scanned Image | Photos, scanned documents, screenshots, etc (.jpg, .gif, .png)
PDF files (.pdf) |
Resources
- Google Online Documentation - http://docs.google.com/support/bin/topic.py?hl=en&topic=15114
- Common Craft: Google Documents in Plain English - http://www.youtube.com/watch?v=eRqUE6IHTEA